Introduction
Welcome to our next lesson. In our previous session, we focused on making your LLM application's API robust and efficient by implementing caching and rate-limiting. Those are crucial operational concerns for the product you're shipping. Today, we pivot to optimizing the process of building that product by enhancing the productivity and effectiveness of the developer—you.
The goal of this lesson is to move beyond viewing AI coding assistants as simple autocomplete tools and learn to integrate them as sophisticated partners in your development workflow. We will explore how tools like GitHub Copilot and, more extensively, Cursor can be used for complex task delegation, workflow automation, and structured development, ultimately accelerating how you engineer LLM applications. This is a key skill for operating at the elite level you're aiming for.
The Landscape of AI Coding Assistants
The world of AI-powered development tools is evolving rapidly. While GitHub Copilot pioneered inline code completion, a new generation of "AI-native" IDEs and extensions are emerging that treat the AI as a core component of the entire development loop.
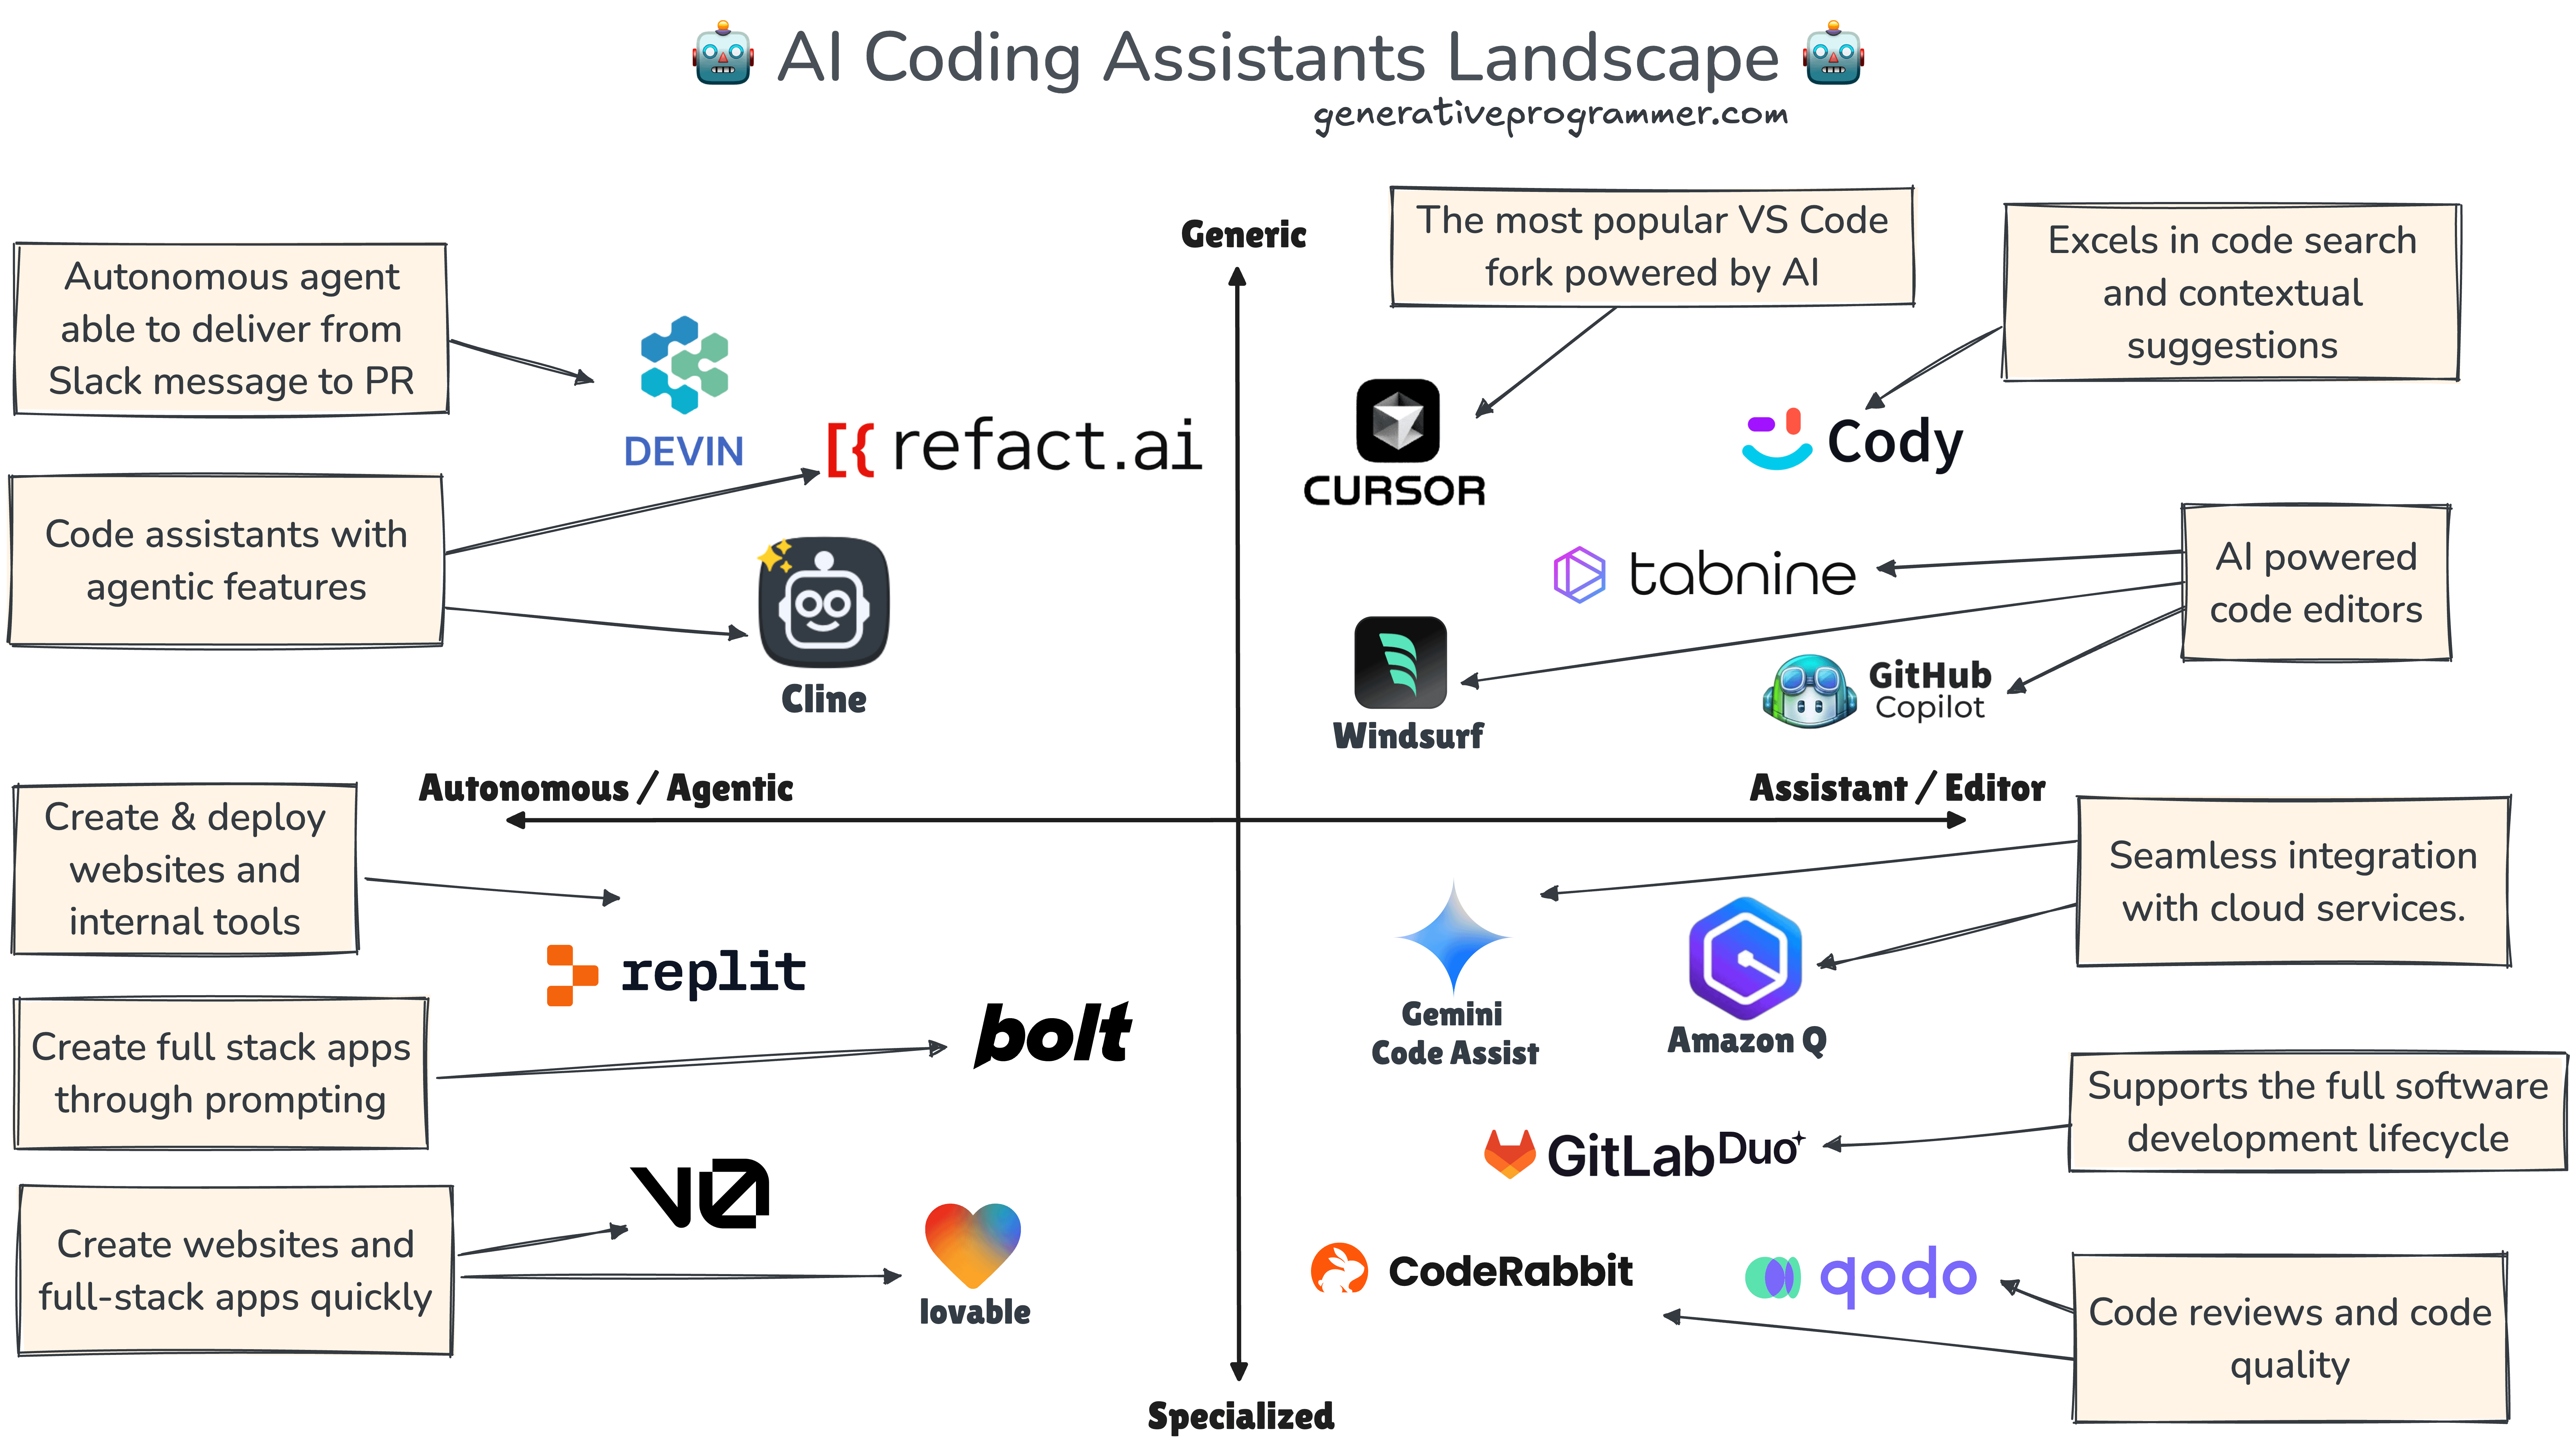
To get a practical feel for the differences, let's watch a quick comparison between the well-known GitHub Copilot and Cursor, which is a popular fork of VS Code built specifically for AI-powered development.
Github Copilot vs Cursor: which AI coding assistant is better?
This video, 'Github Copilot vs Cursor,' provides a direct, task-based comparison that highlights some of the key functional differences, particularly in multi-file editing and reliability.
Watch the following segments: 00:00:09 - 00:03:37: Pay attention to the multi-file editing task (adding an API endpoint). Note the differences in how each tool gathers context and the quality of the final result. 00:04:51 - 00:06:33: Observe the end-to-end workflow test. This demonstrates how a more integrated AI assistant can handle tasks from scratch with greater accuracy. Focus on the process and the outcome, not on declaring one tool an absolute winner. The goal is to understand the different approaches to AI integration in an IDE.
As you saw, the key differentiator is moving from simple suggestions to handling complex, multi-file changes through a more conversational and agentic interaction model. For the rest of this lesson, we will focus primarily on the workflows enabled by these more advanced, agentic capabilities, using Cursor as our main example.
Core Strategies for Workflow Integration
To truly accelerate your work, you need to adopt specific strategies that leverage the strengths of these AI assistants. It's about changing how you code, moving from writing line-by-line to delegating entire blocks of work.
Cursor AI Agents Work Like 10 Developers (Cursor VP Live Demo)
The VP of Product at Cursor gave a live demo showcasing several powerful workflows. We'll break down the key strategies he demonstrates, which are directly applicable to your daily work.
First, watch from 01:40 to 04:57. Pay close attention to two critical best practices: Delegating Discrete Tasks: Notice how the prompts are direct and focused on a single outcome (e.g., "add event tracking," "fix this layout shift"). Context Management: He explicitly states the importance of starting a new chat for each new task to avoid confusing the model with a long, irrelevant history. This is a crucial habit to build.
The key takeaway here is a fundamental principle of working with LLMs that you've seen in prompt engineering: one task, one conversation. An overloaded context window leads to confusion and degraded performance, a point the speaker revisits later in the video (19:38 - 21:08). Always start fresh for a new, unrelated task.
1. Customization and Automation
The real power of these tools is unlocked when you customize them to your specific project needs and automate repetitive tasks.
Cursor AI Agents Work Like 10 Developers (Cursor VP Live Demo)
Let's continue with the Cursor demo to see how you can build your own automations.
Watch from 08:26 to 11:39. Focus on the two types of customization: Custom Rules: A powerful way to enforce standards, like a writing style guide with banned words or coding conventions. Custom Commands: Creating your own slash commands (e.g., /code-review) that execute a detailed checklist. Think of this as creating your own specialized agent for a recurring task.
This level of customization allows you to codify your team's best practices directly into your IDE, ensuring consistency and quality.
Test your understanding!
You are building a production-grade RAG system. A common, repetitive task is adding a new document source (e.g., a new website to scrape or a new API to pull from). This typically involves:
- Creating a new data loader class that inherits from a base
BaseLoaderclass. - Updating a
config.yamlfile with the source's URL and credentials. - Adding a new entry to a
DataSourceenum in yourtypes.pyfile.
Design a custom command for your AI assistant (e.g., a /add_data_source command in Cursor) that would automate this process. What key information would you provide in the prompt, and what files would you explicitly mention (@) for the agent?
Show answer
A well-designed custom command would look something like this:
Command Name: /add_data_source
Prompt to the Assistant:
"You will add a new data source to our RAG pipeline. Here is the information for the new source:
- Source Name:
[User provides name, e.g., 'TechCrunch'] - Source Type:
[User provides type, e.g., 'Website' or 'API'] - Source URL/Endpoint:
[User provides URL]
Your tasks are:
- In
src/loaders/, create a new file named[source_name]_loader.py. - Inside this new file, create a class named
[SourceName]Loaderthat inherits fromBaseLoaderfound in@src/loaders/base_loader.py. Implement theload_datamethod to handle the fetching logic for this source. - Open the configuration file
@config/sources.yamland add a new entry for[source_name]with itsurland a placeholder forapi_keyif needed. - Open
@src/core/types.pyand add[SOURCE_NAME_UPPERCASE]to theDataSourceenum.
Follow the existing patterns in the mentioned files. Ensure the new loader class includes basic error handling for network requests."
Files to explicitly mention:
@src/loaders/base_loader.py(for the inheritance structure)@config/sources.yaml(to add the new configuration)@src/core/types.py(to update the enum)
This prompt breaks the task down, provides clear context with @ mentions, and uses placeholders for the user to fill in, making it a reusable and powerful automation.
2. Headless and Remote Integration
Top-tier engineering involves automating tasks beyond your local machine. Modern AI assistants can be integrated into your broader development infrastructure.
Cursor AI Agents Work Like 10 Developers (Cursor VP Live Demo)
Finally, let's see how these agents can operate outside the editor, in CI/CD pipelines or invoked from other applications.
Watch the following clips from the same demo: CI/CD Integration (12:50 - 14:01): Understand the concept of running a "headless" agent in a GitHub Action to automate tasks like security audits or documentation updates. Remote Invocation (14:01 - 15:48): See how an agent can be triggered from Slack or a web UI to investigate and fix a bug, without even opening the IDE. CLI Workflow (17:20 - 18:58): Note that these agentic capabilities are also available via the command line, catering to developers who prefer terminal-based workflows.
This demonstrates that the AI assistant is not just an editor feature but a platform that can be integrated across your entire software development lifecycle. This is a key component of building highly automated, efficient engineering systems.
A Structured Workflow: Plan and Execute
Perhaps the most mature way to use an AI assistant is to formalize a separation between planning and execution. Asking an LLM to simultaneously understand a high-level goal, plan the steps, and write the code often leads to failure. A better approach is to replicate how an expert human engineer works: first plan, then execute.
My current AI coding workflow - Carl Rannaberg - Medium
This article, 'My current AI coding workflow,' by Carl Rannaberg, details a brilliant and practical method for integrating AI assistants by creating separate 'Planner' and 'Executor' modes.
Read the article from the beginning up to the 'Parallel Agents' section. Focus on understanding: The Core Problem: Why does mixing planning and execution fail? The Planner Mode: What is its goal, what model is used, and why are its editing tools disabled? The Executor Mode: What is its goal, how does it use the plan.md file, and what are the benefits of its one-task-at-a-time, auto-commit workflow? How the Modes Complement Each Other: Why is this separation of concerns so effective?
This "Plan and Execute" pattern is a powerful mental model for collaborating with an AI:
- You act as the architect. In the Planning Phase, you provide the high-level goal. The AI, acting as a junior architect, explores the codebase, asks clarifying questions, and drafts a detailed, step-by-step implementation plan (
plan.md). You review and approve this plan. - The AI acts as the diligent coder. In the Execution Phase, the AI reads the approved plan and executes it one task at a time. After each task, it runs tests and makes an atomic commit. This creates a clean, reviewable, and testable git history—a hallmark of professional software engineering.
Adopting this workflow transforms the AI from a simple tool into a genuine force multiplier, allowing you to focus on high-level architecture while it handles the bulk of the implementation.
Under the Hood: The Four Pillars of AI Assistants
Your goal is deep mastery, which requires understanding not just the "how" but also the "why." How do these tools manage to understand a whole codebase, find relevant files, and generate accurate code? It's not magic; it's a combination of clever engineering principles, many of which should feel familiar.
I Reverse-Engineered How Cursor/Copilot Actually Work
The article 'I Reverse-Engineered How Cursor/Copilot Actually Work' has a fantastic section that breaks down the core technical components. This will connect the tools we're using today to the foundational concepts of our course.
Please read the section titled 'The Four Pillars: What Makes These Tools Work'. As you read, focus on how these pillars relate to topics we've covered or will cover: Context Management: This is the core challenge. Notice the different strategies (@-mentions, recursive import following). Code Graph Analysis: These tools leverage the Language Server Protocol (LSP), the same backend that powers features like 'Go to Definition' in your IDE. Retrieval Strategies (RAG for Code): This is the secret sauce! The system uses Retrieval-Augmented Generation, the very technique you aim to master, but applies it to your codebase to find relevant snippets. Caching Mechanisms: This directly connects to our previous lesson. Notice the use of KV Cache and Prompt Caching to achieve the speed necessary for real-time suggestions.
Understanding these four pillars demystifies the process. An AI coding assistant is essentially a sophisticated agentic system that uses RAG to retrieve context from your codebase and leverages caching to do so quickly.
Conclusion
You've now seen how to elevate your use of AI coding assistants from basic code completion to a cornerstone of a modern, highly efficient software engineering workflow.
Key Takeaways:
- Treat the AI as a Partner, Not a Toy: Move from asking for single lines of code to delegating entire, well-defined tasks.
- Structure is Everything: Use disciplined workflows like "one task, one chat" and the powerful "Plan and Execute" model to ensure high-quality, reliable output.
- Customize and Automate: Build custom rules and commands to codify best practices and automate your most common, repetitive tasks.
- The Tech is Familiar: The "magic" is built on core principles you are learning about—agentic loops, RAG, and caching—applied in the specific domain of code generation.
Mastering these tools and workflows is no longer optional for the elite engineer; it is a fundamental part of the modern developer's toolkit for building complex systems at speed.
What's Next?
In this module, we have covered deploying, securing, and now accelerating the development of our LLM applications. There is one final piece to the puzzle of running a production system: monitoring. In our next lesson, we will learn how to set up monitoring for a production LLM application to track cost, token usage, latency, and quality metrics, closing the loop on the full MLOps lifecycle for LLMs.