Introduction
Welcome back! In our last lesson, we established a strong conceptual understanding of the main fine-tuning paradigms: full fine-tuning, PEFT (LoRA), and QLoRA. You learned how these methods work to adapt a model's weights and the critical trade-offs between them in terms of performance and computational cost.
Today, we shift our focus from the algorithm to the fuel: the data. This lesson addresses the learning outcome: Prepare and format a dataset for supervised instruction fine-tuning. A well-prepared dataset is the single most important factor for a successful fine-tuning job. No matter how sophisticated your training setup is, the principle of "garbage in, garbage out" reigns supreme. Mastering data preparation is a non-negotiable skill for building high-performing, specialized models.
1. What is Supervised Instruction Fine-Tuning (SFT)?
Before we can prepare a dataset, we need to be crystal clear on what it's for. Supervised Fine-Tuning (SFT) is the process of teaching a pre-trained language model to follow instructions or adopt a specific persona by training it on a dataset of high-quality examples. Each example is essentially a prompt-and-response pair.
Think of it this way: a base pre-trained model (like Llama 3) has completed its general education by reading a huge portion of the internet. It's incredibly knowledgeable but might not be a great conversationalist or assistant. SFT is like an apprenticeship where you provide this knowledgeable model with specific examples of the tasks you want it to perform, along with the ideal way to complete them.
Supervised Fine-Tuning - Hugging Face LLM Course
To understand the motivation behind SFT, let's review this section from the Hugging Face LLM Course. It clarifies when SFT is the right tool for the job compared to just using better prompting.
Read the introduction and the section 'When to Use SFT'. Focus on the primary goals of SFT: gaining template control (specific output formats) and domain adaptation (learning specialized knowledge/style).
2. Sourcing and Structuring Your Data
The first step in preparing a dataset is acquiring the raw data. This data generally falls into three categories.
Dataset preparation for LLM post-training
This guide from Anyscale provides a concise overview of where you can get data for fine-tuning.
Read the section 'Sources of training data'. Understand the pros and cons of using public datasets, internal data, and synthetically generated data.
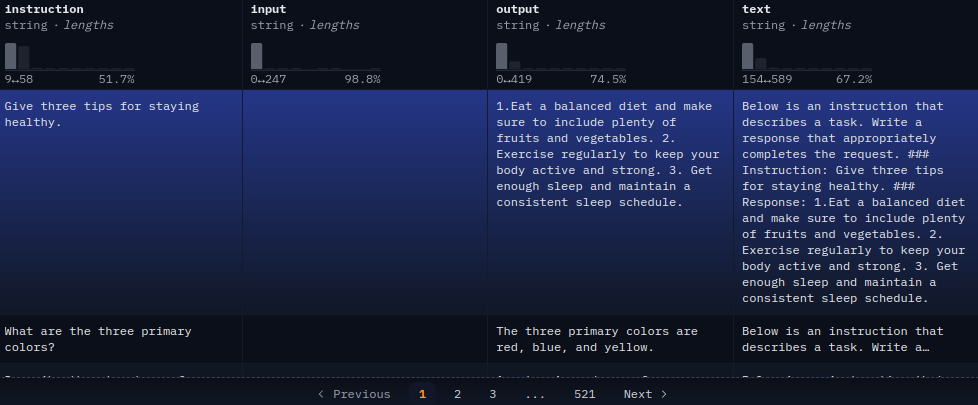
Regardless of the source, the goal is to structure this data into a consistent format. For instruction tuning, this usually means creating records that contain, at a minimum, an instruction and the desired output.
The two most common structures are:
-
Instruction-Following Format (e.g., Alpaca): This is ideal for single-turn, question-answer, or instruction-completion tasks. Each record is typically a JSON object with fields like
instruction,input(optional context), andoutput. -
Conversational Format (e.g., ShareGPT): This is used for training chat models. The data is structured as a list of turns in a conversation, with each turn having a
role(e.g., "user", "assistant") andcontent.
3. From Structured Data to a Model-Ready String: Prompt Templating
An LLM does not take a JSON object as input; it takes a single, continuous string of text. The process of converting your structured data fields (instruction, input, output) into this single string is called prompt templating.
Different models are fine-tuned with different templates. Using the correct template is critical because the model learns to expect and respond to these specific formats and special tokens.
Let's explore two common templating methods.
Method 1: The Alpaca Format
A widely used format is the one popularized by the Stanford Alpaca project. It combines the instruction, input, and response fields into a standard template.
Introduction to LLM Instruction Fine-tuning | Loading Dataset | Alpaca Prompt format
This video from Vizuara provides an excellent, step-by-step walkthrough of how to take a JSON dataset and apply the Alpaca prompt format. It clearly shows how to handle examples both with and without an 'input' field.
Watch the segment from 00:12:17 to 00:22:04. Pay close attention to how the function format_input constructs the prompt string by combining a fixed preamble with the instruction and input fields from the data.
As you saw, the Alpaca format might look like this:
Below is an instruction that describes a task. Write a response that appropriately completes the request.

### Instruction:
{instruction}

### Input:
{input}

### Response:
{output}
Method 2: Model-Specific Chat Templates
Modern instruction-tuned models like Llama 3-Instruct or Mistral-Instruct are trained not just on single instructions but on conversations. Their tokenizers come with built-in chat templates that automatically format a list of conversational turns into the exact string format the model expects, including special tokens like [INST], [/INST], <|start_header_id|>, etc.
Finetune LLMs to teach them ANYTHING with Huggingface and Pytorch | Step-by-step tutorial
Let's dive into a more practical and modern approach using Hugging Face's apply_chat_template. This video from Neural Breakdown with AVB offers a fantastic, code-driven explanation.
Watch from 00:08:33 to 00:14:32. This part is crucial. Focus on: How a structured list of messages (with 'system', 'user', 'assistant' roles) is converted into a single string. The purpose of the add_generation_prompt flag. How you structure your data to prepare both the prompt and the target response for the training process.
Using the tokenizer's apply_chat_template method is now the standard best practice, as it ensures you are perfectly matching the format the model was aligned with.
Test your understanding!
You have a data sample in a Python dictionary:
sample = {
    "instruction": "Translate the following to French.",
    "input": "Hello, how are you?",
    "output": "Bonjour, comment ça va?"
}
Using the Alpaca prompt template structure shown above, what would the final, single-string training example look like?
Show answer
Below is an instruction that describes a task. Write a response that appropriately completes the request.

### Instruction:
Translate the following to French.

### Input:
Hello, how are you?

### Response:
Bonjour, comment ça va?
This entire block of text would be one entry in your training dataset, ready for tokenization.
4. From String to Tensors: Tokenization and Loss Masking
The final and most technical step is to convert the formatted string into tensors that the model can train on. This involves two key concepts you'll use constantly in practice.
The Training Objective Revisited
As we've discussed, a causal language model is trained to predict the next token. When we fine-tune, we give the model the entire formatted string (prompt + response) as input. The model's task is to predict the next token at each position.
So, if the input is [t1, t2, t3, ...], the target labels will be [t2, t3, t4, ...].
The Crucial Trick: Loss Masking
Here's the key insight for instruction fine-tuning: we only want to penalize the model for getting the response part wrong. We don't care if it can't predict the tokens in the prompt we gave it. We want it to learn to generate the output given the instruction and input.
To achieve this, we use loss masking. We construct a labels tensor that is identical to the input_ids tensor, but we replace the token IDs corresponding to the prompt with a special value (usually -100). The PyTorch cross-entropy loss function is designed to ignore labels with this value.
This ensures that the loss is only calculated on the response tokens, and therefore, the gradients are only backpropagated based on the model's ability to generate the desired output.
Finetune LLMs to teach them ANYTHING with Huggingface and Pytorch | Step-by-step tutorial
This is perhaps the most important technical detail in this lesson. The same video from Neural Breakdown with AVB provides an exceptionally clear, step-by-step explanation of how to create the input and target sequences and how to mask the loss for the prompt tokens.
Watch carefully from 00:15:48 to 00:26:08. This is dense but vital. Focus on: How input_ids and target_ids are created by shifting the tokenized sequence. Why the target IDs initially contain the prompt tokens. The process of identifying which tokens belong to the prompt and which belong to the answer. How the prompt tokens in the labels tensor are replaced with -100 to mask them from the loss calculation.
5. Final Quality Checks
Before you invest expensive GPU hours into a fine-tuning job, a final data-quality pass is essential.

Here is a practical checklist based on industry best practices:
- Structural Integrity: Ensure all your data files are valid (e.g., properly formatted JSON) and contain the required fields.
- Remove Duplicates: Deduplicating your dataset prevents the model from overweighting certain examples and can improve generalization.
- Content Filtering: Scan for and remove toxic content or Personally Identifiable Information (PII) unless it's a specific goal of the fine-tuning.
- Length Constraints: Most examples should fit within your model's context window. Longer examples will be truncated, leading to incomplete training samples.
- Split Your Data: Partition your final dataset into training, validation, and test sets (e.g., 85% train, 10% validation, 5% test) to monitor for overfitting and evaluate the final model's performance.
Conclusion
You have now learned the end-to-end process of preparing a dataset for supervised instruction fine-tuning. This is a foundational skill that moves you from being a user of LLMs to a builder.
Key Takeaways:
- SFT requires structured data, typically in an instruction-following (Alpaca) or conversational (ShareGPT) format.
- Data can be sourced from public datasets, internal company data, or generated synthetically by a "teacher" model.
- Prompt templating is the critical step of converting structured data into the single-string format the model expects, using either a standard format like Alpaca's or a model-specific chat template.
- Loss masking is a vital technique where prompt tokens in the label tensor are replaced with
-100to ensure the model is only trained to predict the desired response. - Rigorous data quality checks before training are essential to avoid wasting time and compute resources.
What's Next?
We've covered the "how" of fine-tuning algorithms and the "what" of the data they need. In the next lesson, we will finally bring these two pieces together. You will learn how to implement PEFT (e.g., LoRA) on a pre-trained model using the HuggingFace PEFT library, taking the dataset we've just designed and launching your first fine-tuning job.