Hello! In our previous lessons, we built a solid foundation in summarizing data by exploring Excel's conditional aggregation functions: SUMIFS, COUNTIFS, and AVERAGEIFS. These tools are excellent for analyzing groups of transactions. Now, we will shift our focus from aggregating data to applying logic within individual cells. This is a fundamental step towards creating truly dynamic and automated worksheets.
This lesson introduces the IF function, one of the most versatile and widely used functions in all of Excel. You'll learn how to construct formulas that perform a logical test and then execute one of two actions based on the outcome. For an accounting professional, mastering the IF function is non-negotiable. It's the key to automating tasks like flagging overdue invoices, checking for budget variances, or assigning status labels to transactions, bringing your spreadsheets to life.
The Anatomy of the IF Function
At its core, the IF function asks a question that has a "true" or "false" answer and then acts accordingly. Its structure is simple and logical, consisting of three parts, or arguments.
=IF(logical_test, value_if_true, value_if_false)
logical_test: This is the condition you want Excel to check. It's an expression that evaluates to either TRUE or FALSE. For example, is an actual expense greater than the budgeted amount (C2>B2)? Is an account status "Closed" (A5="Closed")?value_if_true: This is what the formula will return if thelogical_testis TRUE. It could be a piece of text (like "Over Budget"), a number, or even another calculation.value_if_false: This is what the formula will return if thelogical_testis FALSE.
The Journal of Accountancy, a highly respected publication for accounting professionals, provides an excellent introduction to this function.
This article explains the core components of the IF function using clear, accounting-relevant scenarios.
Please read the section that breaks down the three arguments. Then, review the first practical example under the heading "For the first example...", which demonstrates how to check if a department is over budget. This is a classic use case you will encounter frequently.
Practical Application 1: Budget vs. Actual Analysis
Let's put this into practice with a very common accounting task: comparing actual revenue to a goal. Imagine you have a list of divisions and you want to quickly see which ones met their revenue targets.
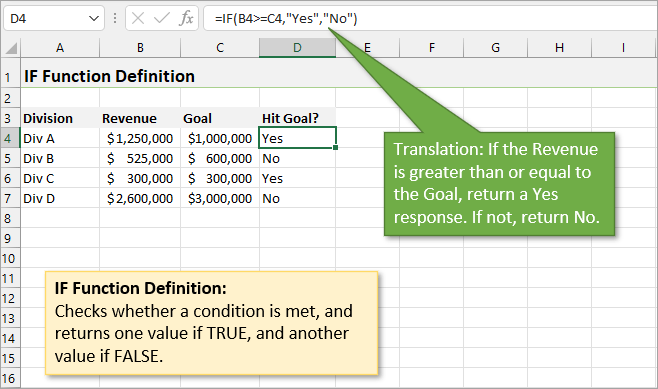
The video below offers a great visual walkthrough of a similar scenario, comparing actual expenses to a budget. Pay close attention to how the presenter constructs the formula using Excel's Function Arguments dialog box, which can be a helpful guide when you're starting out.
This tutorial from Kevin Stratvert provides a clear, step-by-step demonstration of building an IF function.
Watch from 1:51 to 4:15. In this segment, the presenter: Inserts the function and explains the three arguments. Builds a logical test to compare actual vs. budget. Shows how to quickly copy the formula down to apply it to all rows.
Practical Application 2: Automating Status Updates
Another powerful use for the IF function is to automate status tracking. For instance, in an accounts payable process, you might want a formula to automatically label an invoice "Paid" once a payment date is entered. A similar logic can be applied to a month-end closing checklist.
The Corporate Finance Institute (CFI) guide provides an excellent example of this. It checks if a "Remarks" cell (which would contain a completion date) is empty or not, and sets a "Status" accordingly.
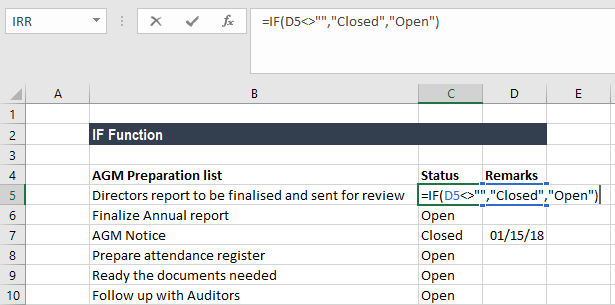
This introduces a useful logical operator, <> (not equal to), and a common technique for checking if a cell is empty ("").
To solidify your understanding, please read through the following guide, which reinforces the syntax and provides more examples.
How to Make an Excel IF Statement - Formula, Examples, ...
This guide from CFI offers a structured look at the IF function's syntax and its practical uses in a business context.
First, review the IF Formula section to see the syntax and the list of available logical operators (=, >, <, <>). Next, read through Example 1, which shows the most basic true/false outcome. Finally, study Example 2 carefully. This is the task-status example shown in the image above and is a great template for tracking task completion.
Using IF for Conditional Calculations
The IF function isn't limited to returning text. The value_if_true and value_if_false arguments can also be formulas. This allows you to create dynamic models that perform different calculations based on specific conditions.
A common accounting scenario is calculating sales commissions. For example:=IF(Total_Sales > Sales_Quota, Total_Sales * 0.10, 0)
This formula checks if Total_Sales exceeds the Sales_Quota. If it does, it calculates a 10% commission; otherwise, it returns 0.
Leila Gharani provides a concise example of using IF to flag amounts that require further review—a simple yet effective way to automate part of an audit or review process.
Excel for Accounting - 10 Excel Functions You NEED to KNOW!
This clip from a larger accounting functions tutorial focuses specifically on a practical use of the IF function.
Please watch the segment from 12:53 to 14:22. Notice how she uses the function to place the word "Check" next to any amount greater than 20,000. She also demonstrates how to return "nothing" ("") if the condition is false, which keeps the worksheet clean.
Conclusion
In this lesson, you've been introduced to the IF function, a fundamental tool for adding decision-making logic to your spreadsheets. You've learned how to structure the formula and apply it to common accounting tasks like budget variance analysis and status tracking. By moving beyond static values and simple arithmetic, you are taking a significant step towards true Excel automation.
Key Takeaways:
- The
IFfunction evaluates alogical_testand returns one value if the result is TRUE, and another if it's FALSE. - The syntax is
=IF(logical_test, value_if_true, value_if_false). - The logical test uses operators like
>,<,=, and<>to compare values or cell contents. - The results (
value_if_true/value_if_false) can be text, numbers, or even other formulas, making it incredibly versatile. - Common applications in accounting include flagging data, automating status updates, and performing conditional calculations.
So far, we have only considered scenarios with two possible outcomes (e.g., "Yes" or "No"; "Open" or "Closed"). But what if you need to test for multiple conditions? For example, what if you want to label a variance as "Over Budget," "Under Budget," or "On Target"? In our next lesson, we will explore how to handle these multi-layered conditions using nested IF functions and the more modern IFS function.