Hello! Welcome to your ninth and final lesson in the "Core Hardware Components" module.
In our last lesson, we examined the Power Supply Unit (PSU) and how it converts AC power from the wall into DC power for your components. We discussed that a byproduct of this energy conversion is heat. The PSU has a fan to cool itself, but it's just one of many heat-generating components in a PC. The CPU and GPU, in particular, produce a significant amount of heat that must be managed effectively.
This brings us to today's topic: the cooling systems that make modern high-performance computing possible. We will describe cooling systems including fans, heat sinks, and liquid cooling. Understanding how these systems work is crucial for building a stable, quiet, and long-lasting computer.
1. Why Cooling is Essential
Every component that uses electricity generates heat as a byproduct. In a compact space like a computer case, this heat can build up quickly. If not removed, high temperatures can cause components to perform poorly or even suffer permanent damage.
To prevent this, computer hardware has built-in safety mechanisms.
To understand the consequences of inadequate cooling, let's read the introduction to the Wikipedia article on "Computer cooling".
Read the first three paragraphs of the article, down to the end of the paragraph that introduces Thermal Throttling and Thermal Shutdown. Focus on what these two terms mean.
As the article explains, when a component like a CPU gets too hot, it will automatically reduce its speed and power consumption to cool down. This is called thermal throttling, and it directly impacts your computer's performance. If the temperature continues to rise, the system may perform a thermal shutdown to prevent damage. The goal of a good cooling system is to keep temperatures low enough that throttling and shutdowns never occur.
2. Air Cooling: Heatsinks and Fans
The most common and straightforward method of cooling is air cooling. It relies on two primary components working together: a heatsink and a fan.
Heatsinks and Heat Pipes
A heatsink is a block of metal with many fins designed to have a very large surface area. It draws heat away from a component (like the CPU) and dissipates it into the surrounding air.
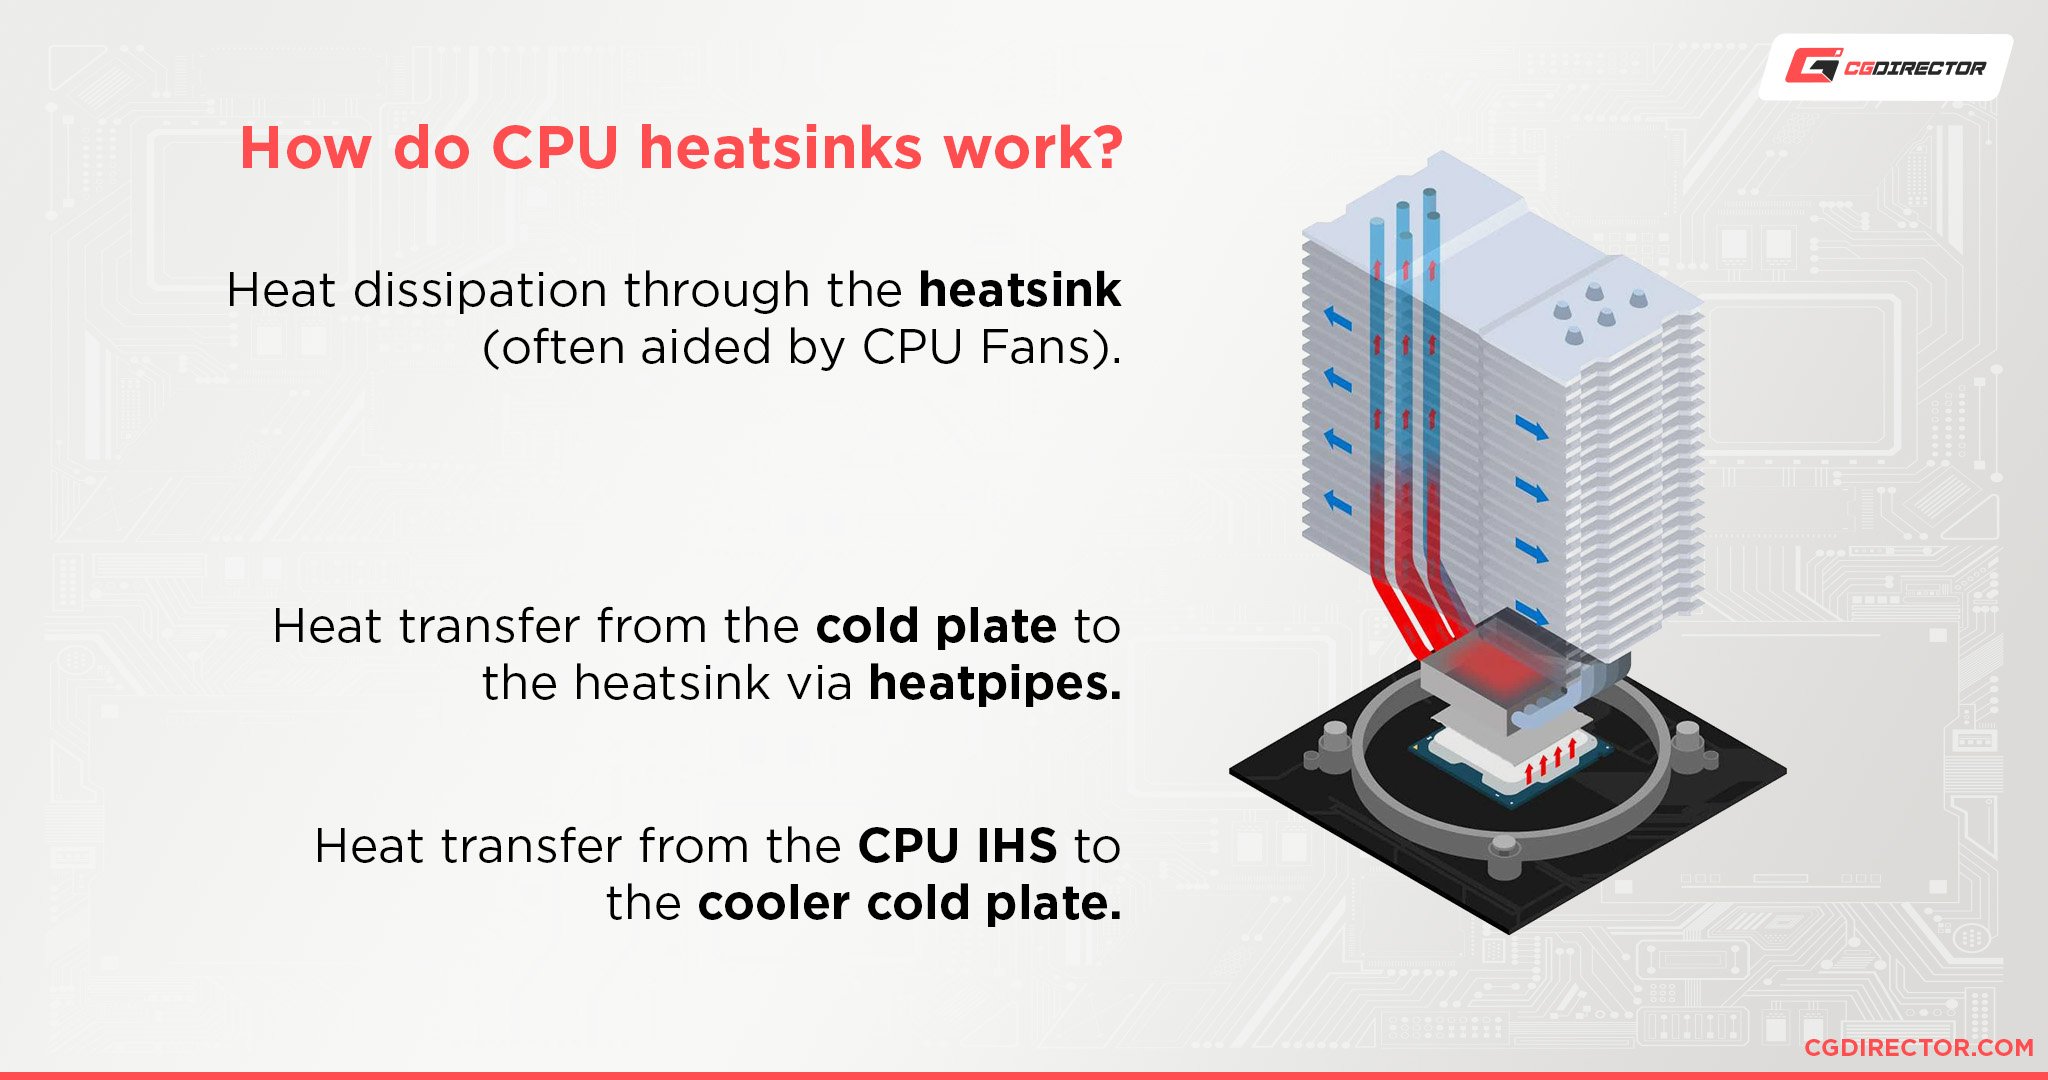
Modern heatsinks are not just simple blocks of metal. They use a clever technology called heat pipes to transfer heat very efficiently.
To understand the mechanics of heatsinks and heat pipes, let's turn again to the Wikipedia article.
Read the sections titled "Heat-sinks" and "Heat pipes and vapor chambers". Focus on how a heat pipe uses a liquid-vapor cycle to move heat from the CPU to the heatsink's fins.
In essence, a heat pipe contains a liquid that evaporates when heated by the CPU. The resulting vapor travels up the pipe to the cooler fins, where it condenses back into a liquid, releasing its heat. The liquid then returns to the base to repeat the cycle. This process is far more effective at moving heat than a solid piece of metal alone.
Fans and Air Coolers
A heatsink can dissipate some heat passively, but for high-performance components, it needs help. A fan is added to actively blow cool air over the fins, rapidly carrying the heat away. The combination of a heatsink and a fan is called an air cooler.
Pros and Cons of CPU Coolers, Explained
The video "Pros and Cons of CPU Coolers, Explained" by JayzTwoCents provides an excellent overview of a typical air cooler, discussing its functionality, benefits, and drawbacks.
Watch the segment on air coolers from 01:34 to 05:59. Pay attention to the pros (cost-effectiveness, reliability) and cons (size, limited overclocking capability).
As the video explains, air coolers are reliable, affordable, and perfectly adequate for most computer builds. Their main limitation is their physical size and the maximum amount of heat they can dissipate, which can be a factor in very high-end or heavily overclocked systems.
3. Liquid Cooling: Superior Heat Transfer
For the highest-performance systems, liquid cooling offers a more powerful solution. This method uses a liquid coolant, which has a much higher capacity to absorb and transport heat than air.
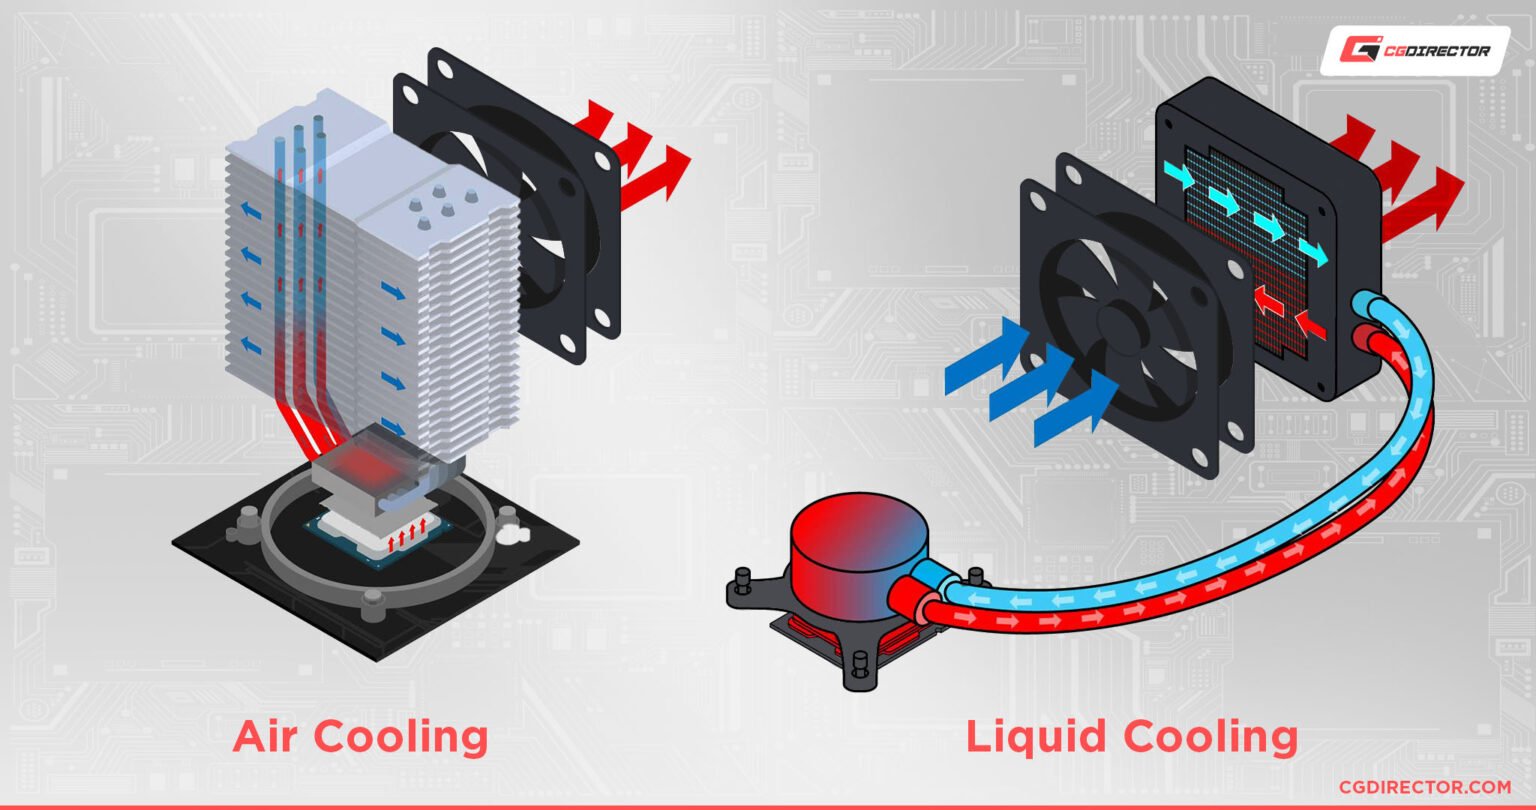
A liquid cooling system consists of a few core parts:
- Water Block: Sits on the CPU (or GPU) to absorb heat into the liquid.
- Pump: Circulates the liquid through the system.
- Radiator: A large, finned heat exchanger where fans blow air to cool the liquid.
- Tubes: Connect all the components.
There are two main categories of liquid cooling:
- All-in-One (AIO) Coolers: These are pre-assembled, sealed units that are easy to install. They offer a significant performance boost over most air coolers with minimal complexity.
- Custom Open-Loop Cooling: This involves buying all the components separately and assembling the loop yourself. It offers the absolute best performance and customization but is expensive, complex, and requires regular maintenance.
Pros and Cons of CPU Coolers, Explained
Let's return to the JayzTwoCents video to explore both AIO and custom loop liquid cooling.
Watch the sections on AIO coolers (05:59 - 12:57) and custom open-loop cooling (12:57 - 20:44). Note the key differences in performance, cost, installation, and maintenance between the two.
To summarize the comparison:
| Feature | Air Cooling | AIO Liquid Cooling | Custom Liquid Cooling |
|---|---|---|---|
| Performance | Good to Great | Great to Excellent | Excellent to Extreme |
| Cost | Low to Medium | Medium to High | Very High |
| Reliability | Very High | High | Medium (user-dependent) |
| Installation | Easy | Moderate | Difficult |
| Maintenance | Low (dusting) | Very Low | High (fluid changes, etc.) |
The Kingston article, "Air Cooling vs. Liquid Cooling in PC Builds", provides a concise written summary of these points if you'd like a quick reference.
4. System Cooling: Case Airflow
A powerful CPU cooler can't work effectively in isolation. The overall airflow within the computer case is critical for supplying the cooler with fresh, cool air and exhausting the hot air it produces.
The basic principle is to create a clear path for air to travel through the case.
PC Case AIRFLOW; A Visual Guide for Optimal Cooling.
The video "PC Case AIRFLOW; A Visual Guide for Optimal Cooling" by Mr Matt Lee offers a fantastic visual explanation of how to optimize airflow.
Watch the segment from 05:15 to 06:51. This part explains the general principle of airflow and how radiator placement can prioritize either CPU or GPU cooling.
A common and effective setup is:
- Intake Fans: At the front and/or bottom of the case, pulling cool air in.
- Exhaust Fans: At the rear and/or top of the case, pushing hot air out.
This creates a front-to-back and bottom-to-top airflow path, working with the natural tendency of hot air to rise. The balance between intake and exhaust fans also creates either positive pressure (more intake than exhaust) or negative pressure (more exhaust than intake) inside the case. Positive pressure is often preferred as it helps prevent dust from being drawn in through unfiltered gaps in the case.
Conclusion
This lesson completes our survey of the core hardware components. You now have a foundational understanding of how computers stay cool under pressure, a critical factor for system stability and performance.
Here are the key takeaways:
- Cooling is necessary to prevent components from overheating, which causes thermal throttling (slowdowns) and potential damage.
- Air cooling uses a heatsink with heat pipes to absorb heat and a fan to dissipate it. This method is reliable, affordable, and sufficient for most users.
- Liquid cooling uses a liquid coolant to transfer heat from a water block to a radiator. It offers superior performance, especially for overclocking and high-end systems.
- Liquid coolers come as simple All-in-One (AIO) kits or complex, high-performance custom loops.
- Effective cooling depends on good case airflow, with fans strategically placed to create a clear path for cool air to enter and hot air to exit.
This lesson marks the end of Module 1. You have now identified all the primary components that make up a modern PC. In our next lesson, we will begin Module 2, "PC Assembly and Power," where we transition from theory to practice. We'll start with the most important first step before touching any hardware: following safety procedures, including electrical safety, ESD protection, and proper tool usage.