Hello! Welcome back to building your educational website.
In our last lesson, you learned how to connect your pages using hyperlinks. Your site now has an index.html and an about.html page, and users can navigate between them. This is a huge step! However, if you look at your code, the content is just one long flow of tags. There's no clear structure to define a "top" (header), a "middle" (main content), or a "bottom" (footer) of the page.
Today, we'll fix that. The learning outcome for this lesson is to structure a page layout using semantic HTML elements like <header>, <nav>, <main>, <section>, and <footer>. Think of these elements as the structural beams and rooms of a house. They don't just hold content; they give the content meaning and create a logical, organized layout. For your project, this means creating a consistent framework that will eventually hold your logo, navigation menu, course content, and site information.
What is Semantic HTML and Why Is It Important?
Before we start coding, it's crucial to understand why we're doing this. Why not just use <div> tags for everything? The word "semantic" means "relating to meaning." Semantic HTML elements are tags that clearly describe their meaning to both the browser and the developer.
For a great overview of why this matters, please read the following article.
Semantic HTML: Beginner's Guide to Semantic Tags and ...
This beginner's guide from StackGik on dev.to clearly explains the three main benefits of using semantic HTML: improved accessibility, better search engine optimization (SEO), and easier code maintenance.
Read the section titled 'Why Should You Even Use Semantic HTML?'. Pay close attention to the explanations for Accessibility, SEO, and Code Maintainability.
In short, using semantic tags makes your website:
- More Accessible: Screen readers can understand your page layout and help visually impaired users navigate your content efficiently (e.g., "skip to main content").
- Better for SEO: Search engines like Google can better understand the structure and importance of your content, which can help your site rank higher in search results.
- Easier to Read and Maintain: Your code becomes self-explanatory. When you see a
<nav>tag, you know it contains navigation links without needing to inspect its contents.
This image provides a powerful visual comparison between a layout built with non-semantic <div> tags and one built with semantic HTML.

The Building Blocks of a Page Layout
Most webpages can be broken down into a few key high-level sections. We'll use this fundamental structure for your educational website.
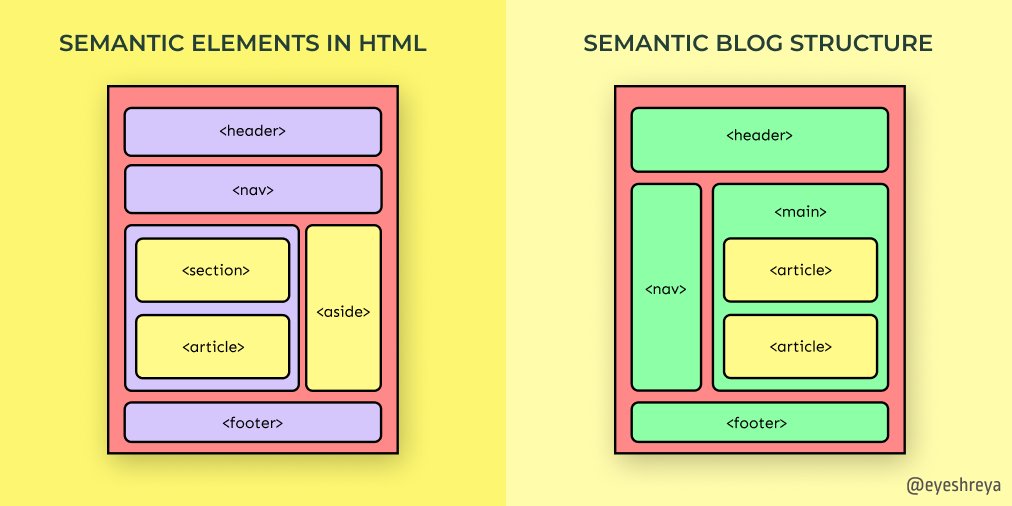
The most common layout elements are:
<header>: Contains introductory content or navigational aids. Typically includes the site logo, the main page title (<h1>), and the primary navigation.<main>: Contains the dominant, unique content of a page. There should only be one<main>element per page.<footer>: Contains closing information for the page or a section. Typically includes copyright notices, contact information, and secondary links.
Let's watch a video that demonstrates how to wrap existing content in these three core elements.
Semantic HTML Tags | HTML5 Semantic Elements Tutorial
In this video, Dave Gray will walk you through refactoring an existing HTML page to include the <header>, <main>, and <footer> elements. This hands-on approach will be very helpful when you apply it to your own code.
Watch from 03:58 to 07:48. Observe how he wraps the top content in a <header>, the main body of content in <main>, and the bottom links and copyright in a <footer>.
Grouping Content: <nav>, <section>, and <article>
Within our main structure, we can get more specific.
-
<nav>: Specifically designed to group major navigation links. This is the perfect place for the links to your "Home" and "About" pages. A page can have multiple<nav>elements (e.g., one in the header and one in the footer). -
<section>: A thematic grouping of content. Think of it like a chapter in a book. On your homepage, you might have a<section>for "Featured Courses" and another for "About the Instructor." -
<article>: A self-contained piece of content that could, in theory, be distributed independently and still make sense. Good examples are a blog post, a forum comment, or a single course description on a course list page.
Deciding between <section> and <article> can be tricky. A good rule of thumb: if the content is a standalone item in a collection (like a list of news articles), use <article>. If it's a distinct part of a larger page narrative (like an "Introduction" or "Contact Info" part of your homepage), use <section>.
This next video clip explains these distinctions and also warns against the overuse of the non-semantic <div> tag.
Semantic HTML Tags | HTML5 Semantic Elements Tutorial
Let's continue with Dave Gray's tutorial. He'll now discuss the difference between <section> and <article> and explain when it's appropriate (and when it's not) to use a <div>.
Watch from 09:58 to 13:01 to see how to use <article> and <section> to further organize content. Then, watch from 19:05 to 20:58 for a clear explanation of why you should avoid overusing <div> and <span>.
Let's Practice: Structuring Your Homepage
Now it's time to apply what you've learned to your index.html file. Open it up in your code editor. We are going to restructure it without changing how it looks in the browser—the changes are all about adding meaning to the code.
Here's your current index.html (or something similar):
<!DOCTYPE html>
<html lang="en">
<head>
<meta charset="UTF-8">
<title>My Educational Site</title>
</head>
<body>
<h1>My Goals for the Year</h1>
<p>Learn more <a href="about.html">about our mission</a>.</p>
<h2>I'm Ready to Learn HTML</h2>
<p>This is my first webpage.</p>
<!-- Your list, image, and other content are here -->
<hr>
<p>© Your Name</p>
</body>
</html>
Follow these steps to add semantic structure:
-
Add the
<header>: Wrap the<h1>and the paragraph containing your link to theabout.htmlpage in a<header>tag. -
Add the
<nav>: Inside the<header>, wrap the link(s) in a<nav>tag. The<nav>tag signals that this is the primary navigation area. -
Add the
<footer>: At the bottom, wrap your copyright paragraph in a<footer>tag. -
Add the
<main>: Wrap everything between your<header>and<footer>in a<main>tag. This is the main content of your page. -
Add
<section>s: Inside<main>, group related content. For example, you could create one<section>for your content about learning HTML and another section for any other topics you have on the page. Each<section>should ideally have its own heading (like an<h2>).
After you're done, your index.html should look something like this:
<!DOCTYPE html>
<html lang="en">
<head>
<meta charset="UTF-8">
<title>My Educational Site</title>
</head>
<body>
<header>
<h1>My Goals for the Year</h1>
<nav>
<a href="index.html">Home</a> |
<a href="about.html">About</a>
</nav>
</header>
<main>
<section>
<h2>I'm Ready to Learn HTML</h2>
<p>This is my first webpage.</p>
<p>My daily schedule:</p>
<ul>
<li>... a list item ...</li>
</ul>
<a href="about.html">
<img src="images/learning-photo.jpg" alt="A person at a desk writing" width="400">
</a>
</section>
<section>
<h2>Another Topic</h2>
<p>Content for another section...</p>
</section>
</main>
<footer>
<p>© Your Name</p>
</footer>
</body>
</html>
Save your file and look at it in the browser. You'll notice... nothing has changed visually! This is expected. These tags are about structural meaning, not visual styling. We'll learn how to style these sections with CSS in the next module.
Test your understanding!
Now, open your about.html file. It probably just has a heading and a paragraph.
Restructure about.html using the same semantic elements: <header>, <main>, and <footer>. Make sure to include a <nav> element in the header with links back to the Home page (index.html) and to the About page itself.
Show answer
Your about.html file might look something like this:
<!DOCTYPE html>
<html lang="en">
<head>
<meta charset="UTF-8">
<title>About Us</title>
</head>
<body>
<header>
<h1>About Our Educational Site</h1>
<nav>
<a href="index.html">Home</a> |
<a href="about.html">About</a>
</nav>
</header>
<main>
<p>This page will contain information about our mission and our team.</p>
<p>We are dedicated to providing high-quality accounting education.</p>
</main>
<footer>
<p>© Your Name</p>
</footer>
</body>
</html>
By giving both pages the same header and footer structure, you are building the foundation for a consistent site design.
Conclusion
Great work! You've taken a massive step toward building a professional website. By organizing your content with semantic HTML, you've made your pages more meaningful for search engines, accessible to all users, and easier for you to manage in the long run.
Key Takeaways:
- Semantic HTML uses tags that describe the meaning of the content.
- The core page layout consists of
<header>,<main>, and<footer>. <nav>is used for major groups of navigation links.<section>is used to group related, thematic content.- This structure adds meaning and accessibility, even if it doesn't change the visual appearance (yet!).
Preview of the Next Lesson:
So far, we've structured text, lists, and the overall page layout. But what if you need to display data in rows and columns? This is common for things like course schedules or pricing plans. In the next lesson, we'll learn how to create a table to display structured data, adding another powerful tool to your HTML toolkit.