Welcome back! In our last session, we wrote our first major Luau script. It's designed to give every player in your game a "Checkpoint" counter that shows up right on the screen.
Today, we get to be game testers! Our mission is to run the game and check if our script is working exactly as we want. We need to make sure the counter appears, that it starts at zero, and that it resets every time we start a new game. This is a crucial step to make sure our Obby's foundation is solid before we build more on top of it.
Entering Test Mode
To check if your game and scripts are working, you need to play it. Roblox Studio has a special "Test Mode" that lets you do this quickly without having to publish your game online. You can enter and exit this mode using the controls in the Test tab.

The three main buttons you will use are:
- Play (Blue triangle): Starts a new game session, loading you in as a player.
- Pause (Blue pause symbol): Freezes the game mid-action.
- Stop (Red square): Ends the test session and returns you to Edit Mode.
Running Your First Test
It's time to see your script in action.
- Make sure you are in Roblox Studio and have your Obby project open.
- Click the Play button at the top of the screen.
Your view will change, and after a moment, your character will spawn in the world at the location of the SpawnLocation part. You are now in Test Mode!
Now, look at the top-right corner of the game window. You should see a box with a list of players. This is the built-in Roblox leaderboard. In that box, you should find your username, and next to it, a column called "Checkpoint" with the number 0 inside it.
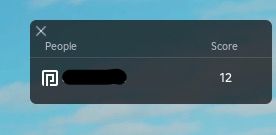
If you see your checkpoint counter at 0, congratulations! This means your script from the last lesson worked perfectly. The PlayerAdded event fired when you joined, and the script successfully created the leaderstats folder and the "Checkpoint" IntValue for your player.
Testing the Reset
For our Obby, we need the checkpoint counter to start at 0 every single time someone plays. A "game session" is one single instance of playing, from joining the game to leaving it. We need to make sure the counter resets for each new session.
Let's test this now:
- While still in Test Mode, click the red Stop button. This simulates your player leaving the game and ends the session. You will return to the regular editor view.
- Now, click the Play button again to start a completely new game session.
- Once you spawn in, look at the leaderboard in the top-right corner again.
Does the "Checkpoint" value still say 0? It should! This confirms that your script correctly sets the value to 0 at the beginning of every new session. This is similar to how in Scratch, clicking the stop sign and then the green flag again resets all your variables to their starting values.
This creator is testing a similar feature in their Obby. Watch how a "Stage" counter appears when they start playing.
How to make your FIRST Roblox Game (Make Robux)
In this short clip from a tutorial by CodeBro29, watch what happens in the top-right corner of the screen right after the creator starts the playtest.
Watch from the playtest. You'll see their 'Stage' counter appear, which is just like our 'Checkpoint' counter, confirming their script is working.
Conclusion
Fantastic work! You have now not only written a functional script but have also learned how to properly test and verify its behavior. This cycle of coding and testing is how all games are made.
Here are the key takeaways from this lesson:
- The Play and Stop buttons in the Test tab allow you to start and end a game session to check your work.
- You verified that your script successfully creates a "Checkpoint" number visible on the in-game leaderboard.
- You confirmed that the checkpoint counter correctly resets to
0for each new game session.
Now that we have a working counter, it's time to make it actually count up! In our next lesson, we will make our Obby interactive. We will give each of our five gates a number and write a script that checks if a player touches them in the correct order. This is where your game will truly start to feel like a race