Welcome back! In our last lesson, we learned about the big ideas behind scripting, like events, variables, and conditionals, and compared them to the Scratch blocks you've used before. We talked about how events are the triggers that make our code run. Today, we're going to stop talking and start doing!
Our goal in this lesson is to write our very first working script in Roblox. We will create a special part in our game that knows when a player touches it. To prove that it's working, we'll make the script send a message to a special window called the Output window. This is the first practical step in making our Obby gates work.
Setting Up Our Test Part
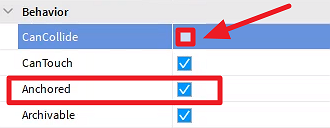
Before we can write a script, we need something to attach it to. We're going to create a simple Part that will act as our test button. For this script to work correctly, the Part needs to have a few specific properties set.
The article below explains how to create a Part and change its properties. We need to make sure our Part is Anchored so it floats in the air and doesn't fall over. We also want to make sure players can walk through it, so we will turn its collision off.
A Practical Guide To Roblox Studio Events – Easy Lua - GameDev Academy
This guide from GameDev Academy will walk us through creating the Part we'll use for testing. Follow the steps to create a new Part, but feel free to give it any color or material you like.
In the article, find the section that begins with "To illustrate how Roblox Studio events work...". Follow the instructions to create a new Part, and rename it something you'll remember, like TouchButton. Next, find the paragraph that describes how to set its properties. This is the most important step! Make sure Anchored is checked.
The Anchored property is in the Properties window under the "Behavior" section. It's a checkbox that holds the part in place, which is exactly what we want for our Obby platforms and gates.
Creating Our First Script
Now that we have our TouchButton part, it's time to give it some instructions. In Roblox, instructions are written in files called scripts.
- In the Explorer window, find your
TouchButtonpart. - Hover your mouse over it and click the little
+button that appears. - From the menu that pops up, select Script.
A new Script object will appear inside your TouchButton, and the script editor will open. You'll see it already contains one line of code:print("Hello, world!")
This is a classic first step in programming! The print() command tells the computer to write a message to the Output window. Let's see it in action.
First, make sure your Output window is visible. If you don't see it, go to the View tab at the top of Roblox Studio and click Output. Now, click the Play button to start the game. You should see the "Hello, world!" message appear in the Output window. This script runs once, as soon as the game loads the part.
Click Stop. Now let's change the script to react to an event instead.
Listening for a Touch
Delete the print("Hello, world!") line. We're going to replace it with code that listens for the Touched event. This is the Luau way of saying "When this part is touched...".
The video below demonstrates how to write the code for a Touched event. We have already created our part, so you can focus on the scripting part of the video.
Events - Roblox Beginners Scripting Tutorial #13 (2025)
This video from BrawlDev shows the exact pattern for writing a Touched event script.
Watch from this section. Pay attention to how the creator first creates a variable for the part, then uses .Touched:Connect(function() ... end) to connect instructions to the event. We will use this same structure.
As the video showed, the code follows a specific pattern. Type the following into your script editor. Pay close attention to the parentheses () and the end keywords.
local touchPart = script.Parent

touchPart.Touched:Connect(function()
    print("Ouch! The part was touched!")
end)
Let's break down what this means:
local touchPart = script.Parentcreates a variable (our named box) calledtouchPart. It holds the part that the script is inside of (script.Parent).touchPart.Touchedis the event we want to listen for.:Connect()is a special function that attaches our own code to the event.function() ... enddefines a block of code. Whatever is betweenfunction()andendwill run every time theTouchedevent happens.print(...)is our instruction that runs when the event is triggered.
Now, press Play and walk your character into the TouchButton. Watch the Output window. You should see the message "Ouch! The part was touched!" appear.

Who Touched Me?
Our script works, but it would be more useful if it knew what touched the part. Was it a player, or just another block that fell on it? The Touched event can give us this information.
We can get this information by adding a parameter to our function. A parameter is a special variable that receives information from the event.
Roblox Touch Events: Ultimate Guide
This next clip from CyberCreator explains how to find out what object triggered the Touched event.
Watch from this clip. The creator shows how to add a parameter called otherPart to the function. This variable will hold a reference to whatever touched the brick. He then uses print(otherPart.Name) to see its name.
Let's update our script to use this new knowledge. Change your code to look like this:
local touchPart = script.Parent

touchPart.Touched:Connect(function(otherPart)
    print("I was touched by: " .. otherPart.Name)
end)
Here's what's new:
function(otherPart): We've addedotherPartinside the parentheses. This variable will now contain the object that touched our button... otherPart.Name: The two dots..are used in Luau to join pieces of text together. We are joining our message with theNameproperty of theotherPart.
Press Play one more time. Walk into the button again. Now, look at the Output window. Instead of a generic message, you'll see exactly which of your character's body parts touched the button, for example: "I was touched by: RightFoot".
Key Takeaways
Great job! You've just written your first interactive script in Roblox. This is a huge step. Let's review what we accomplished:
- We learned how to create a Script and attach it to a Part in the Explorer.
- We used
script.Parentto get a reference to the part our script lives in. - We wrote code to connect a function to the
Part.Touchedevent, making our code run when the part is touched. - We used the
print()command to send messages to the Output window for testing. - We learned that the
Touchedevent can tell us what touched the part by using a parameter.
You now have the fundamental tool needed to make your Obby gates work. In the next lesson, we will build on this. We'll learn how to create a special on-screen scoreboard (called a leaderstats board) that shows each player's progress, starting with a "Checkpoint" value of 0.