Introduction
In our last lesson, we established a professional project structure using the src/ layout and centralized our project's configuration in pyproject.toml. We also performed an editable install with pip install -e . inside a virtual environment.
This lesson drills down into that crucial middle step: the virtual environment. Why did we use it, and how does it solve one of the most common frustrations in software development, often called "dependency hell"?
This lesson directly addresses the learning outcome: Manage project dependencies and create reproducible environments using venv and pip lockfiles. We will move from simply using a virtual environment to mastering it as an indispensable tool for creating isolated, predictable, and shareable Python applications. This is a non-negotiable skill for any professional developer.
The "Why": Escaping Dependency Hell
Imagine you are working on two projects:
- Project A is a legacy maintenance project that requires an older version of a data analysis library, say
pandas==1.5.0. - Project B is a new project that needs features only available in the latest version,
pandas==2.2.0.
If you install these libraries globally on your system, you have a problem. Installing pandas==2.2.0 for Project B will overwrite the version needed for Project A, potentially breaking it. This is "dependency hell."
A virtual environment solves this by creating an isolated "box" for each project. Each box contains its own Python interpreter and its own set of libraries, completely separate from all other projects.
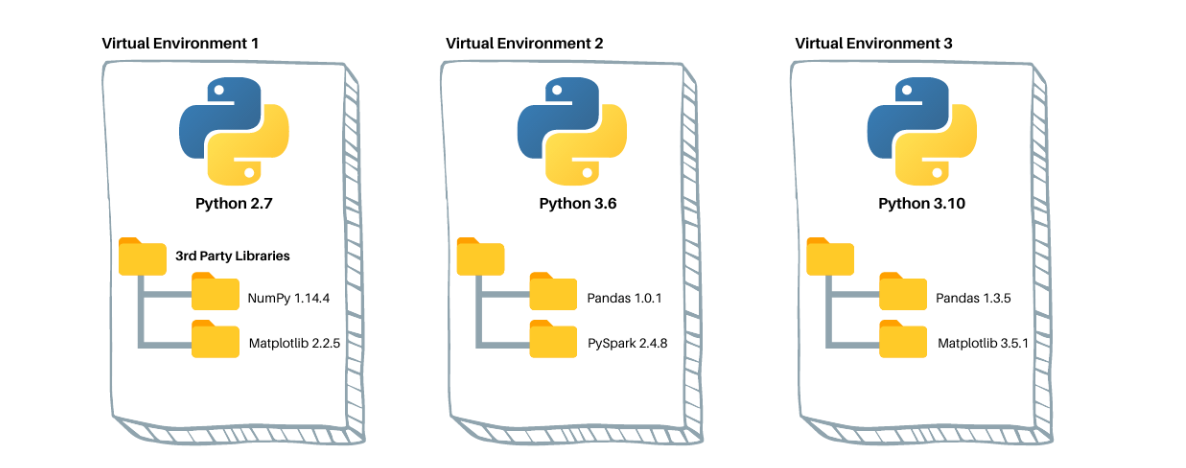
To understand the problems that virtual environments solve in more detail, let's turn to a comprehensive guide.
Python Virtual Environments: A Primer
The following article from Real Python explains the critical reasons for using virtual environments. It addresses issues that you might find familiar from managing dependencies across different projects.
Read the section titled 'Why Do You Need Virtual Environments?' Focus on the three main problems it outlines: avoiding system pollution, sidestepping dependency conflicts (like our pandas example), and minimizing reproducibility issues.
The "How": Using Python's venv Module
Python comes with a built-in module for creating virtual environments: venv. It's the standard, lightweight tool for dependency isolation. Let's walk through the essential commands.
The following video provides a clear, practical demonstration of the entire venv workflow.
Python Virtual Environments - Full Tutorial for Beginners
This tutorial from Tech With Tim offers a step-by-step walkthrough of creating, activating, and using virtual environments with venv.
Watch from 00:36 to 04:35. This segment covers: Creation: The command to create a new virtual environment. Activation/Deactivation: The platform-specific commands to enter and exit the environment. Package Management: How to install packages with pip and see that they are isolated from your global packages.
Here is a summary of the core workflow you just saw:
-
Navigate to your project root directory (e.g.,
my_cli_tool/from the previous lesson). -
Create the virtual environment:
It is a strong convention to name your virtual environment directory.venv. The leading dot marks it as a "hidden" directory on Unix-like systems and keeps it visually unobtrusive.# On macOS/Linux python3 -m venv .venv # On Windows py -m venv .venvThis command creates a
.venvfolder in your project directory. Crucially, you must add.venv/to your.gitignorefile. Never commit a virtual environment to version control. -
Activate the environment:
Activation modifies your shell'sPATHto prioritize the Python interpreter and tools inside.venv/.# On macOS/Linux (bash/zsh) source .venv/bin/activate # On Windows (PowerShell) .venv\Scripts\Activate.ps1 # If you get an error, you may need to run: Set-ExecutionPolicy -ExecutionPolicy RemoteSigned -Scope ProcessYour shell prompt will change to indicate the active environment, for example:
(.venv) $. -
Install dependencies:
With the environment active,pipinstalls packages into the isolated.venvdirectory.pip install requests -
Deactivate the environment:
When you're finished, thedeactivatecommand restores your shell to its normal state.deactivate
The "What": Creating Reproducible Environments with Lockfiles
Now that your project has an isolated environment, how do you ensure another developer (or your production server) can recreate it exactly? You do this by creating a lockfile—a file that lists every single dependency and its precise version.
The Basic Method: pip freeze
The simplest way to generate a lockfile is with pip freeze. This command outputs a list of all packages installed in the current environment.
-
Make sure your virtual environment is active.
-
Run the following command:
pip freeze > requirements.txt
This creates a requirements.txt file that looks something like this:
# requirements.txt
certifi==2024.7.4
charset-normalizer==3.3.2
idna==3.7
requests==2.32.3
urllib3==2.2.2
Another developer can then clone your repository and perfectly replicate your environment:
# In a new, activated virtual environment
pip install -r requirements.txt
The Professional Method: pip-tools
While pip freeze works, it has a major drawback: it mixes your project's direct dependencies (e.g., requests) with transitive dependencies (e.g., certifi, idna). This makes it difficult to manage updates or know why a specific package is included.
A more robust, professional approach is to use pip-tools. This small library provides a workflow that clearly separates what you want from what you get.
jazzband/pip-tools: A set of tools to keep your pinned ... - GitHub
The pip-tools documentation explains this superior workflow. Pay close attention to the roles of pip-compile and pip-sync.
Read the following parts of the README.md file: The introduction ('pip-tools = pip-compile + pip-sync'). The 'Installation' section. The section 'Example usage for pip-compile', focusing on compiling from pyproject.toml. The section 'Example usage for pip-sync'. The section 'Should I commit requirements.in and requirements.txt to source control?'.
Let's implement this superior workflow in our project from the last lesson.
-
Install
pip-tools:
Sincepip-toolsis a development tool, not a runtime dependency of your application, it should be installed into your virtual environment but not listed in your project's main dependencies.# Make sure your .venv is active pip install pip-tools -
Define Direct Dependencies in
pyproject.toml:
Open yourpyproject.tomland addrequeststo your dependencies list.# pyproject.toml [project] name = "my-cli-tool" version = "0.1.0" ... dependencies = [ "requests>=2.30" # Add this line ] ... -
Compile the Lockfile:
Now, instead ofpip freeze, runpip-compile. It will read yourpyproject.toml, resolve all dependencies, and generate arequirements.txtlockfile.pip-compile --output-file=requirements.txt pyproject.tomlThe generated
requirements.txtis far more informative:# # This file is autogenerated by pip-compile with Python 3.11 # by the following command: # # pip-compile --output-file=requirements.txt pyproject.toml # certifi==2024.7.4 # via requests charset-normalizer==3.3.2 # via requests idna==3.7 # via requests requests==2.32.3 # via my-cli-tool (pyproject.toml) urllib3==2.2.2 # via requestsNotice how it clearly states that
requestscame frompyproject.tomland all other packages are dependencies ofrequests. This is invaluable for debugging and maintenance. -
Sync the Environment:
Finally,pip-syncensures your environment exactly matches the lockfile. It will install, upgrade, and—importantly—uninstall any packages that don't belong.pip-sync requirements.txt
You now have a deterministic, reproducible, and easy-to-manage dependency workflow. Commit both pyproject.toml and requirements.txt to your version control system.
Conclusion
You have now mastered the essential tools and workflows for managing dependencies in a modern Python project. This practice of isolating dependencies and creating reproducible builds is fundamental to professional software development, preventing countless hours of debugging "it works on my machine" problems.
Key Takeaways:
- Virtual Environments are Non-Negotiable: Use
venvto create an isolated environment for every project to prevent dependency conflicts. - A Lockfile is Your Environment's Recipe: A lockfile (
requirements.txt) records the exact versions of all dependencies, ensuring that the environment can be perfectly replicated anywhere. pip freezeis Good,pip-toolsis Better:pip freezecreates a basic snapshot of your environment.pip-toolsprovides a more robust workflow where you declare direct dependencies (pyproject.toml),pip-compilegenerates a detailed lockfile, andpip-syncenforces that lockfile on your environment.
- Version Control: Always add your virtual environment directory (e.g.,
.venv/) to.gitignore. Always commit your dependency declaration (pyproject.toml) and your lockfile (requirements.txt).
What's Next:
With a solid project structure and a reproducible environment in place, we are now ready to ensure our code is correct and reliable. In the next lesson, we will dive into testing with pytest, learning how to write fixtures, parametrize tests, and verify our code's behavior automatically.