Hello! Welcome to the fourth lesson in our module on advanced sampling and inference.
In our last lesson, we explored the trade-offs between deterministic (ODE) and stochastic (SDE) sampling. We saw that while deterministic samplers like DDIM are fast and reproducible, the randomness in stochastic samplers can sometimes help correct errors and improve image quality. We framed this as a choice of how to solve a differential equation. DDIM, being a first-order solver, is analogous to the simple Euler method—effective, but not the most efficient.
This leads to a natural engineering question: Can we use a more sophisticated ODE solver to achieve even better results in fewer steps? The answer is a resounding yes, and that brings us to today's topic. Our learning outcome is to apply DPM-Solver for efficient high-quality sampling. We'll explore this state-of-the-art family of solvers, understand why they are so effective, and learn the key parameters to tune for optimal performance.
1. Beyond DDIM: The Power of High-Order Solvers
At its core, sampling in a diffusion model is about solving an ODE that transforms a noise vector into a data sample . DDIM is a first-order solver, meaning it approximates the solution path using only the information at the current step. While a huge improvement over DDPM, it's still a relatively simple approximation.
Numerical methods for solving ODEs have a rich history, and it's well-known that higher-order solvers (like the Runge-Kutta methods you may have encountered) can achieve much higher accuracy for the same number of steps. DPM-Solver (Diffusion Probabilistic Model Solver) applies this principle, creating a family of high-order solvers specifically tailored to the structure of the diffusion ODE.
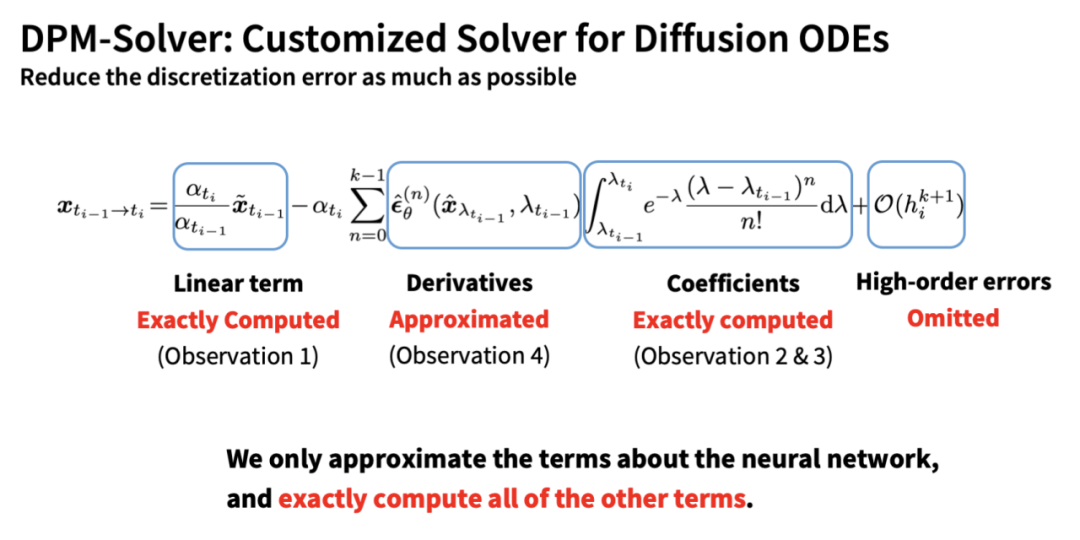
The key benefit is a dramatic increase in efficiency. Where DDIM might need 50, 100, or more steps for a high-quality result, DPM-Solvers can often achieve comparable or even better quality in just 15-25 steps.
2. DPM-Solver vs. DPM-Solver++: The Guided Sampling Problem
You'll encounter two main variants: DPM-Solver and DPM-Solver++. The distinction is critical for practical application, especially when using classifier-free guidance.
The original DPM-Solver, like other high-order methods, works well for unconditional sampling. However, researchers discovered a problem: when using strong classifier-free guidance, these solvers can become unstable and produce worse results than simple DDIM.
This is where DPM-Solver++ comes in.
DPM-Solver++: Fast Solver for Guided Sampling of Diffusion Probabilistic Models
The paper 'DPM-Solver++: Fast Solver for Guided Sampling of Diffusion Probabilistic Models' introduces the solution to this instability problem. You don't need to read the full paper, but understanding the core problem and solution is key.
Please read the Abstract and skim Section 4, 'Designing training-free fast samplers for guided sampling'. Focus on these two points: The Problem (from the Abstract): Note the statement that previous high-order samplers suffer from 'instability issues' and 'become slower than DDIM when the guidance scale grows larger'. The Solution (from Section 4): The key insight was to change the ODE being solved. Instead of solving for the noise prediction \epsilon_ heta, DPM-Solver++ solves for the data prediction x_ heta. This change, combined with other techniques, makes the solver stable even with high guidance scales.
This insight is crucial. DPM-Solver++ isn't just a minor update; it's a redesign specifically to handle the dynamics of guided sampling, which is the standard for most modern applications like text-to-image generation. As a result, for most of your work, DPM-Solver++ will be your default choice.
3. Practical Application with diffusers
Fortunately, using these advanced solvers is straightforward in libraries like Hugging Face diffusers. They are implemented as "schedulers" that you can easily swap into a pipeline.
The official DPM-Solver repository provides clear examples of this integration.
Official code for 'DPM-Solver'
Let's look at the official DPM-Solver repository to see how it's used in practice.
Read the introduction and the section 'Use the SOTA Multistep DPM-Solver++ with Diffusers'. Notice how simple it is to use: you import the scheduler and pass it to the pipeline's from_pretrained method. The code snippet for Stable Diffusion is a perfect example.
In diffusers, you'll primarily interact with these schedulers:
DPMSolverMultistepScheduler: Implements the multistep variant.DPMSolverSinglestepScheduler: Implements the singlestep variant.DPMSolverSdeScheduler: A stochastic version, blending DPM-Solver with SDE principles.
The main distinction to understand is multistep vs. singlestep:
- Multistep: Uses the model's output from several previous timesteps to compute the next step. It's generally more accurate and stable, especially for guided sampling. This is the most commonly recommended variant.
- Singlestep: Only uses the information from the single most recent timestep. It's less memory-intensive and can be faster per-step, but might not achieve the same quality as the multistep version in the same number of total steps.
4. A Guide to Hyperparameter Tuning
Now for the most practical part: how do you configure the scheduler for the best results? Your goal as an engineer is to get the highest quality in the fewest steps. The DPM-Solver authors provide excellent, actionable recommendations.
Let's break down the key parameters you'll set when initializing the scheduler, using the guidance from the official repository.
Official code for 'DPM-Solver'
The DPM-Solver repository contains a fantastic guide for practitioners. We will use it to build a mental model for tuning.
Please read the sections 'Supported Models and Algorithms', 'Suggestions for Choosing the Hyperparameters', and 'Suggestions for the Detailed Settings'. As you read, extract the recommended settings for the following parameters, especially for guided sampling.
Based on that reading, here is a summary of the most important parameters and the recommended heuristics:
-
algorithm_type:"dpmsolver"vs."dpmsolver++"- As we learned,
dpmsolver++is designed for guided sampling and is generally the superior choice. Most modern pipelines default to this.
- As we learned,
-
solver_order:1,2, or3- This controls the order of the solver.
solver_order=1is equivalent to DDIM. - Heuristic:
- For guided sampling (e.g., text-to-image with CFG), use
solver_order=2. Higher orders can become unstable with guidance. - For unconditional sampling, you can use
solver_order=3for potentially higher quality.
- For guided sampling (e.g., text-to-image with CFG), use
- This controls the order of the solver.
-
use_karras_sigmas:TrueorFalse- This is a
diffusers-specific parameter that uses a noise schedule proposed by Karras et al. (the "Elucidating the Design Space of Diffusion-Based Generative Models" paper). This schedule often improves detail and stability, especially at low step counts (under 30). - Heuristic: It's almost always a good idea to set this to
True.
- This is a
-
dynamic_thresholding:TrueorFalse- This is a technique to prevent pixel values from becoming saturated (too bright/dark) when using high guidance scales.
- Crucial Caveat: This method is designed for pixel-space diffusion models (like Imagen). It is not suitable for latent-space models like Stable Diffusion, where the values in the latent space are not bounded in the same way. Applying it to Stable Diffusion can harm performance.
- Heuristic: Leave this as
Falsefor latent diffusion models.
Putting it all together, a robust starting configuration for a Stable Diffusion pipeline would be:
from diffusers import StableDiffusionPipeline, DPMSolverMultistepScheduler
import torch

model_id = "stabilityai/stable-diffusion-2-1-base"

# 1. Initialize the scheduler with recommended settings
dpm_scheduler = DPMSolverMultistepScheduler.from_config(
    model_id,
    subfolder="scheduler",
    algorithm_type="dpmsolver++",
    solver_order=2,
    use_karras_sigmas=True
)

# 2. Load the pipeline with the custom scheduler
pipe = StableDiffusionPipeline.from_pretrained(
    model_id,
    scheduler=dpm_scheduler,
    torch_dtype=torch.float16
)
pipe = pipe.to("cuda")

# 3. Generate with a low number of steps
prompt = "a photorealistic portrait of an astronaut"
image = pipe(prompt, num_inference_steps=20).images[0]
This setup leverages the stability of dpmsolver++ with the recommended solver_order=2 for guidance and the improved karras_sigmas noise schedule, allowing for high-quality generation in just 20 steps.
Test your understanding!
You are tasked with accelerating an older, unconditional, pixel-space diffusion model that generates 64x64 images. Your goal is to get the best possible sample quality in exactly 15 steps.
Based on the heuristics from this lesson, what DPMSolverMultistepScheduler configuration would you start with? Justify your choice for algorithm_type, solver_order, and dynamic_thresholding.
Show answer
A good starting configuration would be:
algorithm_type="dpmsolver++": Whiledpmsolveralso works for unconditional sampling,dpmsolver++is a more robust and modern choice, and often performs just as well or better.solver_order=3: The recommendation for unconditional sampling is to use a 3rd-order solver, as it can achieve higher accuracy without the instability risk posed by guidance.dynamic_thresholding=True(or a thresholding value): Since this is a pixel-space model, the outputs correspond directly to image values. If you observe color saturation or artifacts, dynamic thresholding could help keep the predicted data sample within a valid range (e.g., [-1, 1]).
Conclusion
In this lesson, we demystified the DPM-Solver family, one of the most significant advances in diffusion model sampling. You now have the practical knowledge to apply these solvers to accelerate your own pipelines significantly.
Key Takeaways:
- DPM-Solvers are high-order ODE solvers that can generate high-quality images in far fewer steps (15-25) than simpler methods like DDIM.
- DPM-Solver++ is the preferred variant for modern applications, as it was specifically designed to remain stable with classifier-free guidance.
- The multistep variant is generally recommended over the singlestep one for its accuracy and stability.
- You can tune DPM-Solvers with a few key heuristics:
- Use
algorithm_type="dpmsolver++". - Use
solver_order=2for guided sampling andsolver_order=3for unconditional. - Enable
use_karras_sigmas=Truefor better low-step performance. - Only use
dynamic_thresholdingfor pixel-space models.
- Use
Next Lesson Preview:
While a powerful solver like DPM-Solver is a huge piece of the puzzle, the final output quality is also deeply connected to the sequence of timesteps the solver operates on—the noise schedule. Different schedules can cause the solver to take larger or smaller steps in different parts of the denoising process. In our next lesson, we will learn how to debug sampling artifacts using noise schedule analysis, giving you another powerful tool for perfecting your model's output.