Hello! Welcome back.
In our last lesson, we constructed the first essential component of a latent diffusion model: a high-fidelity variational autoencoder (VAE). We saw how a combination of perceptual and adversarial losses allows it to compress images into a compact latent space while preserving the crucial details needed for realistic reconstructions.
Today, we'll put that VAE to work. Our learning outcome is to implement a latent diffusion model by adapting the training loop to operate on latent vectors. We will take our pre-trained VAE, treat it as a fixed feature extractor, and train a U-Net model to perform the diffusion process entirely within this compressed, efficient latent space. This is the second and final stage of building our model.
1. The Full Picture: Diffusion in Latent Space
Let's start with a high-level overview. The entire process now consists of two distinct, sequential stages:
- Perceptual Compression (VAE): An image is passed through the VAE's encoder to get a compressed latent vector. This is a one-time, feed-forward step.
- Latent Diffusion (U-Net): The diffusion process (both forward noising during training and reverse denoising during sampling) happens entirely in the latent space.
- Image Generation (VAE): Once the U-Net has produced a "clean" latent vector, it's passed through the VAE's decoder to generate the final, full-resolution image.
The diagram below perfectly illustrates this workflow. The VAE encoder and decoder act as portals between the pixel world and the latent world, where the U-Net operates.
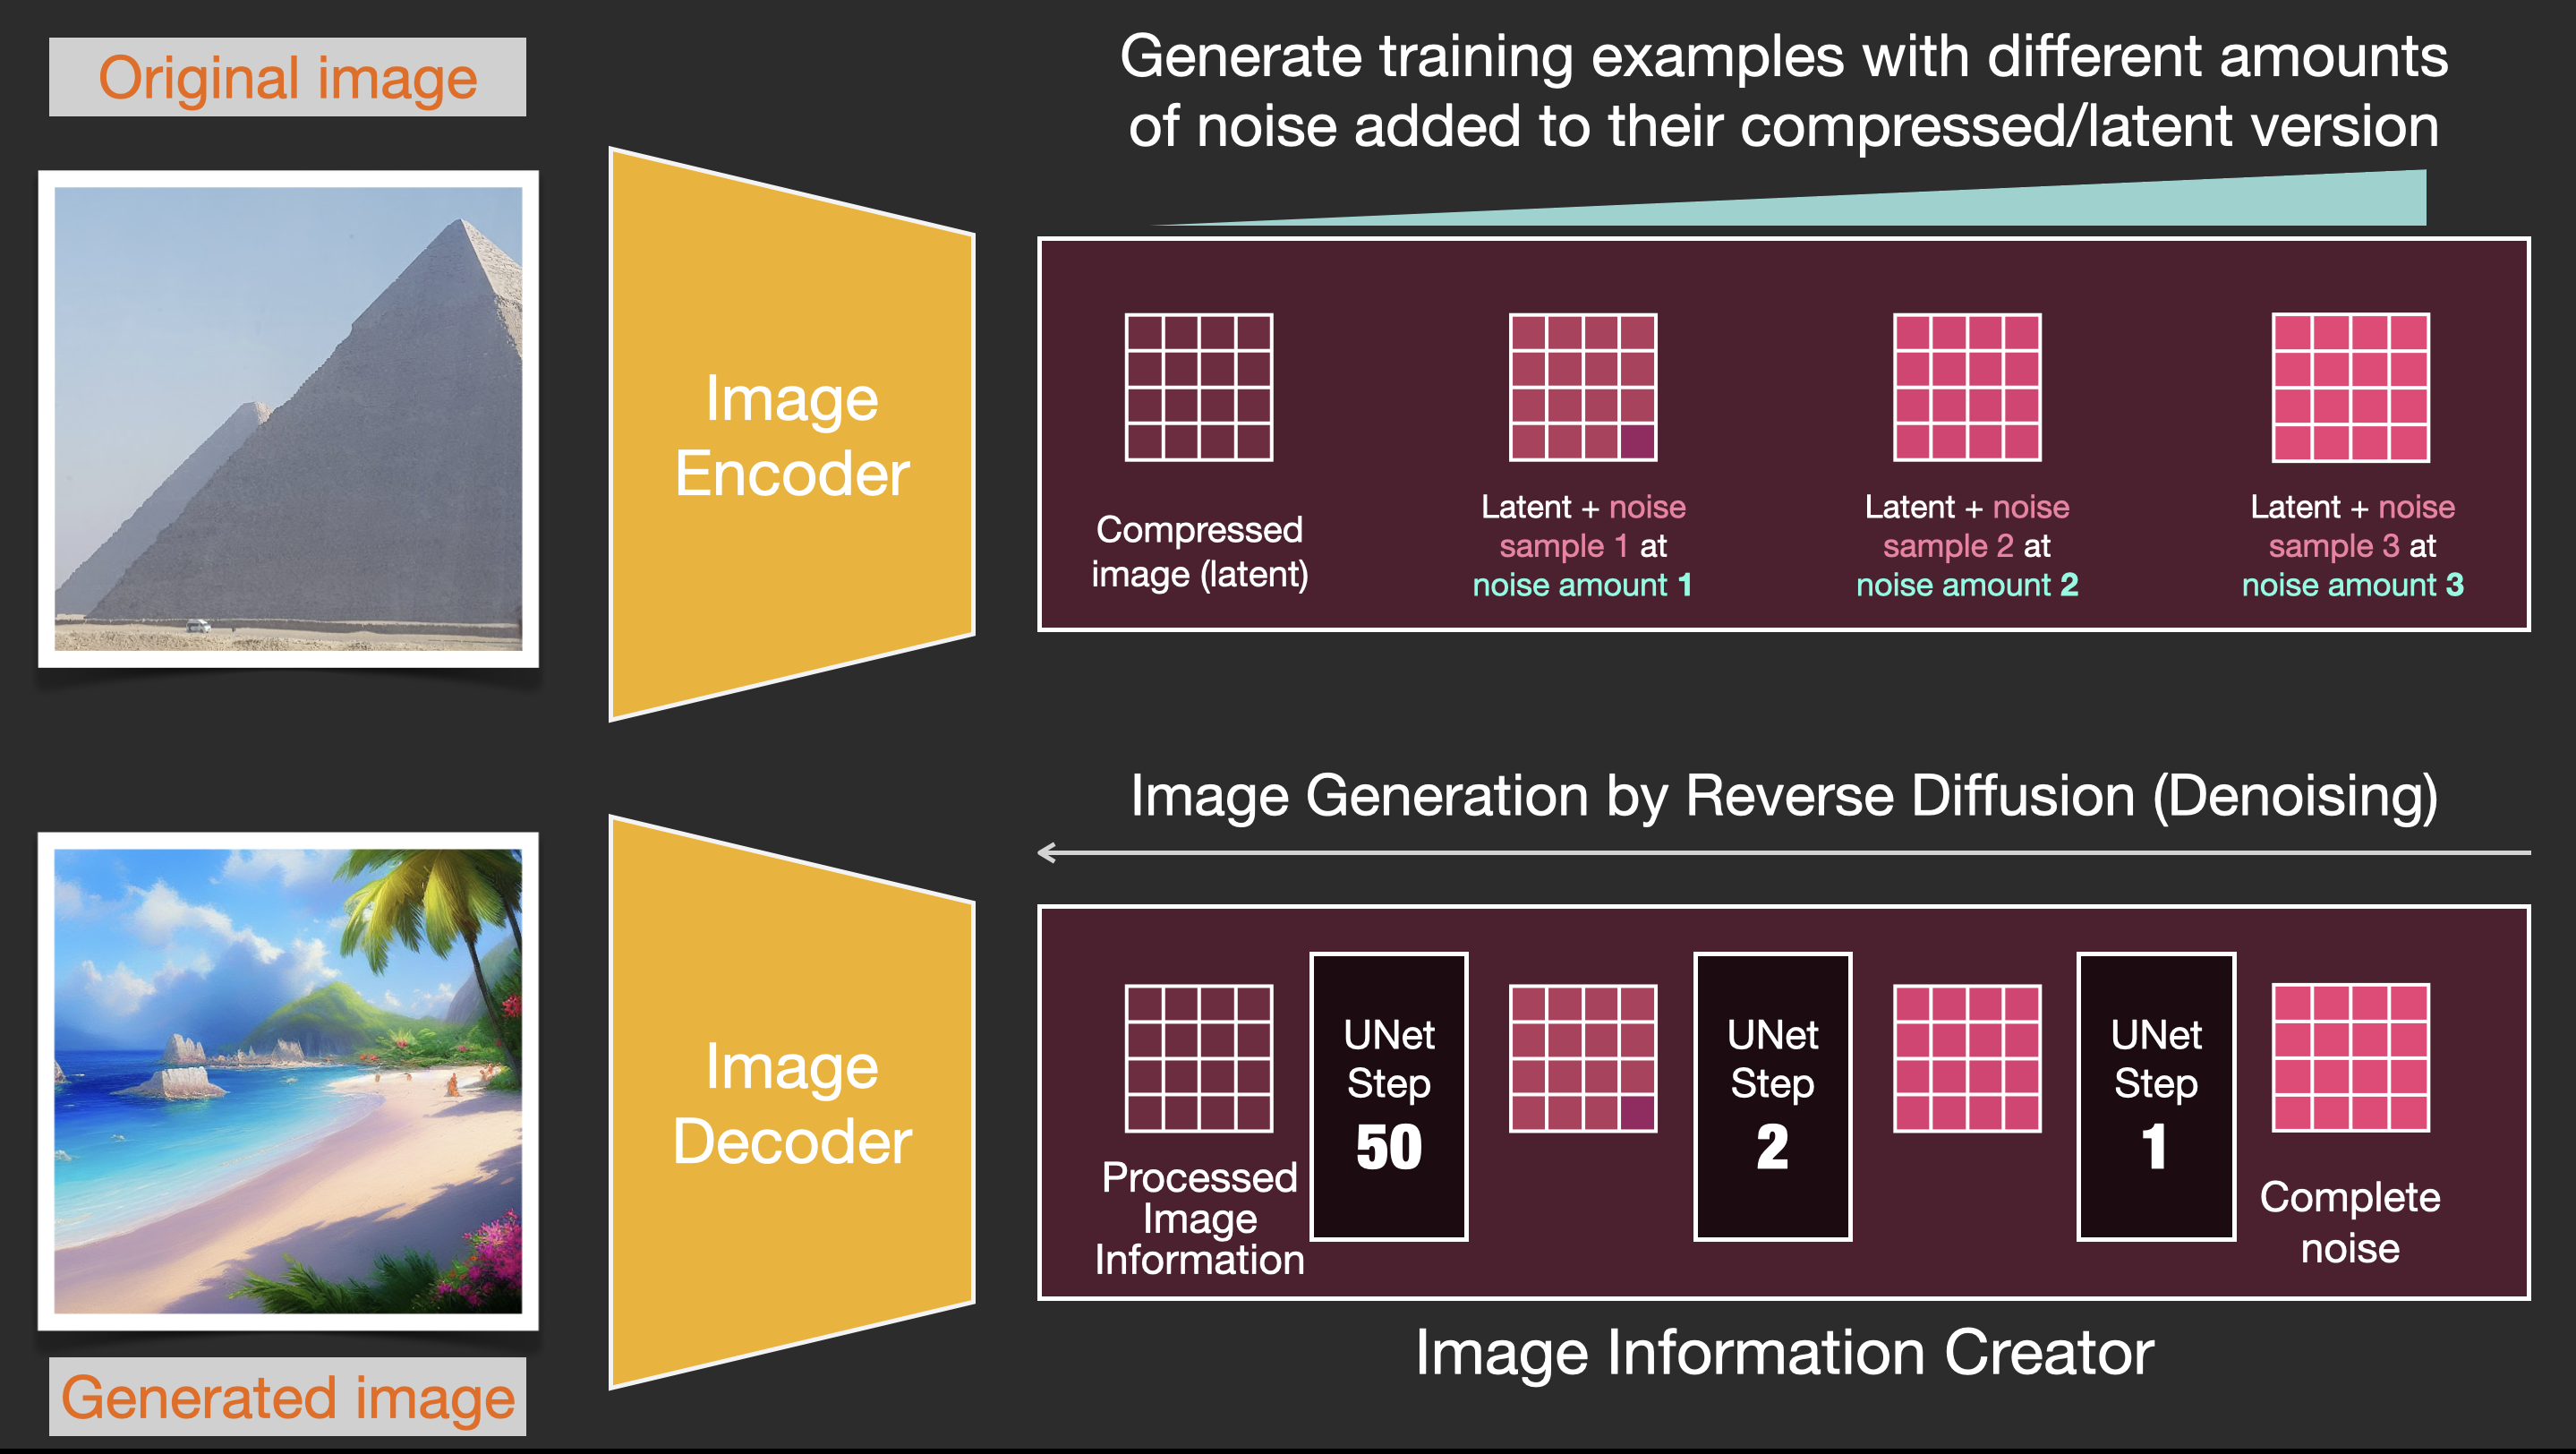
Your previous experience implementing a DDPM in pixel space is the perfect foundation. Today, we're essentially modifying that existing recipe to work on latents instead of pixels.
2. Adapting the Data Pipeline: From Pixels to Latents
The most significant change is in how we handle our data. In a standard DDPM, the training loop consumes batches of images. In a Latent Diffusion Model (LDM), the training loop consumes batches of latent vectors.
A naive approach would be to encode images to latents on-the-fly inside the training loop. However, since the VAE is frozen, this encoding step is deterministic and computationally redundant. A much more efficient strategy, especially for large datasets, is to pre-process the entire dataset.
This involves a one-time pass where you:
- Load every image from your original dataset.
- Pass it through the trained VAE's encoder.
- Save the resulting latent vector.
- Create a new dataset composed entirely of these latent vectors.
Your diffusion model's training loop then loads data directly from this new, pre-computed latent dataset.
Training a Latent Diffusion Model From Scratch
The blog post 'Training a Latent Diffusion Model From Scratch' by Geronimo provides a clear, practical example of this preprocessing step.
Read the section titled 'Latent Dataset'. It explains why pre-computing latents is beneficial and links to a HuggingFace dataset created using this exact method.
3. Adapting the Training Loop
With our latent dataset ready, let's adapt the training loop. The core logic of diffusion—adding noise and training a model to predict it—remains identical. The only thing that changes is the domain in which it operates.
The video below provides a fantastic, concise walkthrough of the necessary code modifications. It starts with a standard DDPM training script and shows the exact lines that need to be changed to convert it into an LDM.
Stable Diffusion from Scratch in PyTorch | Unconditional Latent Diffusion Models
This segment from the 'ExplainingAI' channel is the most direct illustration of today's learning outcome. It demonstrates how to adapt a DDPM training loop for latent diffusion.
Watch from 37:52 to 41:59. Pay close attention to these key steps: Loading the pre-trained and frozen VAE. Using the VAE encoder to get the latent representation of the input images. Adjusting the U-Net's input channels to match the VAE's latent dimension. Running the exact same diffusion training logic, but on the latent vectors.
Let's solidify this with a step-by-step breakdown of the training code. The overall structure will look very familiar.
-
Load Models:
- Load your pre-trained VAE and freeze its parameters (
vae.eval()andfor param in vae.parameters(): param.requires_grad = False). - Instantiate your U-Net. Crucially, the
in_channelsandout_channelsmust now match the channel dimension of your VAE's latent space (e.g., 4 or 32, not 3 for RGB).
- Load your pre-trained VAE and freeze its parameters (
-
The Training Step: For each batch from your latent dataset:
- You receive a batch of clean latent vectors,
latents. - Scaling: It's common practice to scale the latents by a constant factor before adding noise. This helps match the variance of the latents to the expected input variance of the U-Net (often near unit variance).
- Forward Diffusion:
- Sample random timesteps
t. - Sample random noise
noisefrom a standard normal distribution, with the same shape aslatents. - Create noisy latents:
noisy_latents = scheduler.add_noise(latents, noise, t).
- Sample random timesteps
- Noise Prediction: Pass the
noisy_latentsandtthrough the U-Net to getpredicted_noise. - Loss Calculation: Compute the loss, typically MSE, between the
predicted_noiseand the originalnoise.
loss = F.mse_loss(predicted_noise, noise) - Backpropagation:
loss.backward()andoptimizer.step()to update the U-Net's weights. The VAE weights remain frozen.
- You receive a batch of clean latent vectors,
The following reading provides a complete, runnable code example that puts all these pieces together.
Training a Latent Diffusion Model From Scratch
Let's return to the blog post from Geronimo to see a full training loop implementation.
First, read the section 'Predicting the Reverse Process'. It shows how to instantiate the model and implement the core training logic. Then, skim the 'Train!' subsection within the 'ImageNet' section to see the same training loop applied to a larger dataset. Notice how latents *= dcae.config["scaling_factor"] is the practical implementation of the scaling step mentioned above.
Test your understanding!
You have a working pixel-space DDPM training script. A simplified version of its training step looks like this:
# Simplified DDPM training step
def train_step(images, unet_model, scheduler, optimizer):
    # images shape: [batch_size, 3, 64, 64]

    # 1. Sample timesteps
    t = torch.randint(0, scheduler.num_timesteps, (images.shape[0],), device=images.device)

    # 2. Create noisy images (forward process)
    noise = torch.randn_like(images)
    noisy_images = scheduler.add_noise(images, noise, t)

    # 3. Predict noise with U-Net
    predicted_noise = unet_model(noisy_images, t)

    # 4. Calculate loss
    loss = F.mse_loss(predicted_noise, noise)

    # 5. Backpropagate
    optimizer.zero_grad()
    loss.backward()
    optimizer.step()

    return loss
You are given a pre-trained vae_model with a latent dimension of 4 and a scaling_factor. What are the three minimal changes you need to make to this function to adapt it for latent diffusion?
Show answer
Here are the three essential changes:
- Encode images to latents: The function should take
imagesas input, but the diffusion process must happen onlatents. The first step inside the function should be to encode the images and apply the scaling factor. - Apply diffusion to latents: All subsequent operations (
randn_like,add_noise,unet_modelcall) must use thelatentstensor, not the originalimagestensor. - Freeze VAE gradients: The encoding step should not compute gradients with respect to the VAE model.
Here is the modified code:
# Adapted LDM training step
def train_step_ldm(images, vae_model, scaling_factor, unet_model, scheduler, optimizer):
    # images shape: [batch_size, 3, 64, 64]

    # CHANGE 1: Encode images into latents and disable VAE gradients
    with torch.no_grad():
        latents = vae_model.encode(images).latent_dist.sample() * scaling_factor
    # latents shape is now something like: [batch_size, 4, 8, 8]

    # 1. Sample timesteps
    t = torch.randint(0, scheduler.num_timesteps, (latents.shape[0],), device=latents.device)

    # CHANGE 2: Create noisy LATENTS, not images
    noise = torch.randn_like(latents)
    noisy_latents = scheduler.add_noise(latents, noise, t)

    # 3. Predict noise with U-Net from noisy LATENTS
    predicted_noise = unet_model(noisy_latents, t)

    # CHANGE 3: Calculate loss against the latent noise
    loss = F.mse_loss(predicted_noise, noise)

    # 5. Backpropagate (only updates unet_model)
    optimizer.zero_grad()
    loss.backward()
    optimizer.step()

    return loss
4. Adapting the Inference/Sampling Loop
The adaptation for inference mirrors the training loop. You start with a random tensor in the latent space and use the U-Net to iteratively denoise it.
The key difference is the very last step: once the scheduler has produced the final "clean" latent vector latent_0, you must pass it through the VAE's decoder to get the final pixel-space image.
final_image = vae_model.decode(latent_0 / scaling_factor).sample
Note the division by the scaling_factor to reverse the scaling operation we applied during training.
Conclusion
In this lesson, we completed the second stage of our two-stage model. By adapting the familiar DDPM training process to operate in a compressed latent space, we've built a full Latent Diffusion Model.
Key Takeaways:
- Two-Stage Process: LDMs separate perceptual compression (VAE) from the generative diffusion process (U-Net).
- Frozen VAE: During diffusion training, the pre-trained VAE is frozen and used solely to convert images to latents. Its weights are not updated.
- Latent Space Operations: The entire diffusion process—adding noise, U-Net prediction, and calculating loss—occurs on latent vectors, not pixels.
- Adaptations: The primary code changes involve:
- A data preprocessing step to encode images into a latent dataset.
- Modifying the U-Net's channel configuration to match the latent dimension.
- A final decoding step during inference to convert the generated latent back into an image.
Next Lesson Preview:
We've now seen how to build both a pixel-space DDPM and a latent-space LDM. But was the added complexity of the LDM worth it? In the next lesson, we will compare the computational efficiency and generation quality of pixel-space vs. latent-space diffusion. We'll conduct practical experiments to quantify the trade-offs in terms of training time, memory usage, and the quality of the final generated images, solidifying the motivation behind this powerful architectural shift.