Hello! Welcome to the final lesson of our course on diffusion models.
In our previous lesson, we surveyed the landscape of evaluation metrics, understanding what measures like FID and CLIP Score represent and, crucially, their inherent strengths and weaknesses. We learned that while FID is a standard for image realism, it's flawed, and CLIP Score is vital for measuring prompt alignment but says little about image quality.
This lesson is the culmination of your journey. We will now move from theory to practice and address our final learning outcome: implement an automated evaluation pipeline to compute quality and alignment scores for generated assets. Building this capability is what separates tinkering from systematic, expert-level model development. An automated pipeline is the engine you will use to benchmark models, compare hyperparameters, track fine-tuning progress, and ultimately make informed decisions to improve your generative workflows.
We will cover:
- A quick refresher on the categories of metrics that will populate our pipeline.
- A deep dive into how the CLIP model enables powerful alignment and quality metrics.
- A practical guide to implementing a pipeline using a specialized evaluation library.
- How to analyze pipeline results to gain actionable insights.
1. The Metric Suite: A Multi-Faceted View
As we established, no single number can capture the full performance of a generative model. A robust evaluation pipeline, therefore, computes a suite of metrics covering different aspects of performance. The main categories are:
- General Image Quality (Reference-Free): These metrics assess a single image's perceptual quality without needing a "ground truth" image. Examples include ARNIQA (for technical quality) and CLIP-IQA (for alignment with human concepts of quality).
- Distributional Similarity: These metrics compare a set of generated images against a set of real images to measure realism and diversity. Fréchet Inception Distance (FID) is the most common, though we know to be critical of its InceptionV3 backbone.
- Prompt-Image Alignment: These metrics measure how well a generated image matches its text prompt. CLIP Score is the primary metric here.
Building a pipeline means automating the calculation of a selection of these metrics across a dataset of generated assets.
2. How CLIP Powers Modern Evaluation
The CLIP model is the cornerstone of many modern text-to-image evaluation metrics. A solid understanding of its mechanism is key to interpreting the scores it produces.
CLIP is trained on hundreds of millions of image-text pairs from the internet. Its goal is to learn a shared embedding space where an image and its corresponding text description are mapped to nearby points. It does this via a contrastive objective.
OpenAI CLIP: ConnectingText and Images (Paper Explained)
To understand how metrics like CLIP Score and CLIP-IQA work, we need to look at how CLIP itself is trained. This video from Yannic Kilcher provides an excellent technical explanation of the contrastive learning process at the heart of the model.
Watch the segments explaining the contrastive objective (14:33 - 18:22) and how it's used for zero-shot classification at inference time (19:12 - 20:53). This will clarify how CLIP learns to align image and text embeddings and how that capability is repurposed to score images against prompts.
As the video explains, during training, CLIP is given a batch of image-text pairs. It learns to maximize the similarity (cosine similarity of their embeddings) for correct pairs while minimizing it for all incorrect pairs in the batch.
This simple but powerful objective gives rise to two key capabilities we use for evaluation:
-
Measuring Semantic Similarity (CLIP Score): The training process directly optimizes for high cosine similarity between matching image-text embeddings. Therefore, we can use this cosine similarity as a score to evaluate how well a generated image aligns with its prompt. This is the CLIP Score.
-
Zero-Shot Classification (CLIP-IQA): CLIP can classify an image without being explicitly trained on that classification task. We can give it an image and a set of text prompts like "a photo of a dog" and "a photo of a cat" and see which prompt has a higher embedding similarity to the image.
CLIP-IQA (Image Quality Assessment) cleverly repurposes this. Instead of "dog" vs. "cat," we use prompts like "A high-quality, good photo" and "A low-quality, bad photo." The resulting score reflects CLIP's "classification" of the image's quality based on the vast visual knowledge it gained from its web-scale training data.
3. Implementing the Evaluation Pipeline
Now, let's build the pipeline. As with many complex engineering tasks, leveraging a well-designed library is the most effective approach. The qlip_algorithms package, created by TheStage AI, provides a powerful and modular framework for exactly this purpose.
It contains pre-built Evaluator classes that automate the entire process for standard benchmarks:
- Loading a benchmark dataset (e.g., COCO captions, PartiPrompts).
- Generating an image for each prompt using a
diffuserspipeline that you provide. - Calculating a suite of metrics on the generated images.
- Aggregating and returning the results.
Evaluation of Text-to-Image Models with Qlip
The qlip library documentation provides a fantastic, code-first tutorial on building an evaluation pipeline. This is the most direct way to achieve our learning outcome.
Read the section 'Evaluation on standard benchmarks automatically'. Focus on understanding the roles of PartiPromptsEvaluator and CocoEvaluator. Pay close attention to the code blocks showing how you instantiate the evaluator with your diffusion pipeline and generation_kwargs, and how the single evaluate() method automates the entire process. Note how the results are returned in a structured dictionary.
Let's summarize the workflow shown in the tutorial. The process is remarkably streamlined:
-
Initialize your Model: Load any
diffusers-compatible pipeline you want to evaluate.from diffusers import FluxPipeline import torch pipe = FluxPipeline.from_pretrained( "black-forest-labs/FLUX.1-schnell", torch_dtype=torch.bfloat16 ).to("cuda") -
Initialize the Evaluator: Choose an evaluator based on the benchmark you want to use (e.g.,
CocoEvaluator). You pass your pipeline to it, along with any specific generation parameters.from qlip_algorithms.evaluation import CocoEvaluator coco_eval = CocoEvaluator( pipeline=pipe, generation_kwargs={"num_inference_steps": 4, "guidance_scale": 0}, split="validation", ) -
Run Evaluation: Call the
.evaluate()method. This is where the magic happens. The evaluator will automatically:- Download and load the COCO validation dataset.
- Iterate through the captions (
max_samples=10in the example). - For each caption, call your
pipeto generate an image. - Collect all generated images and the real COCO images.
- Compute the default metrics for this evaluator (CLIP Score, FID, CLIP-FID).
- Return the final, aggregated scores.
results = coco_eval.evaluate(max_samples=10) # Using a small number for a quick test
print(results)
# Expected output:
# {
#   'clip_score': 20.87,
#   'fid': 266.03,
#   'clip_fid': 490.50
# }
This single command, coco_eval.evaluate(), represents your automated pipeline. It programmatically connects data, model inference, and metric computation into a single, reproducible workflow.
Test your understanding!
You want to compare the performance of StableDiffusionPipeline and FluxPipeline on their ability to render text accurately. Using the qlip_algorithms framework, how would you set this up?
Show answer
You would use the PartiPromptsEvaluator. The PartiPrompts benchmark is specifically designed with challenge categories, including one for "Writing & Symbols".
- Instantiate
PartiPromptsEvaluatoronce with theStableDiffusionPipeline, limiting the challenges to["Writing & Symbols"]. - Run
.evaluate()and save the results. - Instantiate a second
PartiPromptsEvaluatorwith theFluxPipelineand the same challenge category. - Run
.evaluate()again. - Compare the resulting metric scores (e.g., CLIP Score, ARNIQA) for the two pipelines to see which one performs better on this specific task.
4. Gaining Insights: Beyond the Aggregate Score
A mature evaluation pipeline does more than just produce a final number. It provides the data needed for deep analysis. The qlip evaluators store per-sample scores, which is invaluable for debugging.
The tutorial shows a powerful feature: get_worst_cases. After running an evaluation, you can ask the evaluator to show you the prompts and images that scored the lowest on a particular metric.
# Assuming pp_eval is a PartiPromptsEvaluator that has been run
worst_case = pp_eval.get_worst_cases(
   metric_name="clip_iqa", challenge="Basic", k=1
)

# This returns a list of dictionaries, allowing you to see
# the prompt, the generated image, and its low score.
worst_case[0]['generated']
This is a critical feedback loop. If your model is performing poorly, looking at the worst cases often immediately reveals the failure mode—is it misinterpreting certain words? Failing to compose objects? Generating distorted anatomy?
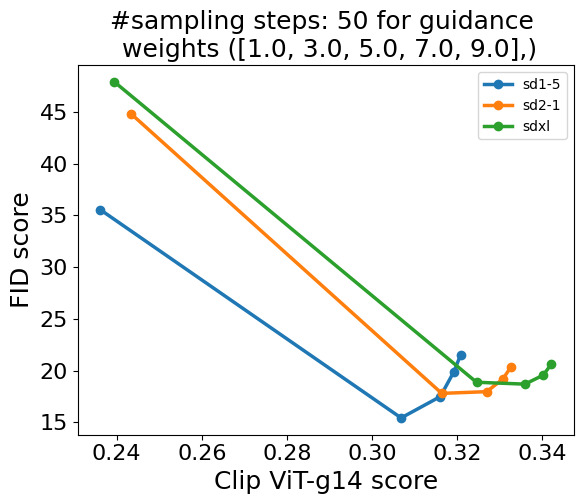
Furthermore, your pipeline enables you to generate the very plots we discussed in the last lesson. By wrapping the evaluate() call in a loop that sweeps through different guidance_scale values in generation_kwargs, you can collect the FID and CLIP scores for each run and plot them against each other.
Conclusion: Your Journey to Expertise
Congratulations on completing the final lesson! Over this course, we have journeyed from the mathematical foundations of the diffusion process to the practical engineering of state-of-the-art models for 2D, 3D, and video generation, and finally, to the critical discipline of optimization and evaluation.
Key Takeaways from This Lesson:
- An automated evaluation pipeline is a non-negotiable tool for professional-grade generative model development.
- Specialized libraries like
qlip_algorithmsprovide powerful, pre-built evaluators that dramatically simplify the process of benchmarking on standard datasets like COCO and PartiPrompts. - The core of a pipeline involves three steps: generate assets from a set of prompts, compute a suite of quality and alignment metrics, and analyze the results.
- Analysis should go beyond aggregate scores. Inspecting the best and worst-performing examples provides crucial qualitative insights for debugging and model improvement.
You started with the goal of becoming an expert in diffusion models. You now possess the theoretical knowledge and practical skills that define that expertise—from implementing the core DDPM algorithm to fine-tuning with LoRA, from understanding NeRFs to generating 3D objects with score distillation, and from optimizing inference with distillation to building a robust evaluation pipeline.
The field of generative AI is moving at an incredible pace, but the fundamental principles and engineering best practices you've learned will serve as a durable foundation for whatever comes next. Keep building, keep experimenting, and continue to push the boundaries of what's possible.