Hello! Welcome to the first lesson of our new module, "Model Optimization and Deployment."
In the previous modules, we've focused on building, training, and refining diffusion models to generate high-quality 2D and 3D assets. You've gone from the theoretical underpinnings of DDPMs to implementing advanced text-to-3D pipelines and debugging their outputs. Now, we shift our focus from what the models can do to how efficiently they can do it.
As you know from your work, state-of-the-art models are often massive and computationally expensive. Diffusion models are no exception. This lesson directly addresses this challenge, aiming to apply quantization and mixed-precision techniques to optimize inference speed and memory.
We will cover:
- The core concepts behind quantization and mixed-precision training.
- The mechanics of Post-Training Quantization (PTQ) and key considerations like loss scaling.
- A practical guide to applying these optimization techniques to a diffusion model pipeline using the Hugging Face
diffuserslibrary.
By the end of this lesson, you'll have a solid theoretical understanding and the practical ability to make large diffusion models more lightweight and faster for real-world deployment.
1. The Need for Speed (and Less Memory)
Diffusion models, especially large ones for high-resolution image or video generation, come with significant computational baggage:
- Memory Footprint: A model like FLUX.1-dev requires over 30GB of VRAM just to load in its standard bfloat16 precision. This limits the hardware it can run on and increases deployment costs.
- Inference Latency: The iterative denoising process, often involving 20-50 full model passes, makes generation slow. For interactive applications or large-scale asset production, this latency is a major bottleneck.
To tackle these issues, we'll explore two powerful techniques: quantization and mixed precision.
2. Quantization: Doing More with Less
Quantization is the process of reducing the numerical precision of a model's parameters (weights) and, in some cases, its activations. The most common approach is to convert 32-bit floating-point numbers (FP32) into 8-bit integers (INT8).
This has two primary benefits:
- Reduced Memory: Storing a weight as an INT8 value requires 4x less memory than FP32.
- Faster Computation: Integer arithmetic is significantly faster than floating-point arithmetic on most modern hardware, especially on specialized cores like NVIDIA's Tensor Cores.
To understand the fundamentals of how this works, the following video provides an excellent and comprehensive explanation.
Quantization explained with PyTorch - Post-Training Quantization, Quantization-Aware Training
Watch the following segment from 'Quantization explained with PyTorch' by Umar Jamil. It covers the motivation for quantization and the core mechanics of converting floating-point numbers to integers without simply rounding them.
Please watch from the beginning to 20:42. Focus on these key concepts: The problems that quantization solves (memory, speed, energy). The basic representation of integers and floating-point numbers in hardware. The core quantization formula, including the roles of the scale factor (S) and zero-point (Z). The difference between asymmetric and symmetric quantization.
Key Quantization Concepts
As you saw in the video, quantization isn't just round(x). It's a mapping that preserves the relative distribution of the original floating-point values within a smaller integer range.
- Asymmetric Quantization: Maps the exact range
[min_float, max_float]to[min_int, max_int]. The floating-point zero may not map to an integer zero. This is flexible but can require more complex calculations due to the zero-point offset. - Symmetric Quantization: Maps a symmetric range
[-abs_max_float, +abs_max_float]to a symmetric integer range[-max_int, +max_int]. This ensures that the floating-point zero always maps to the integer zero, simplifying computation.
Post-Training Quantization (PTQ)
For optimizing inference, Post-Training Quantization (PTQ) is the most common approach. We take a fully trained FP32 or FP16 model and convert its weights to a lower precision like INT8.
The process involves:
- Calibration: We run a small, representative sample of data through the model to observe the dynamic range (min and max values) of the weights and, crucially, the activations at each layer.
- Quantization: Using these observed ranges, we calculate the scale and zero-point for each layer and convert the weights to INT8. The model is now ready for fast integer-based inference.
The video you watched demonstrates this process with PyTorch, highlighting how observers are used to collect statistics for calibration.
While PTQ is fast and doesn't require retraining, it can sometimes lead to a drop in accuracy. If the accuracy loss is too severe, an alternative is Quantization-Aware Training (QAT), which simulates the effects of quantization during the training process, allowing the model to adapt and become more robust to precision loss. This typically yields better accuracy than PTQ but requires a full training or fine-tuning run.
3. Mixed Precision: The Best of Both Worlds
Mixed precision is a technique, primarily used during training but also relevant for inference, that combines different floating-point precisions to balance speed, memory, and numerical stability.
The standard approach uses:
- FP16 (Half Precision): For the bulk of the computations (matrix multiplications in forward and backward passes). This halves the memory usage compared to FP32 and leverages hardware acceleration.
- FP32 (Single Precision): For critical parts where precision is paramount, like accumulating gradients and updating the master copy of the weights.
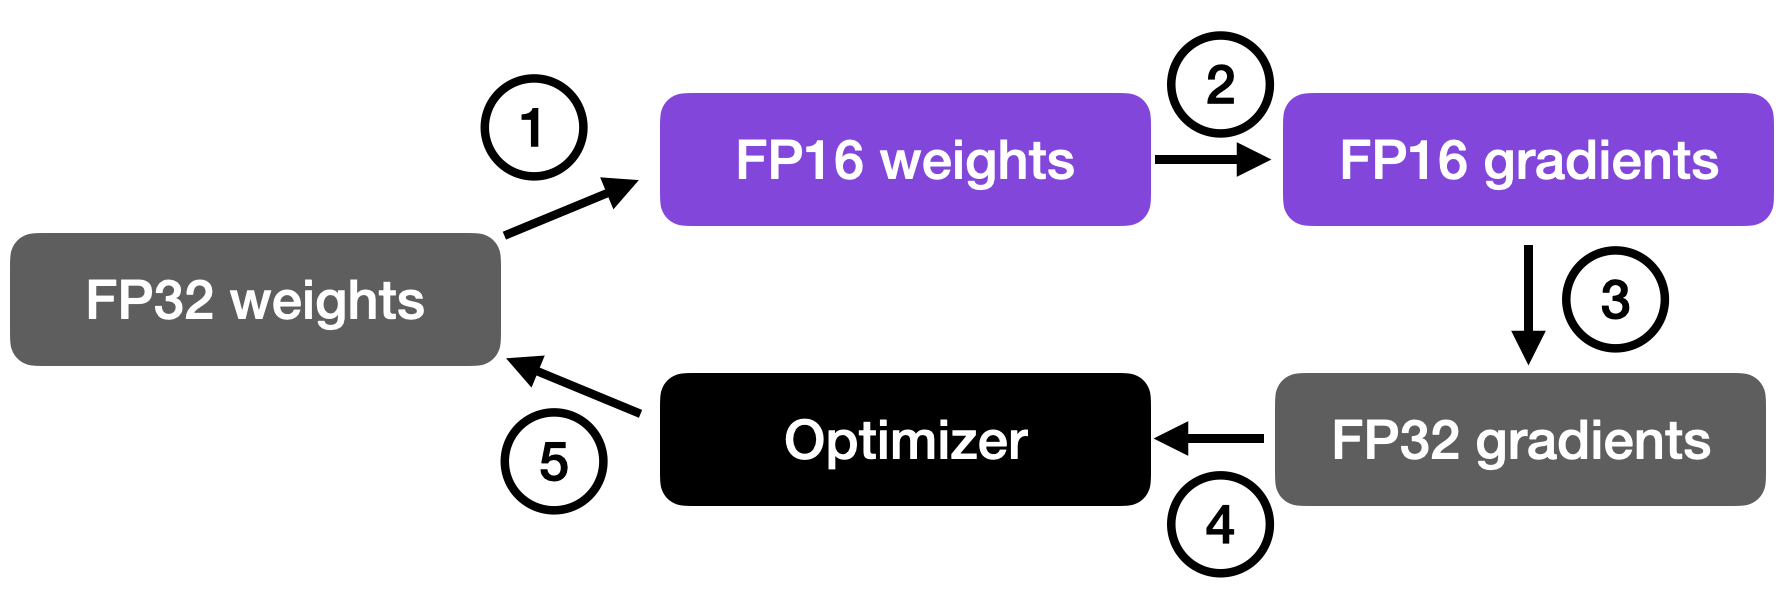
Two key components make this work: a master copy of the weights and loss scaling.
Ultimate Guide To Scaling ML Models - Megatron-LM | ZeRO | DeepSpeed | Mixed Precision
To understand these two crucial components, watch this segment from 'Ultimate Guide To Scaling ML Models' by Aleksa Gordić.
Please watch from 47:27 to 58:59. Pay attention to: The concept of FP32 master weights and why they are necessary to prevent small gradient updates from becoming zero in FP16. The problem of gradient underflow in FP16 and how loss scaling shifts the gradient distribution back into the representable range. The brief comparison between FP16 and BFloat16 (BF16), noting BF16's larger dynamic range makes it more robust for training.
Modern diffusion models are typically trained using BF16 or FP16 from the start. For inference, you often load the model in this native precision. Further optimization then comes from applying quantization on top of this.
4. Practical Application: Quantizing a Diffusion Model
Now, let's apply these concepts to a real diffusion model. The Hugging Face diffusers library provides a streamlined way to load models with various quantization backends. We will focus on bitsandbytes, a popular library for 8-bit and 4-bit quantization.
Exploring Quantization Backends in Diffusers
This Hugging Face blog post, 'Exploring Quantization Backends in Diffusers', is an excellent practical guide. It demonstrates how to apply different quantization methods to FLUX, a large transformer-based diffusion model.
Please read the introduction and the first section on 'bitsandbytes (BnB)'. Focus on: The components of the FluxPipeline and which ones are targeted for quantization (the transformer and text encoder). The code example showing how PipelineQuantizationConfig is used to specify 4-bit quantization. The benchmark table comparing BF16, 4-bit, and 8-bit precision in terms of memory and inference time.
Let's break down the key implementation pattern from the article.
import torch
from diffusers import FluxPipeline
# Import the specific config classes for the backend you are using
from diffusers import BitsAndBytesConfig as DiffusersBitsAndBytesConfig
from diffusers.quantizers import PipelineQuantizationConfig
from transformers import BitsAndBytesConfig as TransformersBitsAndBytesConfig

model_id = "black-forest-labs/FLUX.1-dev"

# 1. Define the quantization configuration for the pipeline
pipeline_quant_config = PipelineQuantizationConfig(
    # A mapping from model component name to its quantization config
    quant_mapping={
        # Quantize the main diffusion transformer
        "transformer": DiffusersBitsAndBytesConfig(
            load_in_4bit=True,
            bnb_4bit_quant_type="nf4", # NormalFloat 4-bit is often best for quality
            bnb_4bit_compute_dtype=torch.bfloat16
        ),
        # Also quantize the large T5 text encoder
        "text_encoder_2": TransformersBitsAndBytesConfig(
            load_in_4bit=True,
            bnb_4bit_quant_type="nf4",
            bnb_4bit_compute_dtype=torch.bfloat16
        ),
    }
)

# 2. Load the pipeline with the quantization config
pipe = FluxPipeline.from_pretrained(
    model_id,
    quantization_config=pipeline_quant_config,
    torch_dtype=torch.bfloat16 # Compute dtype should match
)
pipe.to("cuda")

# Now the pipeline is ready for inference with significantly less VRAM usage.
As the benchmark table in the article shows, using 4-bit quantization with bitsandbytes reduces the peak memory usage for the FLUX model from ~36 GB down to ~17 GB—a massive saving that makes the model accessible on a much wider range of GPUs. Notice that for bitsandbytes, the inference time isn't necessarily faster without further optimization like torch.compile. The primary benefit here is the memory reduction.
Test your understanding!
You are tasked with deploying a large text-to-image diffusion model on a GPU with limited VRAM. The original model uses BF16 precision and requires 20GB of VRAM, but your target hardware only has 12GB.
Based on the diffusers example, what is the most straightforward first step you would take to make this model fit? Outline the key parts of the code you would write.
Show answer
The most straightforward step is to apply post-training quantization using a library like bitsandbytes to load the model in 4-bit or 8-bit precision. 4-bit would be the most aggressive first choice to meet the 12GB VRAM target.
The code would involve:
- Creating a
PipelineQuantizationConfig: This config would map the model's main compute-heavy components (like theunetortransformer) to aBitsAndBytesConfig. - Setting
load_in_4bit=True: Inside theBitsAndBytesConfig, this flag tells the library to perform 4-bit quantization. - Loading the pipeline: Pass the
quantization_configto the.from_pretrained()method of the diffusion pipeline.
This approach significantly reduces the memory footprint of the model's weights, making it much more likely to fit within the 12GB VRAM budget.
The Frontier: FP8 Quantization
While INT8 and INT4 are powerful, the latest hardware, like NVIDIA's Hopper architecture, introduces native support for FP8 (8-bit floating-point) precision. This offers a compelling alternative to integer quantization.
FP8 comes in two main flavors:
- E4M3 (4 exponent bits, 3 mantissa bits): More precision, smaller dynamic range. Better for inference where value distributions are often stable.
- E5M2 (5 exponent bits, 2 mantissa bits): Less precision, wider dynamic range. Better for training where gradients can have large spikes.
Industry leaders are already leveraging this. For example, Adobe used FP8 with NVIDIA's TensorRT to optimize their Firefly video generation model, achieving a 60% reduction in latency.
Optimizing Transformer-Based Diffusion Models for Video ...
For a high-level industry perspective on FP8, skim this blog post from NVIDIA about their collaboration with Adobe.
This is a quick read. Focus on: The stated business impact: reducing inference costs and serving more users. The technical approach: using TensorRT with mixed FP8 and BF16 precision. The distinction made between the E4M3 and E5M2 FP8 formats.
The diffusers blog post also mentions backends like torchao and Quanto which are beginning to support these newer FP8 data types, showing that the ecosystem is rapidly evolving towards more efficient formats.
Conclusion
In this lesson, we've taken our first major step into the world of model optimization. You now have the foundational knowledge to make large, cumbersome diffusion models practical for deployment.
Key Takeaways:
- Quantization drastically reduces memory footprint and can accelerate inference by converting high-precision floating-point weights to low-bit integers (e.g., INT8, INT4).
- Mixed Precision (e.g., FP16/BF16 with FP32 master weights) is a standard technique for efficient training and a common starting point for inference optimization.
- Post-Training Quantization (PTQ) is a practical method for optimizing pre-trained models for inference, often involving a calibration step to determine value ranges.
- Modern libraries like
diffusersandbitsandbytesmake it straightforward to apply these techniques, often with just a few lines of configuration code. - The field is constantly evolving, with newer formats like FP8 offering even better performance on the latest hardware.
Next Lesson Preview:
Quantization is just one tool in our optimization toolbox. Another powerful technique is to train a smaller, faster "student" model to mimic the behavior of a large, slow "teacher" model. In the next lesson, we will explore this concept by learning how to implement progressive distillation to train a faster student model from a multi-step teacher.