Hello!
In our previous lesson, we focused on debugging the local consistency of masked edits, tackling issues like visible seams and lighting mismatches at the boundary of an inpainted region. We developed a toolkit for creating seamless "stitches."
Now, we'll address a more global and often more challenging problem. You might have a perfect, seamless edit, but in the process, the background has warped, the subject's identity has changed, or the overall composition of the image has been unintentionally altered. This lesson tackles precisely this issue. Your learning outcome is to debug the preservation of structure and content in guided editing techniques. We will explore why these non-local artifacts occur and investigate the three primary families of solutions used to prevent them: process-based adjustments, inversion techniques, and specialized architectures.
Part 1: The Fundamental Trade-off: Realism vs. Faithfulness
At the heart of every guided edit is a fundamental tension. The model wants to produce a realistic image based on its training data, but it also needs to remain faithful to the guidance you provide (the original image, a structural map, etc.). When these two goals conflict, something has to give.
A naive image-to-image pipeline often fails this test. If you take a picture of your cat, add 60% noise, and then denoise it with the prompt "a picture of a dog," you'll likely get a dog that has a different pose, background, and lighting. The model prioritized the prompt ("dog") over faithfulness to the original image's structure.
The SDEdit paper elegantly formalizes this as a realism-faithfulness trade-off.
SDEdit: Guided Image Synthesis and Editing with Stochastic Differential Equations
The paper 'SDEdit: Guided Image Synthesis and Editing' provides the theoretical underpinning for this trade-off. We'll focus on how it introduces and controls this balance.
Please read section 3, 'Guided Image Synthesis and Editing with SDEdit,' up to the 'Choice of t0' subsection. Pay special attention to Figure 3 and the accompanying text. Then, look at Figure 12 in Appendix B.3, 'Analysis on t0'. The key is to understand what the hyperparameter t0 represents and how it directly controls the balance between realism and faithfulness.
As you've read, SDEdit works by partially noising the input image and then denoising it. The crucial hyperparameter is , which dictates the starting time for the reverse SDE process (and thus, the initial amount of noise added).
- Low : A small amount of noise is added. The model's reverse trajectory starts very close to the original image. The result is highly faithful to the original structure and content, but might lack realism or creative change because the model has little freedom.
- High : A large amount of noise is added, destroying much of the original structure. The model has more freedom to generate a highly realistic image that strongly follows the prompt, but it will likely lose faithfulness to the original content.
Debugging with :
If your SDEdit output looks more like a random generation than an edit of your input, your is too high. If the edit is too subtle and ignores your prompt, your is too low. The debugging process is a search for the "sweet spot" (often between 0.3 and 0.6) that provides enough freedom for the edit without destroying the essential structure you want to preserve.
Part 2: Inversion Techniques: Finding the Path Home
SDEdit gives us a single knob, , to control the edit. But what if we want the best of both worlds: a strong edit (like from a high ) that still perfectly preserves the unedited parts of the image? This requires a more sophisticated approach: inversion.
The goal of inversion is to find a latent vector (a noise map) that, when denoised, perfectly reconstructs the original image. If we can find this "path home," we can then manipulate it during the denoising process to make targeted edits while ensuring the rest of the image reconstructs correctly.
The following video provides an excellent deep dive into several state-of-the-art inversion and editing techniques.
Deterministic Image Editing with DDPM Inversion, DDIM Inversion, Null Inversion and Prompt-to-Prompt
The video 'Deterministic Image Editing with DDPM Inversion, DDIM Inversion, Null Inversion and Prompt-to-Prompt' by Gabriel Mongaras is a masterclass in modern editing methods. We'll use it to understand how inversion solves the content preservation problem and how to debug it when it fails.
This is a dense video, so we'll break it down: The Problem (00:00 - 09:55): Watch this first section to get a clear articulation of why basic image-to-image and conditional methods fail to preserve content. DDIM Inversion (22:34 - 28:10): Focus on how this process creates a deterministic, one-to-one mapping between an image and a noise latent. This is the key to perfect reconstruction. The Bug and The Fix (28:10 - 40:10): This is the most critical part for our learning outcome. Pay close attention to why DDIM inversion fails with a CFG scale > 1 (accumulated error) and how Null-Text Inversion is used to fix this by optimizing the null text embeddings.
Debugging Scenario: Your "Perfect" Inversion Is Not Perfect
Let's summarize the key debugging insight from the video.
The Scenario: You use DDIM Inversion on an image of "a cat on a sofa." You get a latent that perfectly reconstructs the image. Now, you try to edit it by denoising with the prompt "a dog on a sofa" and a CFG scale of 7.5. The result is a garbled mess: the dog is there, but the sofa is warped, and the background has changed completely. The content was not preserved.
The Cause: The DDIM inversion process is only perfectly reversible when the guidance (prompt + CFG) is identical for both inversion and reconstruction. Using a different prompt or a CFG scale greater than 1.0 introduces error at each step of the inversion. This error accumulates, causing the final inverted latent to be "off-trajectory." When you try to denoise from this incorrect latent, the model cannot find its way back to the original unedited content.
The Solution: Null-Text Inversion
This is a powerful debugging technique that corrects the inversion trajectory in real-time. Here’s the intuition:
- Classifier-Free Guidance (CFG) works by steering the generation away from the unconditional prediction (from a null prompt) and toward the conditional prediction (from your text prompt).
- The error in DDIM inversion comes from this steering process.
- Null-Text Inversion treats the unconditional (null) text embedding as a trainable parameter during the inversion process. At each step, it optimizes the null embedding to find one that makes the CFG-guided prediction for that step match the ground-truth image.
- By doing this, it calculates a sequence of "corrected" null embeddings that effectively cancel out the accumulated error. When you later perform the edit, you use these custom null embeddings instead of the standard one, allowing you to use a high CFG scale while still perfectly reconstructing the unedited parts of the image.
In essence, Null-Text Inversion is a specific algorithm to debug the failure of content preservation when using guided inversion techniques with CFG.
Part 3: Architectural Solutions: Building for Preservation
So far, we've treated the model as a fixed black box and tried to control it via the process (SDEdit) or by inverting it (DDIM Inversion). A different philosophy is to change the model's architecture itself to be inherently better at preserving structure. This is the core idea behind ControlNet.
ControlNet with Diffusion Models | Explanation and PyTorch Implementation
The video 'ControlNet with Diffusion Models' by ExplainingAI clearly explains the motivation and architecture of ControlNet. It reveals how its design is purpose-built to avoid the very content-preservation problems we're discussing.
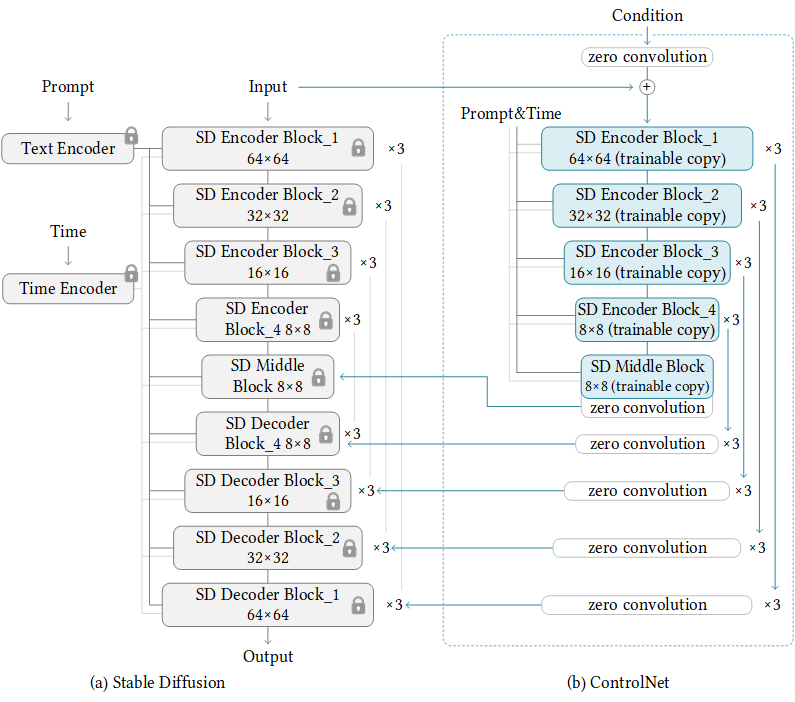
Watch from the beginning to 10:27. Focus on these three architectural choices and why they are critical for preserving the knowledge of the base model: The problem with simple fine-tuning (catastrophic forgetting). The use of a frozen original model and a trainable copy. The role of zero convolutional layers.
ControlNet's architecture is a masterclass in designing for content preservation:
- Frozen U-Net: The original, large, pre-trained diffusion model is completely frozen. This ensures its vast knowledge of textures, styles, and concepts is perfectly preserved. It acts as a powerful, robust backbone.
- Trainable Copy: A copy of the U-Net's encoder blocks is created. This copy is trainable and learns to understand the new structural condition (e.g., a Canny edge map, a human pose).
- Zero Convolutions: This is the clever trick. The outputs of the trainable copy are fed into the frozen decoder via 1x1 convolutional layers whose weights are initialized to zero. This means at the start of training, the ControlNet adds nothing to the frozen model's computation. The output is identical to the original model. As training progresses, these zero-convs learn to add the structural guidance incrementally, preventing the new conditioning from catastrophically interfering with the frozen model's rich feature generation.
Debugging Scenario: Balancing Prompt and Structure in ControlNet
The Scenario: You're using a Canny edge map of a building to guide generation with the prompt "a gothic cathedral at sunset." The output perfectly matches the building's structure, but it looks like a modern office block (ignoring "gothic cathedral") and the lighting is flat (ignoring "at sunset").
The Cause: The guidance from the ControlNet is overpowering the guidance from your text prompt.
The Solution: ControlNet's Tuning Parameters
This is a classic debugging task in ControlNet, where you need to balance two different conditioning signals.
The guide 'ControlNet: A Complete Guide' provides a practical overview of the user-facing parameters that allow you to debug this balance between structural guidance and prompt adherence.
Please read the sections 'Control Weight' and 'Control Mode'. These are the primary knobs you will turn to debug preservation and guidance issues in ControlNet.
As the guide explains, your main debugging tools are:
- Control Weight: This is a simple multiplier on the influence of the ControlNet. In our scenario, the weight is too high. You would decrease the Control Weight to give the text prompt more influence over the style ("gothic") and lighting ("sunset").
- Control Mode: This offers a more nuanced approach. Instead of a simple weight, you can choose "My prompt is more important," which prioritizes the text prompt's influence, or "ControlNet is more important," which does the opposite.
- Starting/Ending Control Step: This is a more advanced tool. You could, for instance, have the ControlNet only apply for the first 50% of the sampling steps (
Ending Control Step = 0.5). This would use the Canny map to establish the global structure early on, then "let go" and allow the text prompt to dominate the later steps, which are responsible for refining details, texture, and style.
Test your understanding!
You are using DDIM Inversion with Null-Text Inversion to change a person's shirt from blue to red in a photo. The edit works perfectly, and the background is preserved. Now, you want to perform a more extreme edit: changing the person into "an oak tree" while keeping the background identical. The resulting image is a distorted mess.
What is the fundamental limitation you are running into, and which of the three techniques discussed (SDEdit, Inversion, ControlNet) might be better suited for such a drastic structural change while preserving the background?
Show answer
The fundamental limitation is that inversion-based editing excels at preserving structure while making stylistic or local changes. It assumes the underlying geometry of the scene remains largely the same. Changing a person into an oak tree is a massive structural change that violates this assumption. The inversion trajectory for "person" is simply too different from the desired trajectory for "tree" for the model to reconcile them cleanly, even with null-text optimization.
ControlNet would be a much better approach. You could generate a segmentation map of the original image, edit the mask for the person to have a tree-like shape, and then use the modified segmentation map as a ControlNet condition along with the prompt "an oak tree." The frozen backbone would preserve the background's content and style, while the ControlNet would force the generation of a tree in the specified location, effectively handling the drastic structural change.
Conclusion
In this lesson, we elevated our debugging skills from local boundary artifacts to the global preservation of image structure and content. We've seen that this is not a single problem but a class of problems with a rich set of solutions.
Key Takeaways:
- The Core Problem: All guided editing balances realism (what the model knows) and faithfulness (what you want to preserve). Debugging is about managing this trade-off.
- Process-Based Debugging (SDEdit): Use the
t0hyperparameter as a direct knob to control the noise level, trading faithfulness for creative freedom. - Inversion-Based Debugging (DDIM/Null-Text): When simple reconstruction fails due to CFG, use Null-Text Inversion to optimize the unconditional embeddings and force the edited trajectory to align with the original, preserving background content.
- Architectural Debugging (ControlNet): Leverage the frozen backbone and zero-convolution design to add structural control without catastrophic forgetting. Debug the balance of power between the control map and the text prompt using Control Weight, Control Mode, and Start/End Steps.
Next Lesson Preview:
We've discussed how to make the model respect structural guidance (ControlNet) and how to align edits with prompts (CFG, weights). However, sometimes the model seems to misunderstand the prompt entirely, with generated content not matching the text description, especially in complex compositions. In our next lesson, we will learn how to analyze cross-attention maps to debug prompt alignment failures, giving us a powerful visual tool to see what the model is "looking at" when it interprets our prompts.