Hello! Welcome back to our course on building complex websites with vibe coding.
In our last few lessons, we focused on building out a modular homepage, creating both static partials (like the hero banner) and dynamic ones that fetch content from across the site (like the "latest posts" section). Now, with content and a homepage in place, we need to provide a way for users to navigate the site.
This lesson directly addresses a cornerstone of user experience and SEO: site navigation. Your extensive experience in SEO has undoubtedly shown you how critical a well-structured menu is for both users and search engine crawlers to discover content and understand a site's architecture. Today, we'll translate that concept into practice with Hugo.
Our learning outcome is to define a multi-level site menu in hugo.toml or front matter and prompt for a template to render it. We will explore how Hugo manages navigation data and how to use our AI-assisted workflow to generate the code that turns that data into a functional menu.
What We're Building: A Multi-Level Menu
A multi-level, or nested, menu is one that contains dropdowns or sub-menus, allowing for a more organized and hierarchical navigation structure. This is essential for the "complex" websites we aim to build.
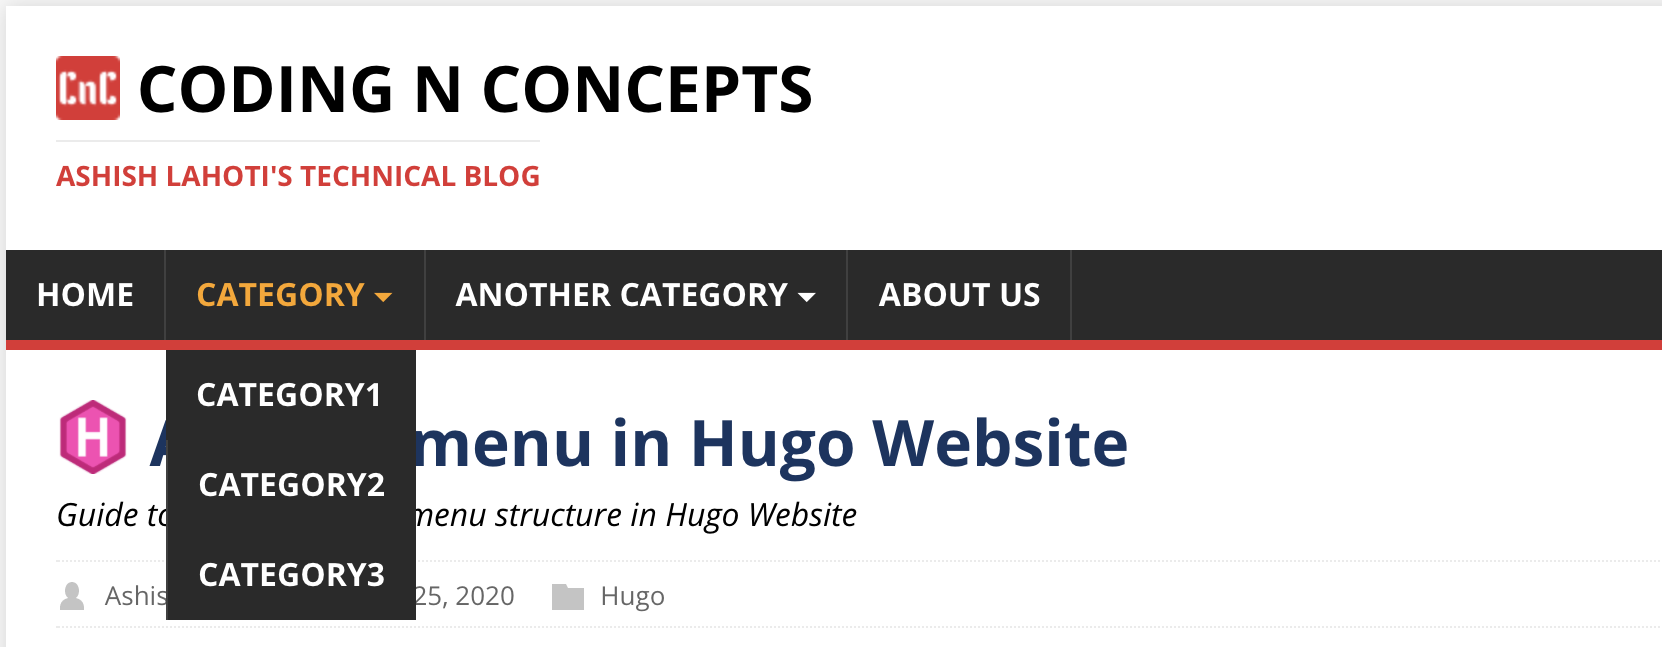
Step 1: Defining Menu Data in Hugo
Hugo decouples the definition of a menu from its presentation. You first define the menu's structure—its links, names, and hierarchy—and then you use a template to render it. This is a powerful concept because it means you can change your site's navigation without touching your layout code, and vice versa.
The official Hugo documentation provides a great overview of the different ways to define menus.
Please start by reading the 'Overview' section of the official Hugo documentation on Menus.
Read just the initial 'Overview' section. It introduces the three ways to define menu entries: automatically, in front matter, and in the site configuration. We will focus on the last two methods for maximum control.
As the documentation states, we will focus on the two most flexible methods: defining menus in the site configuration and in a page's front matter.
Method 1: The Site Configuration (hugo.toml)
Defining your main navigation in hugo.toml is the most common approach. It centralizes your primary navigation structure in one place, making it easy to manage.
To create a nested menu, you use a few key properties for each menu item:
identifier: A unique name for this menu item (e.g.,services).name: The text that will be displayed in the menu (e.g., "Our Services").url: The link for the menu item (e.g.,/services/).weight: A number that controls the order of items. Lower numbers appear first.parent: Theidentifierof another menu item. This is the crucial property that creates the nested relationship.
This article from Static Mania provides a perfect, clear example of how to structure this in your configuration file.
How to Add Nested Navigation in Hugo?
This article, 'How to Add Nested Navigation in Hugo?', demonstrates exactly how to define a multi-level menu in your configuration file.
Focus on the 'Configuring config.toml file' section. Study the code block showing the [[menu.Main]] entries. Pay close attention to how the 'Blog1', 'Blog2', and 'Blog3' items use parent = "blog" to place themselves inside the 'Blog' item.
Let's break down the structure from the article.
Example hugo.toml Structure:
[menu]
  [[menu.main]]
    identifier = "home"
    name = "Home"
    url = "/"
    weight = 1

  [[menu.main]]
    identifier = "blog"
    name = "Blog"
    url = "/blog"
    weight = 2

  [[menu.main]]
    name = "Tech Articles"
    url = "/blog/tech"
    parent = "blog" # This makes it a child of the 'blog' item
    weight = 1

  [[menu.main]]
    name = "Marketing Guides"
    url = "/blog/marketing"
    parent = "blog" # This also becomes a child of 'blog'
    weight = 2
Here, blog is a top-level item. "Tech Articles" and "Marketing Guides" become sub-items under "Blog" because their parent property is set to blog, the identifier of the parent item.
For a quick visual confirmation, this video clip shows a similar setup.
Building a static website in Markdown with Hugo
In this clip from 'Building a static website in Markdown with Hugo', the creator briefly showcases his menu configuration file.
Watch from 00:31:09 to 00:31:57. Notice the menus.toml file and how it defines main menu items and sub-menus. It reinforces the concept of defining navigation in a configuration file.
Method 2: Page Front Matter
Sometimes, you want to add a specific page to a menu without editing hugo.toml. This is common for pages like "About Us" or "Contact." You can do this directly in the page's front matter.
Let's return to the Hugo documentation to see how to define menu entries in front matter.
Read the section 'Define in front matter'. Notice the simple syntax for adding a page to a menu (menus: main) and the more advanced example that uses parent and weight to position the item within a nested structure.
Here's an example for a page at content/about.md:
---
title: "About Our Company"
date: 2023-10-27T10:00:00Z
draft: false
menus:
  main:
    weight: 30 # Place it after 'Home' and 'Blog'
---
This automatically adds an "About Our Company" link to the main menu. You can even use the parent property here to add a content page directly into a dropdown menu defined in hugo.toml.
Test your understanding!
You have a "Services" dropdown menu defined in hugo.toml with the identifier services. You've just created a new page for a specific service at content/services/seo-audits.md.
How would you modify the front matter of seo-audits.md to make it appear as a sub-item within the "Services" dropdown?
Show answer
You would add a menus block to the front matter, specifying main as the menu, services as the parent, and giving it a weight.
---
title: "SEO Audits"
date: 2023-11-21T11:00:00Z
draft: false
menus:
  main:
    parent: services
    weight: 10
---
Step 2: Vibe Coding the Navigation Partial
Now that Hugo understands our menu structure, we need to create the template that renders it as HTML. This is a perfect task for your AI assistant. The logic for a multi-level menu can be tricky, so providing a clear, structured prompt is essential.
Let's use our proven prompt structure to ask the AI to build this for us.

Prompt for AI:
I need you to generate a Hugo partial that renders a responsive, multi-level navigation menu.
File Details:
- The file should be named
nav.html.- It should be located in the
layouts/partials/directory.Logic and Instructions:
- The partial must render the menu named
main. It can access this menu data via.Site.Menus.main.- Start with a
<nav>element containing a<ul>.- Use the
rangefunction to iterate through the top-level menu items.- For each menu item, check if it has children using Hugo's
.HasChildrenboolean.- If it has children:
- Render the list item
<li>with a class to indicate it's a dropdown.- Render the parent link.
- Create a nested
<ul>to contain the child items.- Inside this nested list,
rangeover.Childrento render each child as an<li>with a link.- If it does not have children:
- Render a simple
<li>with a link (<a href="{{ .URL }}">{{ .Name }}</a>).- Add appropriate CSS classes for styling (e.g.,
navbar,nav-item,dropdown,dropdown-menu).
Step 3: Analyzing the AI-Generated Code
Running this prompt should produce a partial similar to the one demonstrated in the Static Mania article you reviewed earlier. Let's analyze a typical output.
layouts/partials/nav.html (Expected AI Output)
<nav class="navbar">
  <ul class="navbar-nav">
    {{/* Loop through the top-level items of the 'main' menu */}}
    {{ range .Site.Menus.main }}
      {{ if .HasChildren }}
        {{/* This item has a sub-menu */}}
        <li class="nav-item dropdown">
          <a class="nav-link dropdown-toggle" href="{{ .URL }}">{{ .Name }}</a>
          <ul class="dropdown-menu">
            {{/* Loop through the children of this menu item */}}
            {{ range .Children }}
              <li class="nav-item">
                <a class="dropdown-item" href="{{ .URL }}">{{ .Name }}</a>
              </li>
            {{ end }}
          </ul>
        </li>
      {{ else }}
        {{/* This is a regular menu item with no sub-menu */}}
        <li class="nav-item">
          <a class="nav-link" href="{{ .URL }}">{{ .Name }}</a>
        </li>
      {{ end }}
    {{ end }}
  </ul>
</nav>
Code Breakdown:
{{ range .Site.Menus.main }}: This is the entry point. It tells Hugo to loop through all items defined for themainmenu.{{ if .HasChildren }}: This is the crucial conditional logic. Hugo automatically populates.HasChildrenastruefor any menu item that has been assigned as aparentby another item.{{ range .Children }}: If an item has children, this nested loop iterates through them. Inside this loop,.refers to the child item..URLand.Name: Within the loops, Hugo gives you access to the properties you defined inhugo.tomlor front matter, which you use to construct the final HTML links.
Finally, to make this navigation appear on every page, you would typically include it in your site's header partial (layouts/partials/header.html):
<header>
  {{/* ... other header content like logo ... */}}

  {{ partial "nav.html" . }}

  {{/* ... other header content ... */}}
</header>
Conclusion
In this lesson, you've mastered a fundamental component of any complex website: multi-level navigation. You now have the skills to architect a site's menu structure and generate the template code to bring it to life. This is a powerful combination of data management (in hugo.toml) and presentation logic (in the partial), all streamlined by our vibe coding workflow.
Key Takeaways:
- Hugo menus are defined by data, primarily in
hugo.tomlor a page's front matter. - Nested menus are created using a parent-child relationship defined by the
parentandidentifierproperties. - A menu partial renders this data using
range .Site.Menus.mainto loop through items. - The
.HasChildrenand.Childrenvariables are the keys to rendering nested sub-menus correctly. - A detailed prompt specifying the recursive logic is essential for getting a correct multi-level menu template from an AI assistant.
Preview of the next lesson:
With a main navigation in place, users can get to different sections. But how do they know where they are within those sections? To solve this, our next lesson will focus on another key navigation element: generating a breadcrumb navigation partial that reflects the site's content hierarchy. This will build directly on our understanding of Hugo's content structure and templating.