Hello! Welcome back to our course on building complex websites with "vibe coding."
In our last lesson, you did an excellent job prompting an AI to generate a modern, responsive grid layout for our taxonomy pages. We integrated the CSS by placing it in the static/css/ directory. While this worked perfectly for development, it's not the most efficient way to handle assets for a live, production website. As an SEO expert, you know that page load speed is a critical ranking factor and a core component of a good user experience.
Today, we'll level up our asset management. Our learning outcome is to integrate AI-generated CSS and JavaScript into the project using Hugo Pipes for bundling and optimization. We'll move beyond the simple static folder and learn the professional way to process, minify, and prepare our assets for deployment. This will directly improve your site's performance metrics, which are crucial for SEO.
From static to assets: The Key to Optimization
In Hugo, there are two primary places to store assets like stylesheets, scripts, and images: the static directory and the assets directory. Understanding their difference is fundamental to using Hugo's optimization features.
Building a Hugo + Tailwind technical blog from scratch
To understand this crucial distinction, let's look at a section from the article 'Building a Hugo + Tailwind technical blog from scratch' on dev.to. It clearly explains the role of each directory.
Please read the section titled '4) Asset Layer: assets/ vs static/'. Focus on the one-line descriptions for each directory.
As the article states:
static/: Files in this directory are copied directly to your final website (public/) as-is. Hugo doesn't touch them. This is simple and predictable.assets/: This is a special directory. Files here are not copied directly. Instead, they can be processed, combined, and optimized by a powerful Hugo feature called Hugo Pipes.
Since our goal is optimization, we need to use the assets directory.
Your first step: Move the style.css file you created in the last lesson from static/css/style.css to a new location: assets/css/style.css.
Introducing Hugo Pipes for CSS
Hugo Pipes lets you create a processing "pipeline" for your assets. Think of it as an assembly line: you start with a source file, and it passes through several stations (minification, fingerprinting) before becoming the final product.
Let's see what this pipeline looks like for our CSS file. We'll use a clear example that demonstrates this process.
Optimizing Hugo Blog Performance: How I Made My Site 3x ...
The article 'Optimizing Hugo Blog Performance' provides a concise and practical code snippet for processing CSS with Hugo Pipes.
In the section 'Step 2: CSS and JavaScript Optimization', focus on the first code block under 'Bundle and Minify Your Assets'. Pay attention to the part commented with {{/* CSS */}}.
Based on that example, let's replace the old <link> tag in your main layout file (layouts/_default/baseof.html) with the Hugo Pipes equivalent.
Find this line in your baseof.html inside the <head> tag:
<link rel="stylesheet" href="{{ "/css/style.css" | relURL }}">
And replace it with this code:
{{/* Process CSS with Hugo Pipes */}}
{{ $styles := resources.Get "css/style.css" }}
{{ if hugo.IsProduction }}
  {{ $styles = $styles | minify | fingerprint }}
{{ end }}
<link rel="stylesheet" href="{{ $styles.RelPermalink }}">
Let's break down this pipeline step-by-step:
{{ $styles := resources.Get "css/style.css" }}: This line finds our source file in theassetsdirectory and loads it into a variable called$styles.{{ if hugo.IsProduction }}: This is a conditional check. The code inside this block will only run when you build your site for production (e.g.,hugo), not during local development (hugo server). This is best practice, as it keeps your local development fast and makes debugging easier.{{ $styles = $styles | minify | fingerprint }}: This is the core of the pipeline.minify: Hugo removes all unnecessary characters from the CSS file (like whitespace and comments) to make the file size smaller. Smaller files mean faster downloads.fingerprint: Hugo adds a unique hash to the filename (e.g.,style.a1b2c3d4.css). This is a crucial technique for cache busting. When you update your CSS, the filename changes, forcing browsers and CDNs to download the new version instead of serving an old, cached one. This ensures your users always see the latest design.
<link rel="stylesheet" href="{{ $styles.RelPermalink }}">: This generates the final HTML<link>tag, pointing to the fully processed and optimized CSS file.
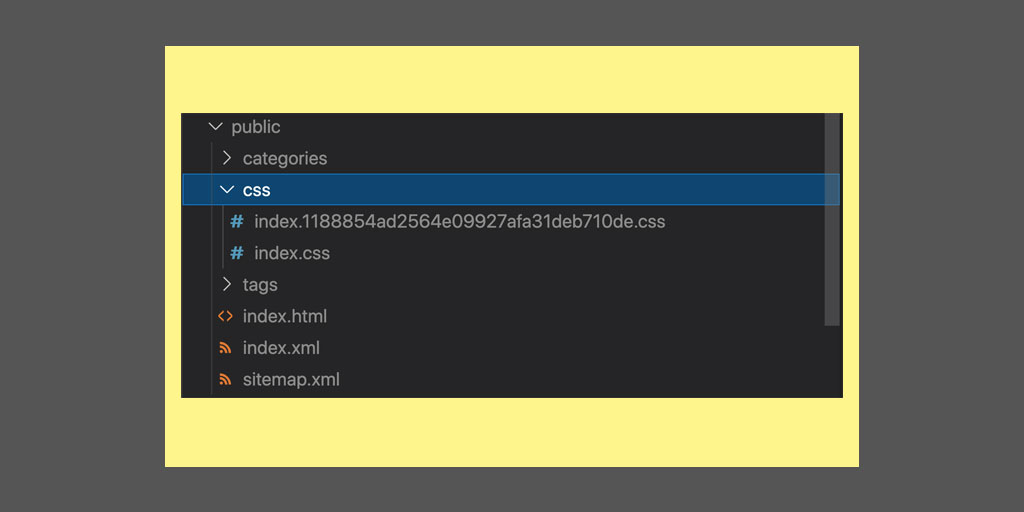
After making this change, restart your Hugo server. Your site should look identical, but under the hood, Hugo is now managing your CSS much more efficiently. When you build the site, you'll see a fingerprinted file in your public/css directory.
Applying the Same Logic to JavaScript
The exact same principles apply to JavaScript files. Even if you don't have any JS from your AI yet, we can set up the pipeline for when you do.
- Create a placeholder file: Create a new file at
assets/js/main.js. - Add some content: Put a simple line in it, like
console.log("JavaScript is ready!");. - Update your template: Add the following code to your
baseof.htmlfile, right before the closing</body>tag. The code snippet from thedevviews.comarticle also shows this part.
{{/* Process JS with Hugo Pipes */}}
{{ $js := resources.Get "js/main.js" }}
{{ if hugo.IsProduction }}
  {{ $js = $js | minify | fingerprint }}
{{ end }}
<script src="{{ $js.RelPermalink }}" defer></script>
This pipeline is nearly identical to the CSS one. The only difference is that we are outputting a <script> tag. Note the defer attribute—this is another performance best practice. It tells the browser to download the script without blocking the rendering of the page content, which improves the user's perceived load time.
Test your understanding!
You have asked your AI to generate CSS for a new photo gallery feature and saved it as assets/css/gallery.css. Your existing styles are in assets/css/style.css. For performance, you want to combine both files into a single CSS file for production.
How would you modify your Hugo Pipes code in baseof.html to achieve this?
Show answer
You would use resources.Concat to bundle the files together before the rest of the pipeline. The key is to first create a slice (which is like an array) of your resources and then concatenate them.
Here's how the code would look:
{{/* Define the slice of CSS files */}}
{{ $cssFiles := slice (resources.Get "css/style.css") (resources.Get "css/gallery.css") }}

{{/* Process the bundled CSS with Hugo Pipes */}}
{{ $styles := $cssFiles | resources.Concat "css/bundle.css" }}
{{ if hugo.IsProduction }}
  {{ $styles = $styles | minify | fingerprint }}
{{ end }}
<link rel="stylesheet" href="{{ $styles.RelPermalink }}">
This process is called bundling, and it's a common optimization technique to reduce the number of HTTP requests a browser needs to make.
Conclusion
Congratulations! You've taken a major step from simply using AI-generated code to professionally integrating and optimizing it within a Hugo project. This is a crucial skill for building high-performance websites that rank well and provide a great user experience.
Key Takeaways:
- The
assetsdirectory is for files you want Hugo to process;staticis for files to be copied without changes. - Hugo Pipes creates a processing pipeline for your assets.
minifyreduces file size by removing unnecessary characters, speeding up load times.fingerprintadds a unique hash to filenames for effective cache-busting, ensuring users always get the latest version.- These optimization techniques are not just technical details; they are essential for modern SEO and web development.
Preview of the next lesson:
We've optimized our text-based assets (CSS and JS). Now, let's tackle what is often the biggest culprit for slow websites: images. In the next lesson, we will learn how to use Hugo's image processing functions to generate responsive image formats (srcset). This will allow the browser to automatically choose the best-sized image for any device, dramatically improving your site's performance and Core Web Vitals scores.