Hello! Welcome to the third lesson in our course.
In the last lesson, you successfully set up a new Hugo project and ran the local development server. When you ran hugo new site, you likely noticed that it created a number of folders in your project directory. You saw firsthand that without any templates in the layouts folder, Hugo renders a blank page, confirming our core model: content + templates = HTML.
Today, we're going to demystify that folder structure. This lesson will describe the specific roles of Hugo's four most important directories: content, layouts, data, and static. Understanding this "map" of a Hugo project is absolutely essential for your goal of using AI tools for development. To effectively "vibe code," you need to know exactly where to tell your AI assistant to place the files it generates.
Let's start with a quick video overview of the directory structure.
Creating a New Site / Directory Structure | Hugo - Static Site Generator | Tutorial 4
This video from Giraffe Academy provides a concise walkthrough of the folders Hugo creates. It will give you a good first impression of what each one is for.
Watch the sections explaining the 'content' (03:34 - 04:00), 'data' (04:00 - 04:33), 'layouts' (04:33 - 05:28), and 'static' (05:28 - 05:49) folders. Don't worry about the other folders for now; we'll focus on these four.
Now that you've had a quick tour, let's dive deeper into each of these key directories. We'll use an article from Kinsta that draws helpful parallels to the CMS environments you're familiar with.
The Four Pillars of a Hugo Project
Think of these four directories as the foundational pillars of your site. Mastering their purpose is the key to organizing your project efficiently.
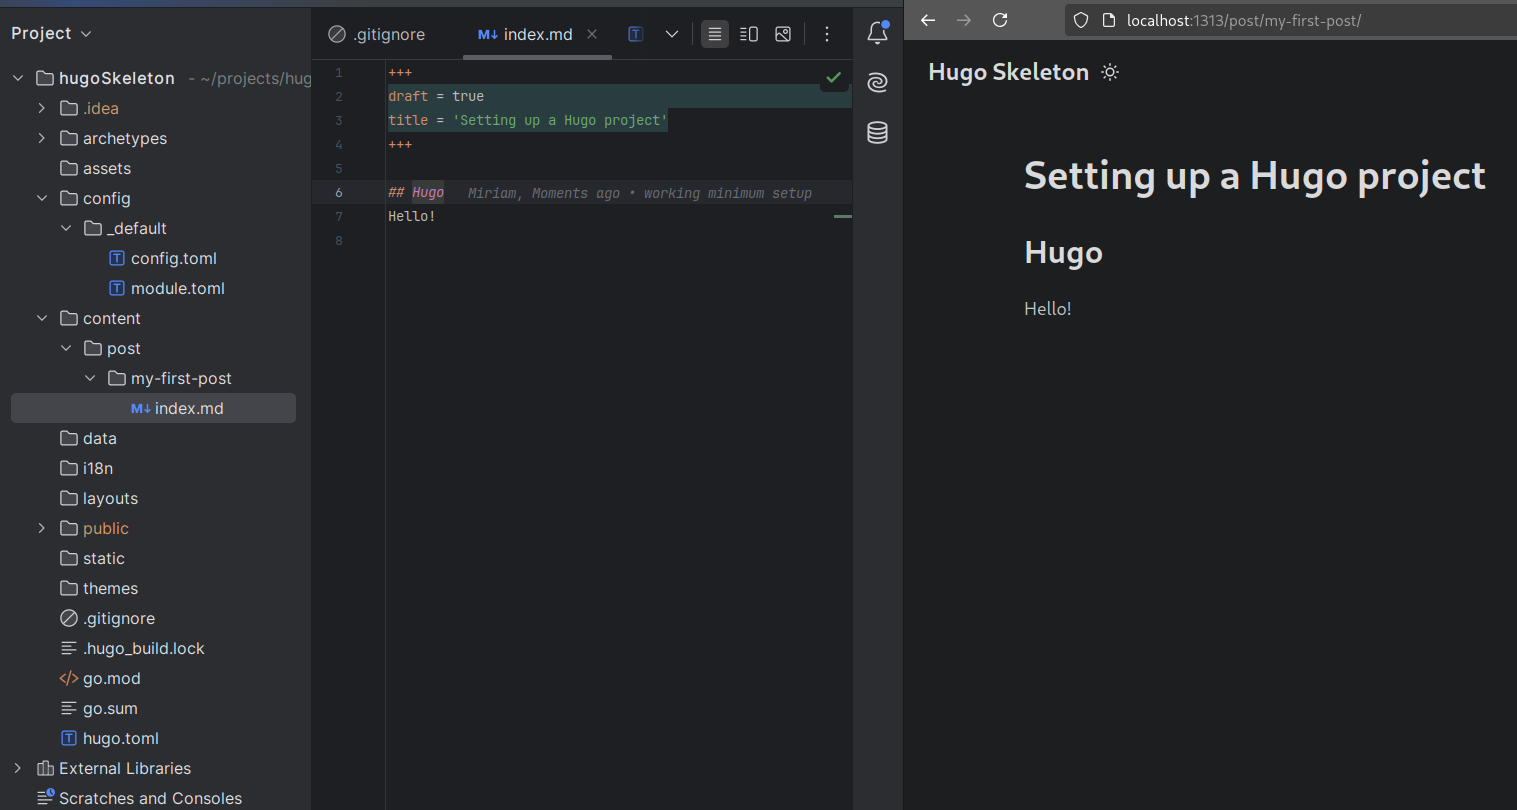
Let's break down the role of each directory, referencing the structure in the image above.
How To Build a Blazing Fast Static Site With Hugo
The article 'How To Build a Blazing Fast Static Site With Hugo' offers clear, concise explanations for each directory. We will read through the relevant subsections to solidify our understanding.
Please read the following subsections: 'Hugo’s Content Folder', 'Hugo’s Layouts Folder', 'Hugo Data Folder', and 'Hugo Static Folder'. As you read, notice the analogies to CMS concepts like 'custom post types' and the 'media library'.
Now, let's synthesize what you've read and connect it to our "vibe coding" goal.
1. The content Directory
- Purpose: This is where the primary content of your website lives. Each Markdown file (
.md) in this folder typically corresponds to a single page on your site (e.g., a blog post, an "About Us" page, a service page). - CMS Analogy: This is the direct equivalent of the 'Posts' and 'Pages' sections in WordPress. The subfolders you create here, like
/content/blog/or/content/case-studies/, function much like custom post types or categories, providing a powerful way to organize your site structure—a concept you're very familiar with from an SEO perspective. - Your AI Workflow: This directory is the destination for the content you'll manage in Google Sheets. Your workflow will involve syncing a sheet of blog posts, for example, into a series of Markdown files inside
/content/blog/.
2. The layouts Directory
- Purpose: This folder contains the HTML templates that define how your content is displayed. Hugo's templating engine combines these layouts with your Markdown files to generate the final site. This is where you'll find files for single pages, list pages, and reusable components called "partials" (like headers and footers).
- CMS Analogy: This is your theme layer. In WordPress, this would be the theme folder containing PHP files like
single.php(for a single post),archive.php(for a list of posts), andheader.php(a partial). - Your AI Workflow: This is where your AI assistant will do most of its work. You will write prompts asking it to generate the HTML and template logic for your homepage, a blog post design, a services page, and more. The generated
.htmlfiles will be saved here.
3. The static Directory
- Purpose: This folder is for any file that doesn't need to be processed by Hugo. Files here are copied directly into the final
publicdirectory as-is. This is the place for images, fonts, PDFs, and crucial SEO files likerobots.txtor site verification files. - CMS Analogy: This is similar to the 'Media Library' in WordPress, but for any type of static asset, not just media.
- Your AI Workflow: When you need to add a logo, a hero image, or a downloadable file, you will place it in the
staticdirectory. Your AI-generated templates will then reference these files with a simple path (e.g.,/images/logo.png).
4. The data Directory
- Purpose: This directory holds structured data in formats like JSON, YAML, or TOML. This data doesn't create pages on its own but can be pulled into any template. It acts like a mini, file-based database for your site.
- CMS Analogy: This is more flexible than what most standard CMS offer out-of-the-box. It's like having a set of global options or a repository of structured information (like a list of team members, office locations, or testimonials) that you can easily use anywhere on your site.
- Your AI Workflow: This directory is critical for your goal of building complex layouts from Google Sheets. You will sync sheets that contain non-page content—like the different sections of a homepage—into a single file like
data/homepage.json. Your homepage template inlayouts/will then read this file to build the page dynamically.
Test your understanding!
You want to add a "Our Team" section to your company's "About Us" page. Your plan is to manage the list of team members (with their name, title, and headshot filename) in a Google Sheet for easy updates by the HR department.
Which Hugo directories will be involved, and what is the specific role of each in making this happen?
Show answer
Three directories are primarily involved:
data: The Google Sheet with team member information would be synced to a file here, for exampledata/team.json. This makes the structured data available to the whole site.static: The headshot image files (e.g.,jane-doe.jpg) would be placed in a subfolder here, likestatic/images/team/.layouts: The template for the "About Us" page (e.g.,layouts/_default/single.html) would contain the code to read thedata/team.jsonfile, loop through each team member, and generate the HTML to display their name, title, and the image from thestaticdirectory.
A Comprehensive Reference
We've focused on the four most common directories, but Hugo creates a few others as well. The official documentation provides a complete list, which serves as an excellent reference.
The official Hugo documentation provides a definitive guide to the entire directory structure. This is a great resource to bookmark.
Review the table under the 'Directories' heading. You'll see the four we've discussed, plus others like archetypes (templates for new content) and public (the final generated site).
Conclusion
You now have a solid mental map of a Hugo project's structure. Understanding the distinct roles of these directories is the key to organizing your site and, more importantly, to effectively directing your AI tools to build the site for you.
Key Takeaways:
content: Contains your site's pages, written in Markdown. It's the what.layouts: Contains the HTML templates that render your content. It's the how.static: Holds assets like images and CSS that are copied over without changes.data: Stores structured data (like JSON) that can be used anywhere in your templates, perfect for feeding content from a Google Sheet.
Preview of the next lesson:
In our next lesson, we will tie everything together. We will formally define the "vibe coding" development cycle: transforming an idea into a Google Sheet, using an AI prompt to generate the necessary code, placing that code into the correct directories (layouts, data), and refining the result. You'll see exactly how the knowledge from today fits into a practical, repeatable workflow.