Hello! In our last lesson, we created a high-level map of the LLVM project, identifying its core components, key subprojects like Clang and MLIR, and the monorepo structure where they all reside. You now know what the pieces are and where to find them in the source tree.
Today, we take the next logical and most crucial step for any aspiring contributor: we will get that source code onto your machine, configure it, and compile it from scratch. This process is a rite of passage for every LLVM developer. It transforms the abstract project into a tangible set of tools you can run, debug, and modify. We will use the industry-standard tools Git, CMake, and Ninja to manage this complex but powerful process. By the end of this lesson, you will have a complete, self-built LLVM toolchain, ready for exploration and your first contributions.
Prerequisites: Preparing Your System
Building LLVM is a resource-intensive task. Before we begin, it's important to ensure your development environment is properly set up. You'll need a significant amount of disk space, memory, and CPU time. A debug build, which we will aim for, can consume over 100 GB of disk space and a substantial amount of RAM during the linking phase.
The official "Getting Started" guide provides a detailed list of requirements.
Getting Started with the LLVM System
This document outlines the hardware, software, and C++ toolchain requirements for building LLVM. It's essential reading to ensure your system is ready.
Please review the "Requirements" section. Pay close attention to these subsections: Hardware requirements: Note the disk space and time estimates. Don't be surprised if a full build takes over an hour on a powerful machine. Software requirements: Confirm you have modern versions of CMake and Python installed. We'll be using Ninja, so it's a good idea to install that as well (sudo apt-get install ninja-build on Debian/Ubuntu, or via your system's package manager). Host C++ toolchain: This is a critical point. LLVM development pushes the boundaries of C++, so an up-to-date C++ compiler (GCC, Clang, or Visual Studio) is mandatory. The document lists the minimum required versions.
Step 1: Cloning the Monorepo
As we discussed in the previous lesson, the entire LLVM project and its subprojects are hosted in a single Git repository, called a monorepo. Your first step is to clone this repository to your local machine.
Open your terminal and run the following command. This will download the entire history of the project, which is large but essential for tools like git bisect that we will cover later.
git clone https://github.com/llvm/llvm-project.git
This will create a directory named llvm-project containing all the source code. For the rest of the lesson, we'll assume you are working in a directory that is a sibling to llvm-project.
Step 2: The Build Process Demystified: CMake and Ninja
Before we type the build commands, it's vital to understand what they do. LLVM uses CMake as its build system. However, CMake is a meta-build system or a build system generator. It doesn't compile the code itself. Instead, it reads configuration files (CMakeLists.txt) throughout the source tree and uses them to generate build files for a native build tool.
The native build tool we'll use is Ninja. Ninja is a small, minimal build system that is optimized for one thing: speed. It's designed to start building your code as fast as possible, which is a huge quality-of-life improvement for a project the size of LLVM.
This two-step process can be visualized as follows:
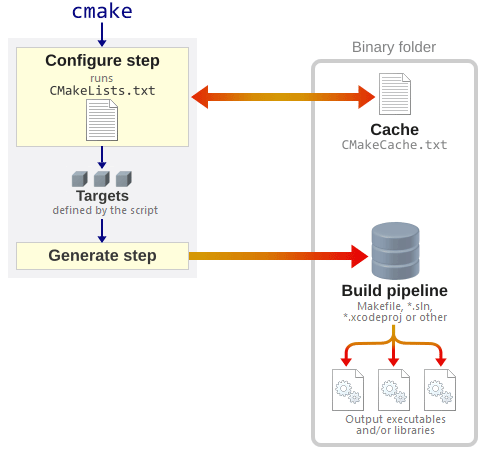
This "out-of-source" build, where the generated files are kept in a separate directory from the source code, is a standard best practice that keeps the source tree clean.
Step 3: Configuring Your Build with CMake
This is the most important step. The way you configure the build determines what components are built, how they are optimized, and what debugging features are enabled. We'll create a build directory and run cmake from there.
# Create a directory to hold the build artifacts
mkdir llvm-build
cd llvm-build


# Run CMake to configure the build
cmake -G Ninja ../llvm-project/llvm \
      -DCMAKE_BUILD_TYPE=Debug \
      -DLLVM_ENABLE_PROJECTS="clang;lld" \
      -DLLVM_ENABLE_ASSERTIONS=ON \
      -DLLVM_TARGETS_TO_BUILD="X86" \
      -DLLVM_USE_LINKER=lld
This command looks complex, but it's just a series of options passed to CMake. Let's break it down:
cmake -G Ninja ../llvm-project/llvm: This is the core command.-G Ninjatells CMake to generate build files for Ninja.../llvm-project/llvmis the path to the top-levelCMakeLists.txtfile for the LLVM core project.
-DCMAKE_BUILD_TYPE=Debug: This is one of the most critical settings. It controls optimization levels and the inclusion of debug symbols.Debug: No optimizations, full debug information. Makes compilation faster and is essential for stepping through code in a debugger, but results in slow-running tools. This is what we need for later lessons on debugging Clang.Release: Full optimizations, no debug information. Produces fast tools but is impossible to debug.RelWithDebInfo: Fully optimized code with debug information. A good compromise, but can be confusing to debug as optimizations can reorder/eliminate code.
-DLLVM_ENABLE_PROJECTS="clang;lld": This tells CMake which subprojects to build alongside the core LLVM libraries. We are enablingclang(the C/C++ frontend) andlld(the fast linker). If you wanted to work on the debugger, you would addlldbhere.-DLLVM_ENABLE_ASSERTIONS=ON: This is non-negotiable for development. It compiles in assertions (assert()) that perform internal consistency checks. When an assertion fails, it indicates a bug in LLVM itself. Running with assertions enabled is the best way to catch errors early.-DLLVM_TARGETS_TO_BUILD="X86": LLVM is a cross-compiler, capable of generating code for many architectures (ARM, MIPS, PowerPC, etc.). This option restricts the build to only include the backend for the architecture you specify (in this case, X86 for Intel/AMD CPUs). This can dramatically reduce build times.-DLLVM_USE_LINKER=lld: This instructs the build process to use LLVM's own linker,lld, to link the LLVM tools themselves. On many platforms,lldis significantly faster than the default system linker, which provides another major build time reduction.
While we use the command line, many IDEs provide a graphical interface for these same settings. The concepts are identical.

Step 4: Compiling with Ninja
Once CMake has successfully configured the project, you'll see a message like Configuring done and Generating done. Now, all the hard work is done. To start the compilation, simply run Ninja.
# From within the 'llvm-build' directory
ninja
This command will build all the projects you enabled. If you only want to build one, like Clang, you can specify it as a target:
ninja clang
Now is a good time to get a coffee. This process will take a while as it compiles millions of lines of C++ code. Your CPU fans will spin up, and your system will be busy.
After the build completes successfully, you will find all the tools you've built (like clang, llc, and opt) inside the llvm-build/bin directory. Congratulations, you have a working, self-hosted LLVM toolchain!
Pro-Tips for an Efficient Workflow
Building LLVM is a recurring task, and optimizing it is key to developer productivity. The developer community has converged on a set of best practices, many of which are summarized in the resources.
Getting Started with the LLVM System
This section focuses on common problems, especially those related to memory and build time.
Read the section on common problems. It reiterates the advice we've discussed: use Ninja, use LLD, limit targets, and consider your build type carefully.
How to contribute to LLVM | Red Hat Developer
This article from Red Hat provides a concise, opinionated guide to setting up a development environment, reflecting the practices of experienced contributors.
Read the sections on setup and the recommended commands. The author advocates for Release builds with assertions enabled (-DCMAKE_BUILD_TYPE=Release -DLLVM_ENABLE_ASSERTIONS=true). This creates fast-running tools that still perform internal checks, a common setup for developers who aren't actively using a debugger but are running tests or analyzing performance.
For now, our Debug build is the right choice as it prepares you for the debugging-focused lessons to come. But keep the Release + assertions configuration in mind for the future.
Conclusion
In this lesson, we transitioned from theory to practice, taking the essential steps to build your own personal LLVM toolchain from source. This is a significant milestone that unlocks your ability to modify, test, and contribute to the project.
Key Takeaways:
- LLVM uses a two-stage build process: CMake configures and generates the build files, and Ninja executes the build with high efficiency.
- Building "out-of-source" (in a separate
builddirectory) is standard practice and keeps the source tree clean. - The
cmakecommand's-Dflags are powerful levers for controlling what is built and how. Key options includeCMAKE_BUILD_TYPE,LLVM_ENABLE_PROJECTS, andLLVM_ENABLE_ASSERTIONS. - You can drastically improve build performance by using Ninja, LLD, and limiting the enabled projects and target architectures.
You now have a fully functional build of LLVM in llvm-build/. In our next lesson, we will put this build to use. We'll learn how to recompile LLVM with AddressSanitizer (ASan), a powerful tool for finding memory-related bugs, which is an indispensable skill for anyone working on a large C++ codebase like LLVM.