Introduction
In our last session, we delved into the engineering of attachment points, focusing on how to securely anchor heavy, non-fabric elements to a garment. We established that the key is to combat stress concentration by distributing the load across the garment's structure. Now, we shift our focus from the micro-level of a single attachment to the macro-level of the entire design. This lesson addresses the crucial balance between aesthetic desire and physical reality: where should you place ornamentation for maximum visual impact without compromising the garment's integrity?
This is not just a question of taste, but a complex interplay of physics, materials science, and artistic vision. For a Bollywood costume, which must be both dazzling up close and structurally sound through hours of high-impact choreography, this balance is everything. We will explore how to analyze a design for its structural strengths and weaknesses and how to use reinforcement not just as a corrective measure, but as a proactive design tool that enables ambitious embellishment.
The Principle of Integrated Design: Structure and Aesthetics
A common mistake in decorative garment design is to treat embellishment as a final layer applied to a finished item. This approach inevitably leads to sagging, distortion, and failure. The weight of ornamentation must be considered from the very first sketch. The structural support system and the aesthetic surface design must be conceived and developed in parallel.
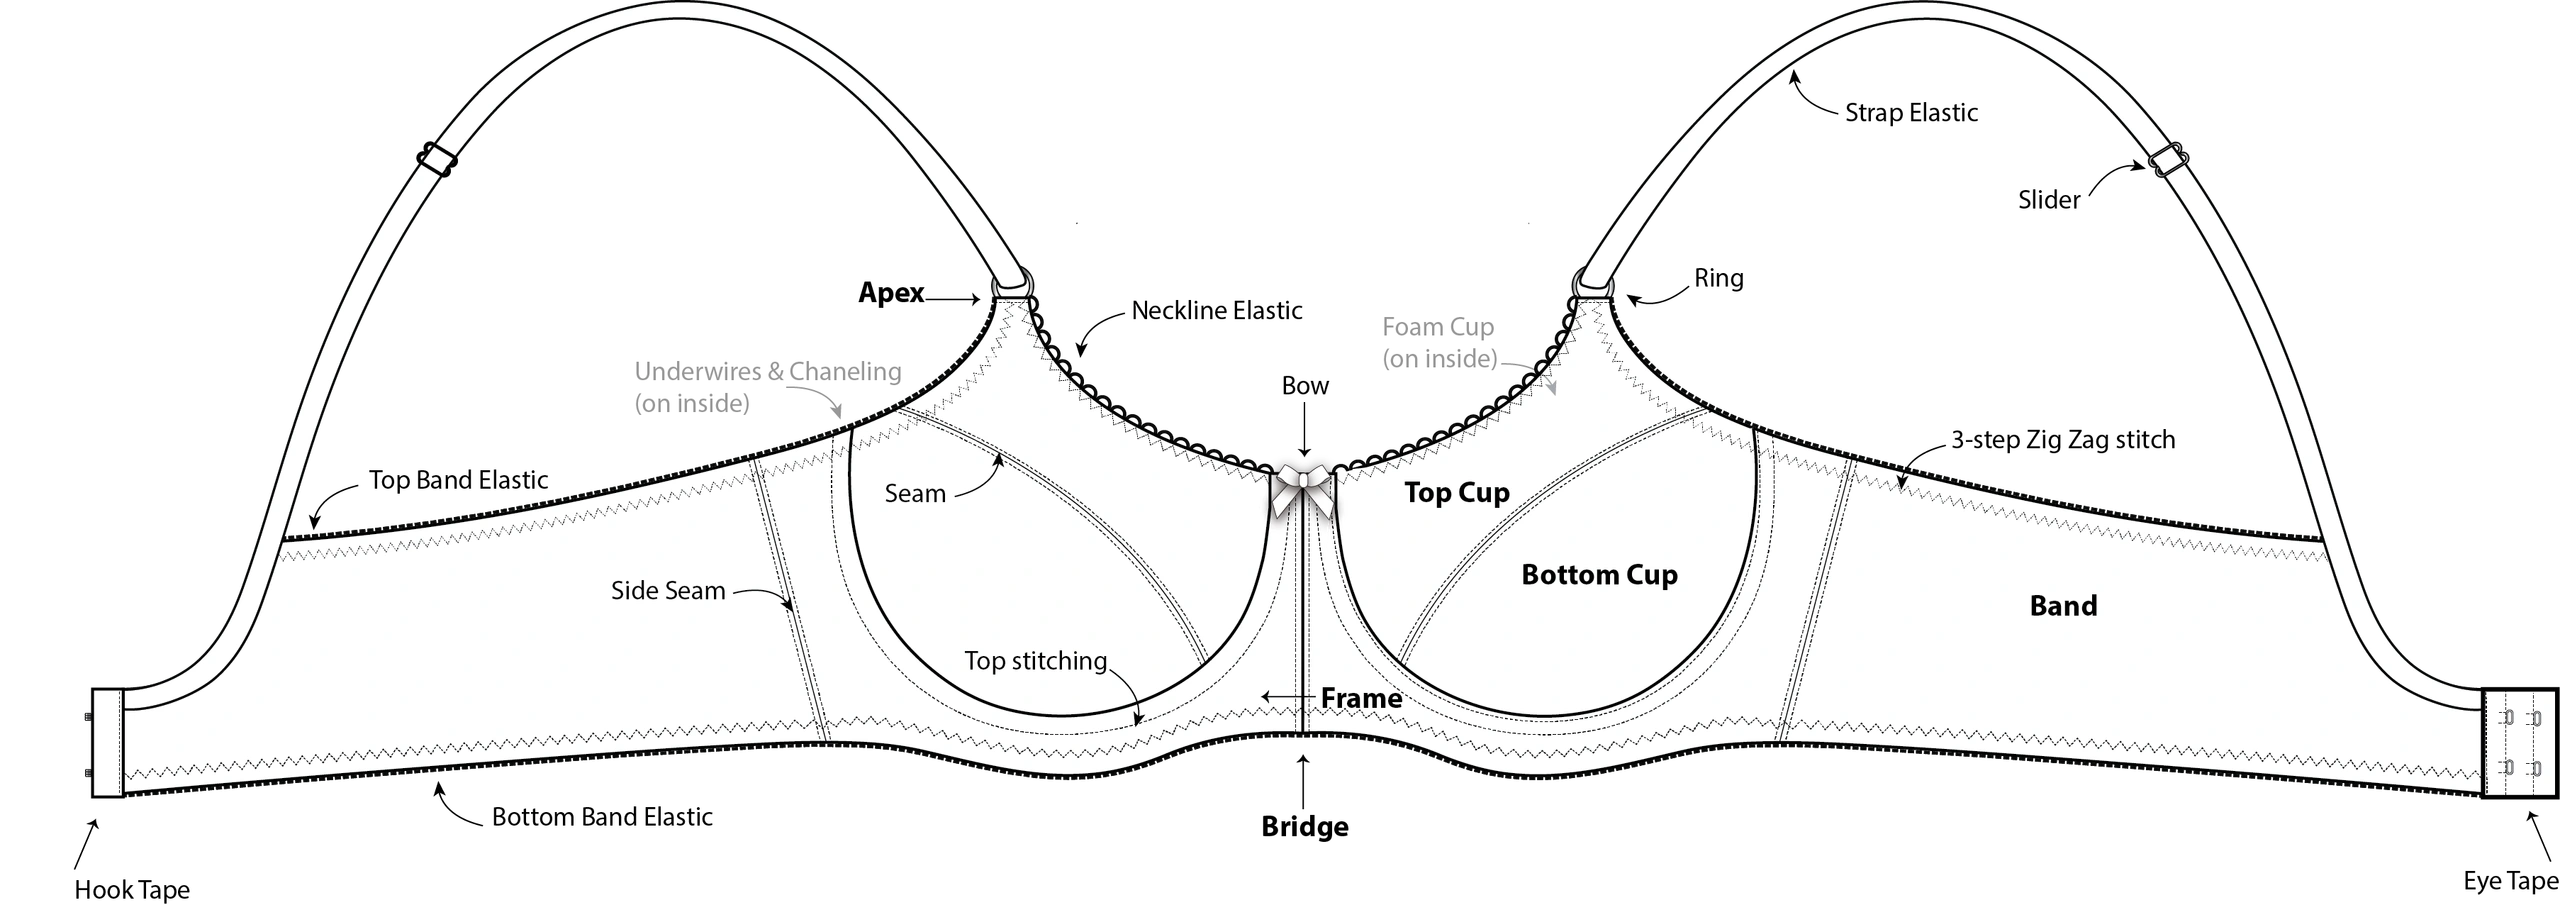
Think of the bra not as a blank canvas, but as a structural map with inherent strengths and weaknesses.
- Strong Zones: These are the load-bearing lines and points of the garment. They include the seams (especially vertical cup seams and where multiple seams converge), the area directly over the underwire channeling, the center gore (bridge), the side seams, and the strap attachment points.
- Weak Zones: These are areas with minimal internal support. They include the center of a single piece of fabric (like a seamless foam cup), unsupported top or bottom edges, and areas made of delicate or very stretchy materials.
Your primary goal is to direct the forces exerted by your embellishments along the strong zones and away from the weak ones. When your design requires placing weight in a weak zone, you must transform it into a strong one.
Reinforcement: Turning a Canvas into a Scaffold
The most powerful tool for managing the weight of ornamentation is reinforcement. For heavily embellished bras, like those used in belly dance or Bollywood, the original bra cup is often just a form; its structural capacity is created by adding layers of reinforcement. This process turns a soft cup into a rigid, load-bearing shell.
The following reading from Sparkly Belly, a resource for belly dance costumers, provides an excellent, detailed guide on this process. The challenges of supporting heavy coin or crystal work in belly dance are directly analogous to those in Bollywood.
How to Reinforce Bra Cups for Belly Dance Costumes with Chani Pt 1 - SPARKLY BELLY
This article explains the entire process of reinforcing a standard foam-cup bra to prepare it for heavy decoration. It's a foundational technique for any designer working with embellishments.
Read the article from the beginning. Pay close attention to these key concepts: The 'Why': Understand the initial explanation of why reinforcement is necessary to prevent cups from deforming under weight. The Material: Note the detailed discussion on what interfacing is, its different types, and why the author prefers woven cotton. The point about dyeing the interfacing is a perfect example of balancing structural needs with aesthetic considerations to prevent color distortion in the final garment. The Tools: The section on tools emphasizes the importance of a curved pressing surface. This is critical; fusing interfacing to a cup on a flat surface will destroy its three-dimensional shape, ruining both fit and aesthetic. The Technique: Study the step-by-step process of applying the interfacing. The most crucial takeaways are cutting the strips on the bias for flexibility, overlapping them to create a double layer, and pressing carefully on a ham to preserve the cup's curve. Notice how you are essentially building a new, stronger structure on top of the old one.
After studying this method, you can see that the bra cup is no longer just foam; it has become a composite material engineered to bear a specific load. You have actively redesigned its structural properties.
Strategic Placement: Working With, Not Against, Physics
Once you have a reinforced foundation, you can begin placing your embellishments. The strategy is to align the weight with the structure you’ve built.

The design of the costume above demonstrates two key placement strategies:
-
Aligning with Structural Lines: The heaviest and largest crystals are not scattered randomly. They are concentrated along the neckline, the underwire line, and the band. These areas are either seams or edges that have been heavily reinforced (as we learned in the Sparkly Belly article) and can handle the load. This creates a visual outline that enhances the bra's shape while being structurally sound.
-
Creating Stabilized Fields: Sometimes, an aesthetic requires a dense field of embellishment across a wider area, not just along a line. This is where the concept of an underlining becomes critical. Rather than reinforcing with strips, you stabilize the entire piece of fashion fabric before it's even sewn into the bra. This technique, borrowed from couture sewing, creates a stable "island" that can support weight.
The following article from Threads magazine, while demonstrating on a skirt, perfectly explains the principle of using a silk organza underlining to manage heavy, embellished fabric.
Working with Embellished Fabrics, Part 2 - Threads
This article provides high-level techniques for handling fabrics that are already heavily embellished. The principles are directly applicable to constructing a bra from such materials.
Please read the following sections: Focus on step 1, "Stabilize the heavy fabric." The technique of tacking a silk organza underlining to the fashion fabric is a fantastic way to add strength without bulk. Also, note the brilliant use of a selvedge strip at the top edge to prevent stretching—a perfect solution for the neckline of a heavy bra. In step 2, review the method for hand-sewing the zipper. The emphasis on using strong, waxed thread and close stitches is a lesson in creating secure closures that can withstand the strain of a heavy garment. This applies equally to a bra's hook-and-eye closure. Finally, look at step 5, which discusses prickstitching the lining to the garment. This step mechanically joins the lining to the fashion fabric and underlining, ensuring the entire system works as a single unit to manage weight and prevent sagging or twisting.
Case Study Synthesis: Designing a "Crystal Cascade" Bra
Let's synthesize these concepts to solve a typical Bollywood design problem.
The Scenario: You are tasked with creating a bra for a lead actress in a lavish item number. The director wants a "dripping diamonds" effect, with a dense cascade of crystals originating from the center gore and spreading out over the cups.
The Analysis:
- Aesthetic Goal: A fluid, heavy cascade of crystals.
- Structural Challenge: The design concentrates immense weight at the center front (a weak point) and pulls downwards and forwards, threatening to collapse the cups and create sag.
This is an optimization problem where we must satisfy the aesthetic constraint (the cascade effect) while adhering to the physical constraints of the materials and gravity.
The Integrated Design Solution:
- Foundation: We begin with a strong multi-part cup pattern, as the seams will provide our initial structural lines.
- Cup Reinforcement: Using the technique from the Sparkly Belly article, both cups are fully reinforced with two layers of fusible woven interfacing, cut on the bias and fused over a tailor's ham to preserve their shape perfectly.
- Neckline & Gore Stabilization: Before assembly, the top edge of each cup pattern piece is stabilized with a sewn-in strip of silk organza selvedge, as shown in the Threads article. The center gore pieces are also backed with a stable, non-stretch fabric.
- Load-Bearing Anchor: At the center gore, where the cascade originates, we don't just sew the main jewel to the fabric. We use the "internal plate" or "reinforced tab" method from our previous lesson, anchoring the primary weight to the bra's core frame.
- Aesthetic Weight Distribution: Now we place the crystals. The largest, heaviest crystals are hand-sewn along the strong seam lines of the cups and the stabilized neckline. Their weight is borne by these reinforced structural lines.
- The Illusion of Density: Smaller, lighter crystals are then used to fill the "fields" over the reinforced cup panels. From a distance, the effect is of a uniformly dense cascade, but we have strategically placed the weight. The density of embellishment is varied according to the load-bearing capacity of the underlying area.
- Final Assembly: The bra is constructed, and a smooth, stable lining is prickstitched to the cup's inner layer. This ensures the lining, reinforcement, and fashion fabric move as one, preventing any internal shifting and supporting the entire structure.
The final product achieves the aesthetic vision not by fighting physics, but by respecting it. The structure is not hidden; it is an integral, albeit invisible, part of the beauty.
Conclusion
Balancing aesthetics and structure is the defining challenge of designing high-impact, embellished garments. It requires you to think simultaneously as an artist and an engineer. Today, you've learned to move beyond simply decorating a surface to designing a complete, integrated system where the support structure is as important as the visible ornamentation.
Key Takeaways:
- Embellishment and structural design must be developed in parallel, not sequentially.
- Reinforcement with materials like fusible interfacing transforms a simple bra cup into an engineered, load-bearing component.
- Always map the load paths. Place the heaviest elements along the garment's strong structural lines (seams, reinforced edges).
- Use underlining and prickstitching techniques to create stabilized "fields" that can support embellishment in areas away from seams.
- The final aesthetic is an illusion created by the intelligent distribution of weight across an engineered foundation.
Next Lesson Preview
We have now completed our deep dive into the engineering of surface design. We've learned to reinforce fabrics, create secure attachment points, and strategically place embellishments. It's time to put these components together. In our next module, "Professional Bra Construction Techniques," we will begin with the fundamental task of building the bra itself. Our first lesson will focus on how to construct a three-part cup, ensuring the precise seam alignment necessary for the smooth shape and superior support that all of these advanced techniques rely upon.