Hello! Welcome back to your Kubernetes crash course.
In our last lesson, we explored how a Pod gets an identity using a ServiceAccount and its auto-mounted token. We saw that this identity is authenticated by the API server, but the default ServiceAccount has no permissions, leading to 403 Forbidden errors. This distinction between authentication (who you are) and authorization (what you can do) is critical.
Today, we'll take the next logical step. Your learning outcome is to create ServiceAccounts and use them in Pods. We will move away from the powerless default account and start building dedicated identities for our applications. This is the cornerstone of implementing the principle of least privilege for in-cluster workloads.
This process is directly analogous to your work with cloud IAM. Instead of letting all your applications run with a generic, default identity, you create specific IAM Roles (in AWS) or Managed Identities (in Azure) with tailored permissions for each service. We're doing the exact same thing, but within the Kubernetes ecosystem.
1. Why Create Custom ServiceAccounts?
Before we jump into the "how," let's solidify the "why." Using the default ServiceAccount for all your applications is a security anti-pattern. If you grant permissions to the default account to make one application work, you inadvertently grant those same permissions to every other application in that namespace that doesn't have a specific ServiceAccount assigned.
If a single one of those applications has a vulnerability, an attacker could potentially leverage the default ServiceAccount's permissions to move laterally within your cluster.
Creating A Kubernetes Service Account To Run Pods
The article 'Creating A Kubernetes Service Account To Run Pods' provides an excellent explanation of the security rationale behind this best practice.
Read the section titled 'Why Create A Service Account?'. Focus on the security implications of using a single, shared identity for all workloads.
By creating a unique ServiceAccount for each application or logical group of applications, you isolate their identities and can grant them only the precise permissions they need to function.
2. Creating and Assigning a ServiceAccount
Creating and using a new ServiceAccount is a two-step process:
- Define and create the ServiceAccount object itself.
- Modify your Pod's manifest to use this new ServiceAccount.
Given your experience with Terraform, you'll appreciate that the preferred way to manage Kubernetes resources is declaratively, using YAML manifests.
Step 1: Create the ServiceAccount
A ServiceAccount is a very simple object. At its most basic, it just needs a name.
apiVersion: v1
kind: ServiceAccount
metadata:
  name: my-app-sa
You can save this as a .yaml file and apply it with kubectl apply -f <filename>.yaml.
Step 2: Use the ServiceAccount in a Pod
To tell a Pod to use your new ServiceAccount, you add the serviceAccountName field to the Pod's spec.
apiVersion: v1
kind: Pod
metadata:
  name: my-app-pod
spec:
  serviceAccountName: my-app-sa  # This line assigns the ServiceAccount
  containers:
  - name: my-app-container
    image: nginx
When this Pod is created, the kubelet will mount the token from my-app-sa instead of the default one.
Configure Service Accounts for Pods
The official Kubernetes documentation, 'Configure Service Accounts for Pods', walks through these exact steps with clear examples.
Read the section 'Use more than one ServiceAccount'. Pay attention to the simple manifest for creating a ServiceAccount and the spec.serviceAccountName field used to assign it to a Pod.
3. A Complete End-to-End Demonstration
Let's watch a video that ties everything together. It will demonstrate creating a custom ServiceAccount, assigning it to a Pod, and then—crucially—showing how that Pod can be granted permissions that the default account doesn't have. This will give you a concrete example and a perfect preview of our next lesson.
The video 'RBAC in Kubernetes' by Pavan Elthepu provides a fantastic hands-on demonstration of this entire workflow.
Watch from 15:59 to 19:15. The video walks through the following sequence: (15:59) It introduces ServiceAccounts as identities for applications. (16:47) It creates a new ServiceAccount named test-sa. (17:03) It runs a Pod using the default ServiceAccount and shows that it's Forbidden from listing other Pods. (17:53) It updates the Pod to use the new test-sa and shows it is still forbidden (because the new SA has no permissions yet). (18:25) It then uses a RoleBinding to grant permissions to the test-sa. (18:55) Finally, it shows that the Pod, now using its empowered identity, can successfully list other Pods.
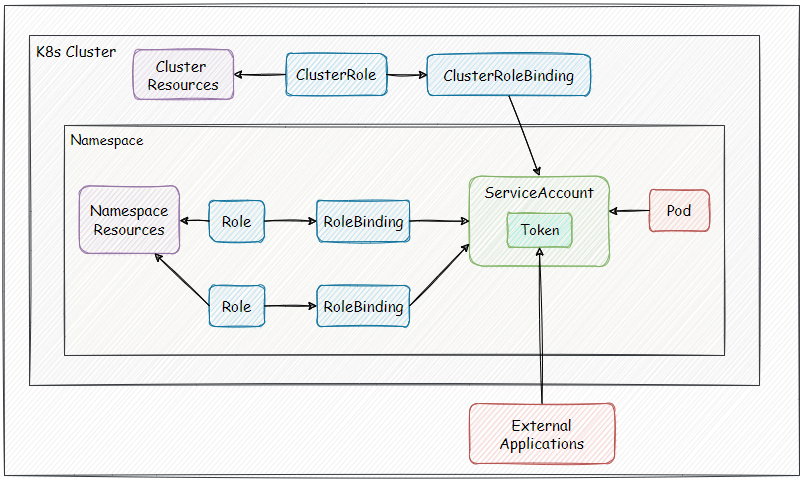
This demonstration makes the entire concept tangible. Creating a ServiceAccount gives your Pod a unique name badge (authentication), but that badge is useless until you add it to an access list (authorization via RBAC).
The diagram below visualizes this relationship. Our focus today is on the link between the Pod and the ServiceAccount. The video gave you a preview of how that ServiceAccount is then linked to permissions via a RoleBinding.
Test your understanding!
You are deploying a new CI/CD runner application as a Pod in the ci-runners namespace. This application needs to be able to create and delete other Pods in the same namespace. You want to follow the principle of least privilege.
- What is the first resource you should create to give this application a unique identity?
- How would you tell your runner Pod to use this identity? (Describe the field and value you would add to the Pod manifest).
- After deploying the Pod with its new identity, it tries to create another Pod and gets a
403 Forbiddenerror. Does this mean your configuration is wrong? What is the expected next step?
Show answer
- You should first create a
ServiceAccount, for example, with the nameci-runner-sain theci-runnersnamespace. - In your runner Pod's manifest, under
spec, you would add the fieldserviceAccountName: ci-runner-sa. - No, the configuration is not wrong; it's incomplete. The
403 Forbiddenerror is expected because the new ServiceAccount has been authenticated but has not yet been authorized. The next step is to create aRolethat allows creating and deleting Pods and aRoleBindingto grant that Role to theci-runner-saServiceAccount.
Conclusion
You've now learned the practical steps for creating and assigning unique identities to your in-cluster applications. This is a fundamental security practice in Kubernetes that moves you from a novice user to a security-conscious platform engineer.
Key Takeaways:
- Always create custom ServiceAccounts for your workloads to adhere to the principle of least privilege. Avoid granting permissions to the
defaultServiceAccount. - A ServiceAccount is a simple API object created via a YAML manifest or
kubectl create serviceaccount. - Assign a custom ServiceAccount to a Pod by setting the
serviceAccountNamefield in the Pod'sspec. - A new ServiceAccount has an identity but no permissions by default. Granting permissions is a separate authorization step.
Next Up:
In this lesson, we saw a preview of how a RoleBinding can grant permissions. In our next session, we will dive deep into that topic. You will learn to configure namespace-scoped RBAC using Roles and RoleBindings, giving you full control over what your applications are allowed to do.