Hello! Welcome to the fourth lesson in our Kubernetes Core Concepts module.
In our last session, we delved into the heart of the control plane, focusing on how the API server acts as the gateway to the cluster and how etcd serves as the single source of truth, storing the cluster's state. We touched upon the idea that etcd holds both the desired state (what you want) and the actual state (what's currently running).
Today, we're going to explore the philosophy behind how you communicate that desired state to Kubernetes. This lesson focuses on a fundamental concept that underpins all modern infrastructure automation: declarative management. By the end of this 60-minute lesson, you will be able to explain the concept of declarative management in Kubernetes and its significant benefits over an imperative approach. For a Platform Engineer like yourself, mastering this concept is crucial, as it's the foundation of Infrastructure as Code (IaC) and GitOps practices.
Two Ways of Giving Instructions: Imperative vs. Declarative
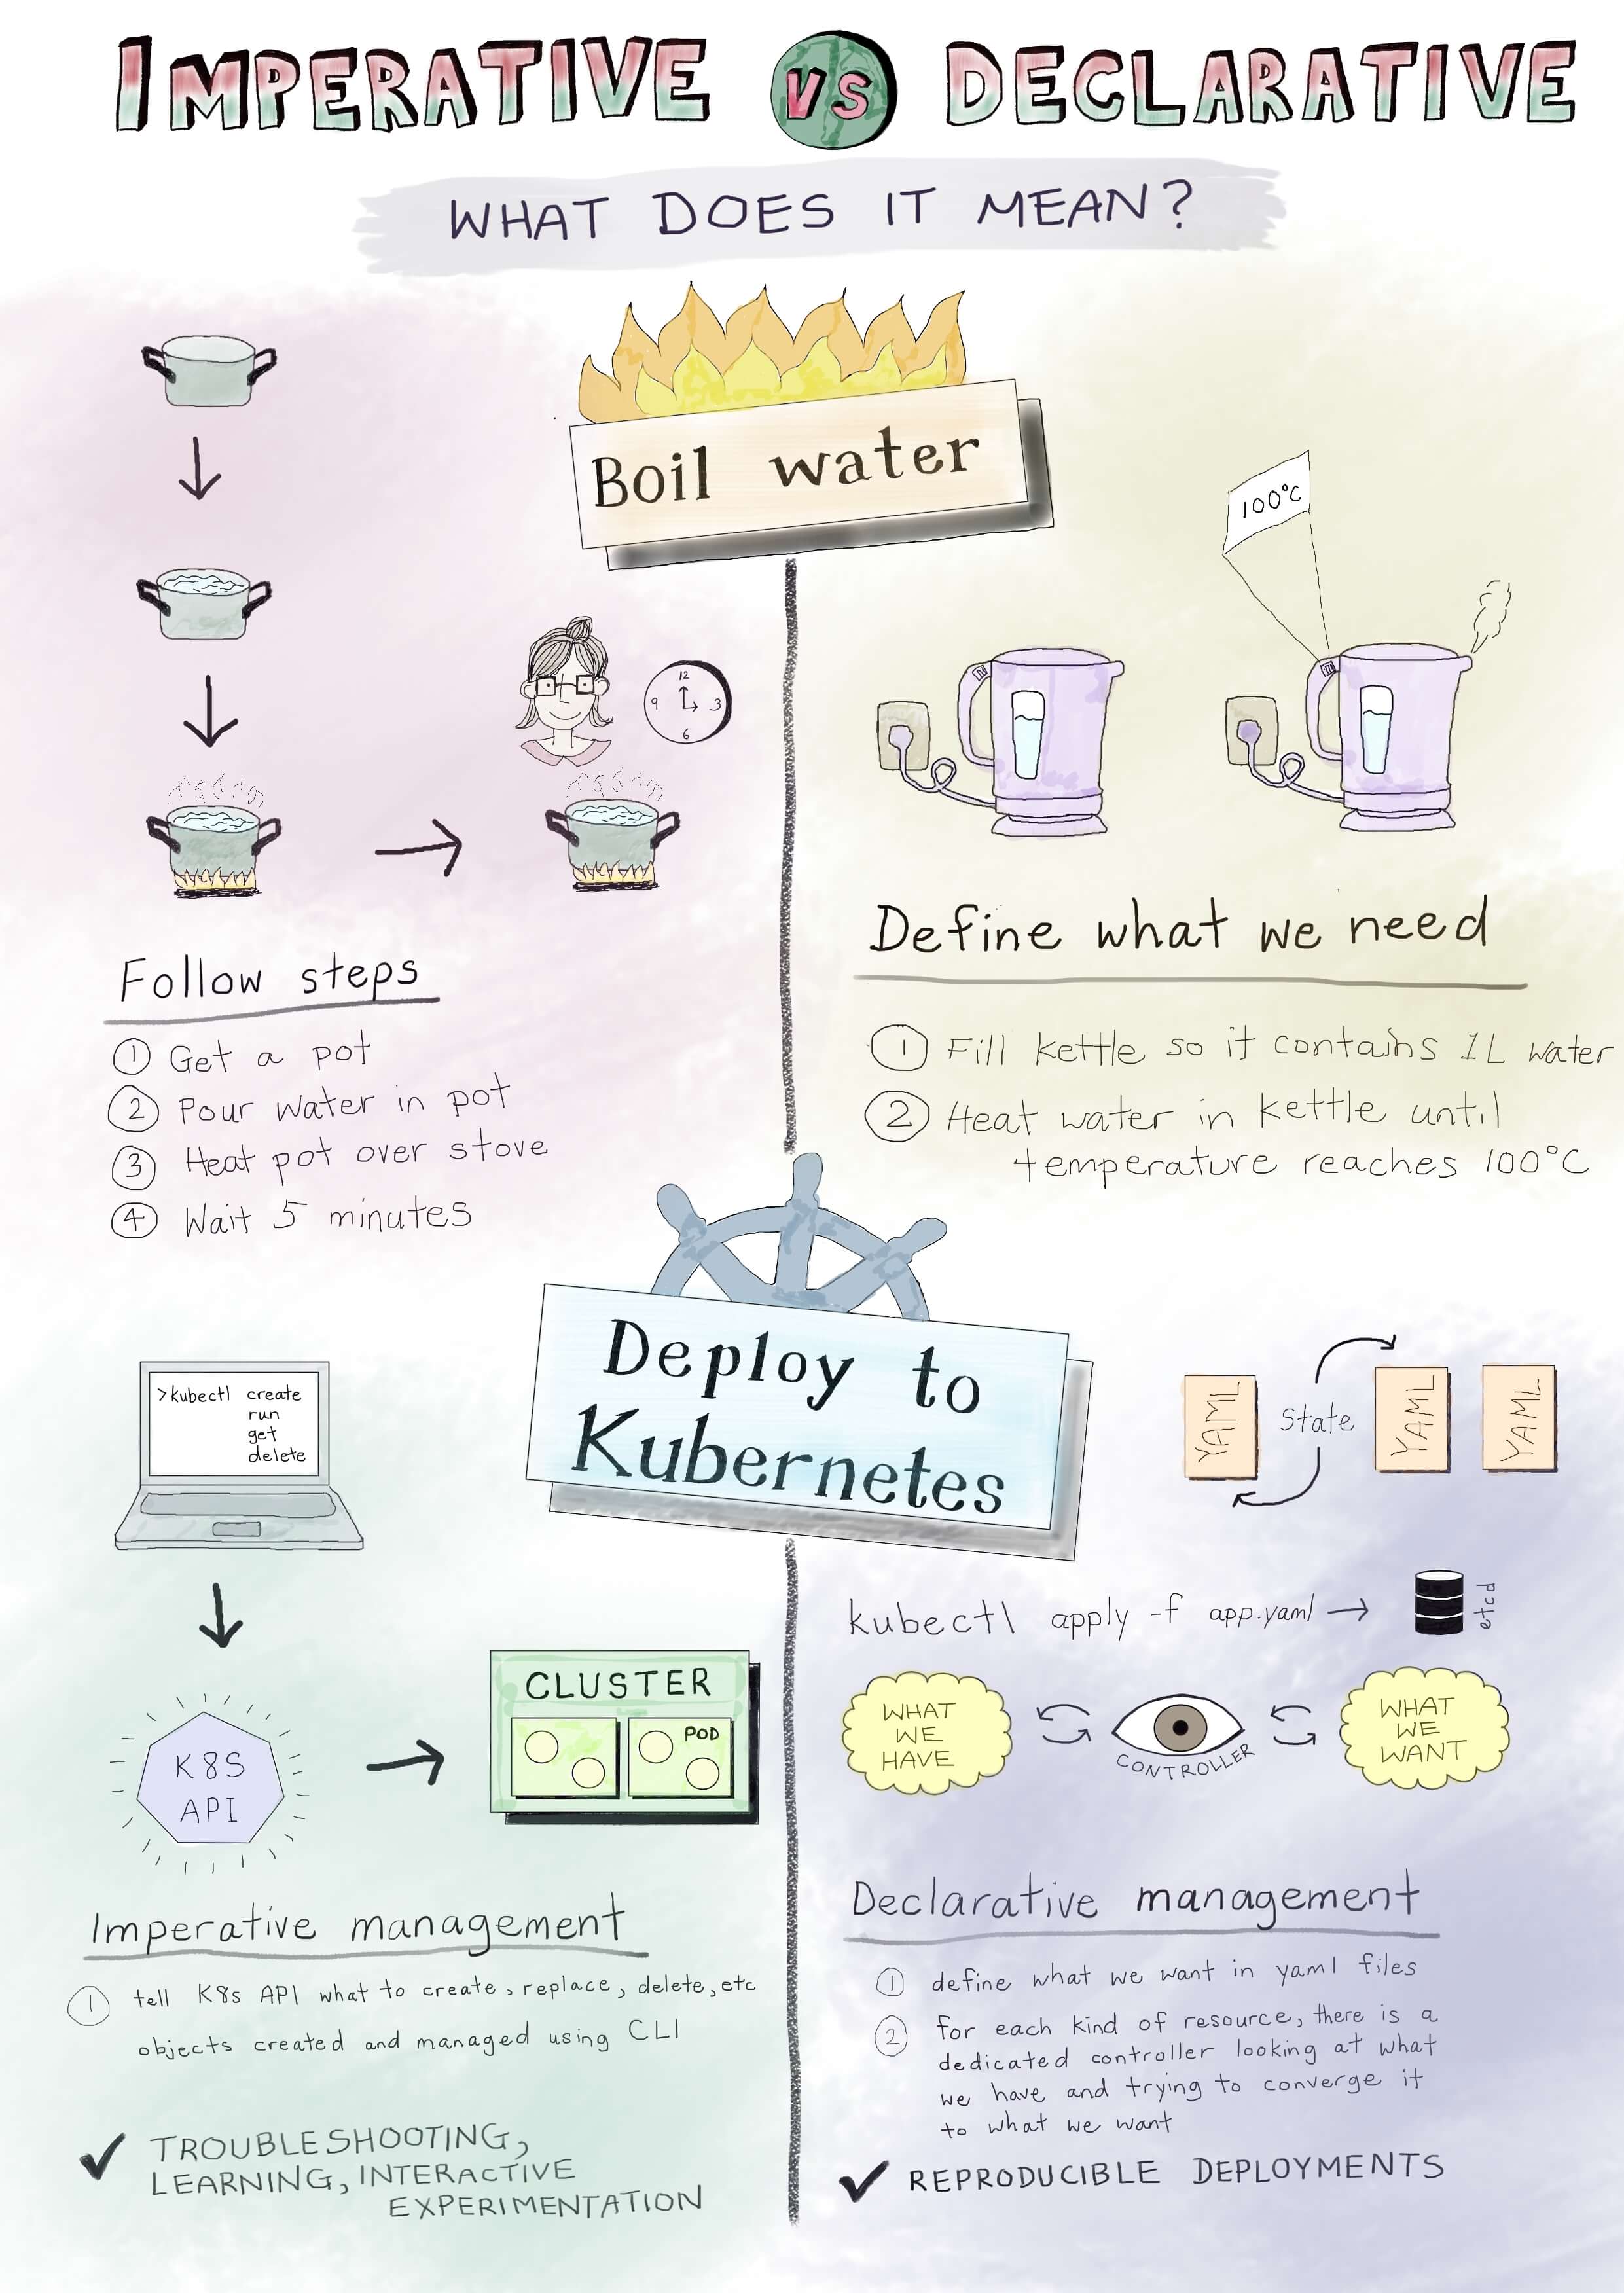
Imagine you're trying to get a taxi to a friend's house. You have two ways to do it:
- The Imperative Way: You tell the driver every single turn. "Drive forward 200 meters, turn left at the intersection, take the second exit at the roundabout, stop at the third house on the right." You are providing explicit, step-by-step instructions.
- The Declarative Way: You simply give the driver the destination address. The driver, knowing the city, figures out the best route, handles traffic, and deals with any detours. You've declared your desired end state, and the expert (the driver) handles the "how."
Kubernetes management follows these same two philosophies.
The Three Management Techniques
The official Kubernetes documentation outlines three ways to manage objects, which map onto these philosophies. Let's get a clear definition of each and their trade-offs.
The official Kubernetes documentation provides a concise comparison of the different ways to manage objects. This will give you a solid framework for understanding when and why to use each approach.
Read the sections titled 'Imperative commands', 'Imperative object configuration', and 'Declarative object configuration'. Pay close attention to the comparison table at the beginning and the 'Trade-offs' listed for each technique.
Based on your reading, here is a summary of the key distinctions:
| Approach | Description | kubectl command |
How it works | Best for... |
|---|---|---|---|---|
| Imperative Commands | You tell Kubernetes exactly what to do, right now. | run, create, scale, expose |
You execute a direct action on live objects in the cluster. | Quick tests, one-off tasks, learning, debugging. |
| Imperative Object Config | You tell Kubernetes to perform a specific action using a config file. | create -f, replace -f |
You provide a complete object definition in a file and explicitly tell Kubernetes to create or replace it. | A more structured approach than direct commands, but still requires manual state tracking. |
| Declarative Object Config | You describe the desired state of the system in config files. | apply -f |
You provide one or more manifest files, and kubectl figures out the necessary actions (create, update, patch) to make the live state match your declared state. |
Production environments, CI/CD pipelines, GitOps. |
Your experience with Terraform has already given you a strong foundation in declarative principles. Writing a .tf file to define your cloud infrastructure is directly analogous to writing a YAML manifest to define your Kubernetes resources. In both cases, you define "what" you want, and the tool's engine works to make it a reality.
How Kubernetes Achieves the Declarative Model
The real power of Kubernetes comes from how it makes the declarative model work. It's not just a one-time setup; it's a continuous process. This is accomplished by Controllers running a reconciliation loop.
You'll recall the kube-controller-manager from our first lesson. It's a collection of controllers (like the Deployment controller or ReplicaSet controller) that are the brains behind this process.
To understand this crucial mechanism, let's watch a video that explains it in detail.
Kubernetes Controllers Deep Dive: How They Really Work
This video from 'DevOps & AI Toolkit' does an excellent job of explaining the concept of controllers and their reconciliation loops, which are the engine of declarative management.
Please watch the following three segments: The introduction explaining the concept (00:00 - 02:30). The explanation of the control loop and idempotency (02:30 - 03:51). The detailed breakdown of the reconciliation process (11:46 - 16:46). Focus on how a controller continuously compares the 'desired state' with the 'current state' and takes action to close the gap.
The key takeaway from the video is this continuous cycle:
- Observe: The controller watches the API server for the current state of the resources it manages (e.g., how many Pods for a Deployment are actually running?).
- Compare: It compares this actual state to the desired state defined in the manifest you provided (which is stored in
etcd). - Act: If there's a difference (a "drift"), the controller takes action by making calls to the API server to correct it. For example, if a Pod has crashed, the actual state is 2 Pods, but the desired state is 3. The controller will act by creating a new Pod.
This loop runs continuously, making the system self-healing and resilient to failures.
Seeing It in Action: Imperative vs. Declarative kubectl
Now let's see how these concepts translate into actual kubectl commands. The following video walks through creating a Pod both imperatively and declaratively. It also includes a fantastic tip for generating YAML manifests automatically.
Day 7/40 - Pod In Kubernetes Explained | Imperative VS Declarative Way | YAML Tutorial
This video from 'Tech Tutorials with Piyush' provides a great practical demonstration. It will show you both approaches side-by-side.
Watch the following segments: Concept (02:26 - 05:44): A quick explanation of imperative vs. declarative. Imperative Demo (05:44 - 08:11): See how kubectl run creates a Pod directly. Declarative Demo (13:22 - 20:25): Understand the basic structure of a Pod YAML file and how kubectl apply -f is used to create and update it. The dry-run Trick (23:34 - 26:55): Learn a powerful technique to generate a YAML manifest from an imperative command. This is incredibly useful when you're learning or need a template.
The kubectl run my-pod --image=nginx --dry-run=client -o yaml command is a powerful tool in your arsenal. It lets you quickly generate a valid manifest that you can then save, modify, and check into version control, bridging the gap between quick experimentation and robust, declarative configuration.
Test your understanding!
You are managing a Deployment running nginx:1.20. A new security advisory requires you to update the application to nginx:1.21.
- How would you perform this update using a single imperative command?
- How would you perform this update using the declarative approach (assuming you have a
deployment.yamlfile)? - What is the main advantage of the declarative approach for this task in a production environment?
Show answer
-
Imperative: You would use the
kubectl set imagecommand:kubectl set image deployment/my-nginx-deployment nginx=nginx:1.21 -
Declarative: You would follow these steps:
a. Open yourdeployment.yamlfile.
b. Find the lineimage: nginx:1.20and change it toimage: nginx:1.21.
c. Save the file.
d. Runkubectl apply -f deployment.yaml. -
Main Advantage: The key advantage of the declarative approach is that the change is captured and versioned. The
deployment.yamlfile, likely stored in Git, now serves as the single source of truth. This provides an audit trail (who made the change and why), allows for peer review through pull requests, and makes the deployment easily reproducible in any other environment. The imperative command, while fast, leaves no record outside of shell history.
Conclusion
In this lesson, we've contrasted the imperative "how-to" approach with the declarative "what-I-want" approach for managing Kubernetes objects. You've seen that while imperative commands are useful for quick tasks, the declarative model is the cornerstone of building robust, reproducible, and automated systems—a primary goal for any Platform Engineer.
Key Takeaways:
- Imperative: You issue direct commands (
run,create,scale) to manipulate live cluster objects. It's fast but lacks a record of changes. - Declarative: You define the desired state in YAML manifest files and use
kubectl apply. This is the preferred method for production. - Reconciliation Loop: Kubernetes controllers continuously work to make the cluster's actual state match your declared desired state. This enables self-healing.
- Benefits: The declarative approach enables version control (GitOps), audit trails, peer review, and highly reliable, automated deployments.
In our next and final lesson for this module, we will discuss Namespaces. Now that you know how to declare objects, we'll look at how to organize and isolate them within the cluster, which is essential for managing multi-tenant or multi-environment clusters.