Hello! Welcome to the final lesson in our module on Persistent Storage Fundamentals.
In our last session, we put on the hat of a cluster administrator and provisioned a piece of storage by creating a hostPath PersistentVolume (PV). That PV is now in your cluster, with a status of Available, waiting to be used.
Today, we'll switch roles to that of an application developer. Our goal is to consume the storage that the administrator made available. We will first request a piece of that storage using a PersistentVolumeClaim (PVC) and then mount that claim into a running Pod. This will complete the fundamental workflow of decoupling application storage from the underlying infrastructure.
By the end of this lesson, you will be able to create and mount a PersistentVolumeClaim (PVC) in a Pod to consume persistent storage.
1. The Developer's Request: PersistentVolumeClaim
As an application developer, you shouldn't need to know whether the cluster's storage is provided by AWS EBS, an on-prem NFS server, or a hostPath on a node for local testing. Your application simply needs storage with certain characteristics: a minimum size and a specific access mode (e.g., can it be shared by multiple pods?).
This is precisely the purpose of a PersistentVolumeClaim (PVC). It is a request for storage. When you create a PVC, Kubernetes' control plane works to find a PV that satisfies the claim's requirements.
Day 29/40 Kubernetes Volume Simplified | Persistent Volume, Persistent Volume Claim & Storage Class
To visualize this relationship, let's watch a short video that uses a clear diagram to explain how a user's PVC is matched and bound to an administrator's PV.
Watch the segment from 09:43 to 16:58. Focus on the interaction between the 'Storage Admin' who creates PVs and the 'User' who creates PVCs. Pay attention to the two key criteria for a successful binding: sufficient capacity and matching access modes.
This decoupling is a core principle you'll encounter constantly as a Platform Engineer. Developers declare their needs via a PVC, and the platform (Kubernetes) fulfills that need using the available resources (PVs) provisioned by administrators.
2. Creating the PersistentVolumeClaim
Let's continue the hands-on exercise from our last lesson. We have a PV named task-pv-volume. Now, we will create a PVC to claim it.
Configure a Pod to Use a PersistentVolume for Storage
The official Kubernetes documentation provides the exact YAML manifest for a PVC that is designed to bind with the PV we created earlier.
Please follow the instructions in the section titled 'Create a PersistentVolumeClaim'. Study the pv-claim.yaml manifest, then create the object using kubectl apply. Afterwards, run the kubectl get pv and kubectl get pvc commands to verify the result.
After running the commands, you should have noticed two important changes:
kubectl get pvc task-pv-claim: The status is nowBound.kubectl get pv task-pv-volume: The status is alsoBound, and theCLAIMcolumn now showsdefault/task-pv-claim.
This confirms the binding was successful. Let's look at the spec of the PVC to see why:
spec:
  storageClassName: manual
  accessModes:
    - ReadWriteOnce
  resources:
    requests:
      storage: 3Gi
storageClassName: manual: This matched thestorageClassNameof our PV.accessModes: [ "ReadWriteOnce" ]: This matched theaccessModesof our PV.resources.requests.storage: 3Gi: The requested 3Gi is less than or equal to the available 10Gi capacity of our PV.
Because all conditions were met, Kubernetes bound the claim to the volume.
3. Mounting the Claim into a Pod
Now that we have a bound claim, we can use it as a volume in a Pod. The key here is that the Pod references the PVC, not the PV.
This diagram visually summarizes the relationship between the three objects. Notice how the Pod's volumes section points directly to the PVC by name.
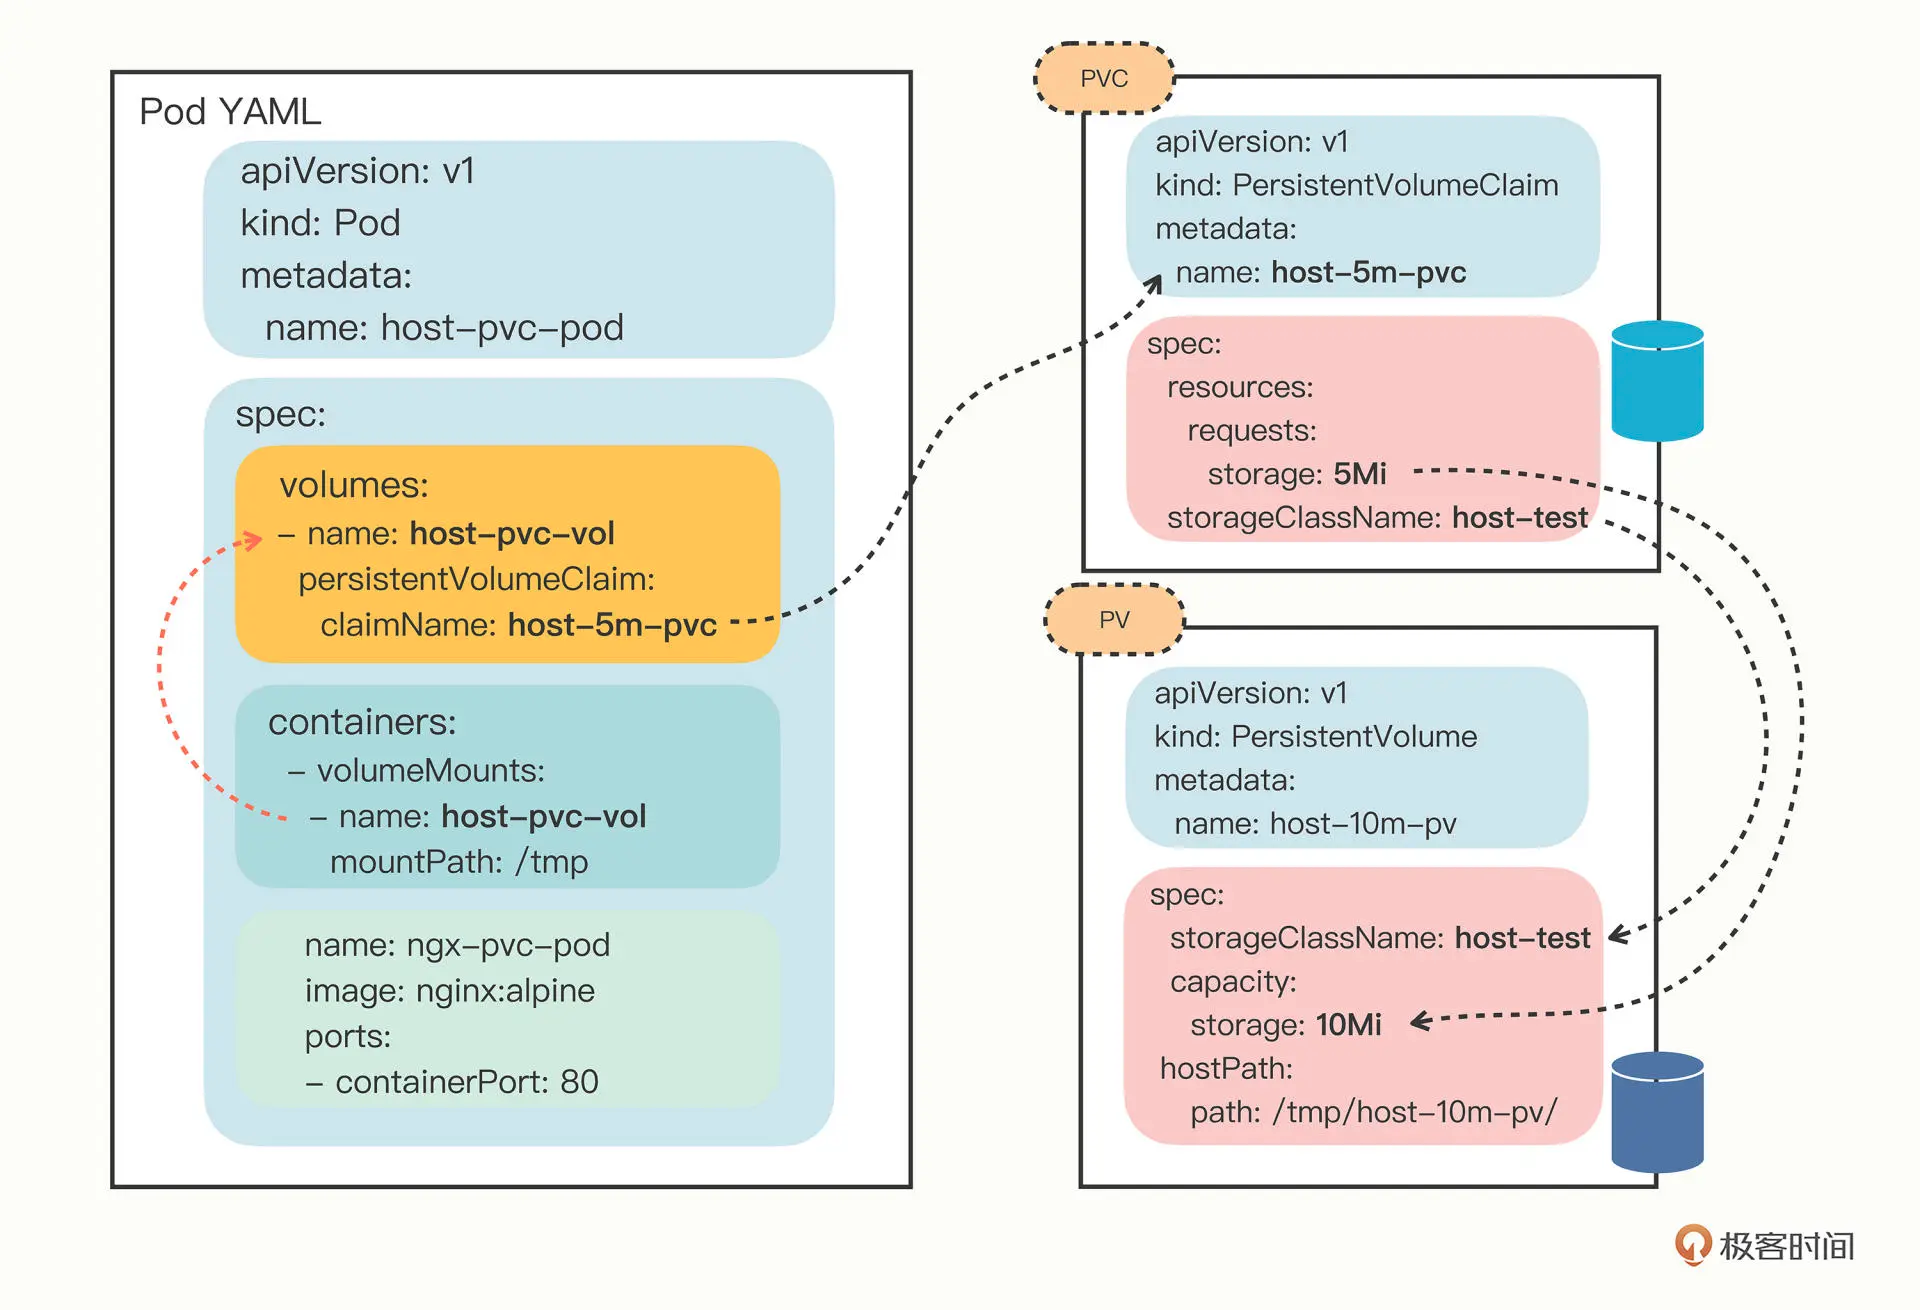
Let's create the Pod that will use our claim.
Configure a Pod to Use a PersistentVolume for Storage
Continuing with the same official guide, we'll now create the Pod manifest that mounts our PVC and verifies that it can access the data we created in the last lesson.
Follow the guide in the section 'Create a Pod'. Pay close attention to the volumes and volumeMounts sections in the pv-pod.yaml manifest. After creating the Pod, use kubectl exec to get a shell inside the container and verify that Nginx is serving the index.html file from our storage.
Let's break down the two crucial parts of the Pod's manifest that make this work:
-
Declaring the Volume: Inside
spec.volumes, we declare a volume and tell Kubernetes it comes from a PVC.volumes: - name: task-pv-storage # A name for this volume within the Pod persistentVolumeClaim: claimName: task-pv-claim # The name of the PVC to use -
Mounting the Volume: Inside
spec.containers, we usevolumeMountsto attach the declared volume to a path inside the container.volumeMounts: - mountPath: "/usr/share/nginx/html" # Path inside the container name: task-pv-storage # Must match the volume name from above
You've now successfully configured a Pod to consume persistent storage!
Test your understanding!
You have the existing task-pv-pod and task-pv-claim. How would you modify the Pod's manifest to mount the same persistent volume at a second location, /data, inside the container, in addition to the existing mount at /usr/share/nginx/html?
Show answer
You would add a second entry to the volumeMounts list. The volumes section remains unchanged because you are still using the same single volume source.
spec:
  volumes:
  - name: task-pv-storage
    persistentVolumeClaim:
      claimName: task-pv-claim
  containers:
  - name: task-pv-container
    image: nginx
    volumeMounts:
    - mountPath: "/usr/share/nginx/html" # Existing mount
      name: task-pv-storage
    - mountPath: "/data"                 # New mount
      name: task-pv-storage
4. Verifying True Persistence
The final test is to ensure the data truly persists beyond the life of a single Pod. The best way to do this is to write some data, delete the Pod, and see if the data is still there when the controlling Deployment creates a new Pod.
Let's perform this final verification. The following guide provides a clean, self-contained example using a Deployment, which is a more realistic scenario.
First, clean up the Pod you just made: kubectl delete pod task-pv-pod. The PVC and PV will remain. Now, follow the guide starting from the text 'To understand how the persistence works...'. You will create a new Deployment that uses your existing PVC (myclaim in the example, but you should use task-pv-claim). Follow the steps to exec into the pod, write a file, delete the pod, and then exec into the newly created pod to cat the file and confirm persistence. Finally, use the kubectl delete commands at the end to clean up the deployment, PVC, and PV to finish the exercise.
This exercise powerfully demonstrates that the storage lifecycle is independent of the Pod lifecycle, which is the entire point of using PVs and PVCs.
Conclusion
Well done! You have successfully completed the full, fundamental workflow for managing persistent storage in Kubernetes. You've acted as both the administrator provisioning storage (PV) and the developer consuming it (PVC and Pod).
Key Takeaways:
- PersistentVolumeClaims (PVCs) are objects that developers create to request storage of a certain size and access mode, abstracting away the underlying storage details.
- Kubernetes binds a PVC to a compatible PV based on matching
storageClassName,capacity, andaccessModes. A bound PV/PVC pair is a one-to-one mapping. - A Pod consumes persistent storage by referencing a PVC by name in its
spec.volumessection and then mounting that named volume into a container viaspec.containers.volumeMounts. - Data stored on a PersistentVolume survives Pod deletion and restarts, ensuring data persistence for stateful applications.
Next Up:
This lesson concludes our module on storage fundamentals. You now have the building blocks to provide stateful applications with stable storage. In the next module, we will explore different types of Kubernetes workloads beyond the simple Pod and Deployment, including Jobs for one-off tasks, CronJobs for scheduled workloads, and StatefulSets for more complex stateful applications.