Hello! Welcome to the next lesson in our FreeRTOS module.
In our previous session, you successfully performed a manual integration of the FreeRTOS kernel into your STM32 project. You have a solid, professional foundation with the kernel source files, a custom FreeRTOSConfig.h, and the necessary compiler settings in place. Your project is ready, but the operating system is still idle.
Today, we bring the RTOS to life. We will create and run multiple tasks, the fundamental units of execution in FreeRTOS. You will learn how to assign different priorities to these tasks and observe how the scheduler uses preemption to manage which task runs when. This is where you'll see the "multi-tasking" in a real-time multi-tasking system.
Your learning outcome for this lesson is to create and manage multiple tasks with different priorities.
1. The Anatomy of a FreeRTOS Task
Before we write any code, let's establish a clear mental model. A "task" in FreeRTOS is essentially a C function that runs independently, as if it has the CPU all to itself. Each task has its own stack to store local variables and its own execution state. The scheduler's job is to rapidly switch between these tasks, creating the illusion that they are all running in parallel.
Every task exists in one of several states. Understanding these states is key to understanding RTOS behavior.

- Running: The task is currently executing code on the CPU. On a single-core processor like our STM32, only one task can ever be in the Running state at any given moment.
- Ready: The task is ready to run, but another task of equal or higher priority is currently in the Running state.
- Blocked: The task is waiting for something. This is a very efficient state, as the task consumes zero CPU time. A task enters the Blocked state when it calls a function like
vTaskDelay()to wait for a time period to elapse, or when it waits for data to arrive from another task. - Suspended: The task has been manually "frozen" and will not be scheduled for any reason until it is explicitly resumed.
2. Creating Your First Tasks
Let's move to the practical implementation. We will create two simple tasks: one to blink the onboard LED at a fast rate, and a second one to blink it at a slower rate, creating a "heartbeat" effect. This will require modifying main.c.
First FreeRTOS project - PoMAD
The PoMAD article you used in the last lesson provides the perfect starting point for adding tasks to our manually-configured project. It uses the native FreeRTOS API xTaskCreate which we will now dissect.
Please read the sections that show how to prototype the task functions and modify the main() function to create them. Then, read the implementation code for vTask1 and vTask2. Focus on understanding the xTaskCreate function and the structure of a task function (infinite loop with a blocking call).
Let's break down the most important function, xTaskCreate:
BaseType_t xTaskCreate(
    TaskFunction_t    pvTaskCode,     // Pointer to the task's C function
    const char *      pcName,         // A descriptive name for the task (for debugging)
    uint16_t          usStackDepth,   // The size of the task's stack in words
    void *            pvParameters,   // A pointer to pass input parameters to the task
    UBaseType_t       uxPriority,     // The priority of the task
    TaskHandle_t *    pvCreatedTask   // A handle to control the task (optional)
);
Your Turn to Code:
-
Open
main.c. -
Prototype two task functions before
main():void vTask_BlinkFast(void *pvParameters); void vTask_BlinkSlow(void *pvParameters); -
Modify your
main()function to create these tasks and start the scheduler. Note that we are initially setting both tasks to priority1.int main(void) { // ... your existing HAL_Init(), SystemClock_Config(), etc. ... BSP_LED_Init(); // Assuming you have a function to init the LED GPIO xTaskCreate(vTask_BlinkFast, "Blink_Fast", 128, NULL, 1, NULL); xTaskCreate(vTask_BlinkSlow, "Blink_Slow", 128, NULL, 1, NULL); // Start the scheduler vTaskStartScheduler(); // The scheduler has taken control, so this part of the code // should never be reached. while (1) { } } -
Implement the task functions after
main(). Each task is an infinite loop that performs an action and then "blocks" for a period usingvTaskDelay().vTaskDelay()is crucial; it passes control back to the scheduler so other tasks can run.void vTask_BlinkFast(void *pvParameters) { while(1) { BSP_LED_Toggle(); // Or HAL_GPIO_TogglePin(...) vTaskDelay(pdMS_TO_TICKS(100)); // Delay for 100ms } } void vTask_BlinkSlow(void *pvParameters) { while(1) { BSP_LED_Toggle(); vTaskDelay(pdMS_TO_TICKS(500)); // Delay for 500ms } }Note:
pdMS_TO_TICKS()is a handy FreeRTOS macro that converts milliseconds into the equivalent number of scheduler ticks. -
Compile and flash your code. You should see the LED blinking in a slightly irregular pattern. This is because both tasks have the same priority, so the scheduler is using a "round-robin" approach to switch between them each time a tick interrupt occurs.
3. Understanding and Applying Task Priorities
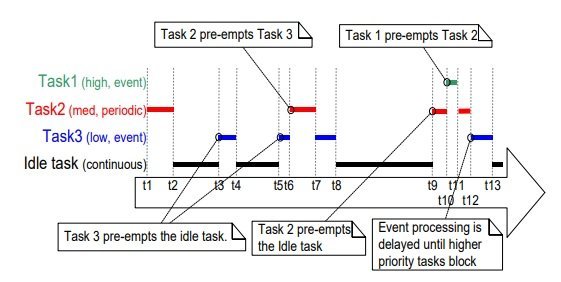
The real power of an RTOS comes from preemption based on priority. The scheduler's golden rule is: Always run the highest-priority task that is in the Ready state.
Task Priorities in FreeRTOS - Part 1: The Essential Three
To use priorities effectively, it helps to have a conceptual framework. This article from Embedded Experts proposes a simple, powerful model for classifying tasks.
Read the section 'Task Trio: Classifying Tasks and Setting Priorities Effectively'. This will introduce you to the three main categories of tasks in a typical embedded system. This is the professional mindset for architecting RTOS applications.
As the article explains, we can group tasks into:
- Hard Real-Time: Highest priority. For tasks that absolutely must meet a deadline (e.g., processing a CAN message before a timeout).
- Normal Application: Middle priority. The bulk of your application logic.
- Background: Lowest priority. Housekeeping tasks that can be delayed without issue (e.g., updating a log file, monitoring system health).
This Gantt chart shows preemption in action. When an event makes a high-priority task ready (Task 1), it immediately preempts (interrupts) the lower-priority task that was running.
Your Turn to Code (Part 2):
Let's see this on your hardware. Modify the priority of vTask_BlinkSlow to be higher than vTask_BlinkFast.
// In main()
xTaskCreate(vTask_BlinkFast, "Blink_Fast", 128, NULL, 1, NULL);
xTaskCreate(vTask_BlinkSlow, "Blink_Slow", 128, NULL, 2, NULL); // Higher priority
Compile and flash again. What do you observe? The LED should now blink at a steady 500ms interval. The vTask_BlinkFast task is being starved—it never gets a chance to run because the higher-priority vTask_BlinkSlow is always either Running or Blocked (waiting for its 500ms delay). When the delay finishes, it becomes Ready and immediately preempts the lower-priority task.
4. A Professional Approach to Priorities and Task Management
Hard-coding numbers like 1 and 2 for priorities is poor practice. A professional approach defines them as macros for clarity and maintainability.
Task Priorities in FreeRTOS - Part 1: The Essential Three
Let's adopt this best practice. The same article shows how to define and use priority macros.
Read the section 'From Theory to Code: Defining Task Priorities with C Macros' and apply it to your project. Add priority definitions to your FreeRTOSConfig.h file and refactor your xTaskCreate calls to use these macros.
Your Turn to Code (Part 3):
-
Open
FreeRTOSConfig.h. At the bottom, add your priority definitions:/* Application specific task priorities */ #define TASK_PRIORITY_LOW ( tskIDLE_PRIORITY + 1 ) #define TASK_PRIORITY_NORMAL ( tskIDLE_PRIORITY + 2 ) #define TASK_PRIORITY_HIGH ( tskIDLE_PRIORITY + 3 )(Note: It's good practice to define priorities relative to
tskIDLE_PRIORITY, which is 0). -
In
main.c, change thexTaskCreatecalls to use these macros. Let's set both back to a normal priority for now.xTaskCreate(vTask_BlinkFast, "Blink_Fast", 128, NULL, TASK_PRIORITY_NORMAL, NULL); xTaskCreate(vTask_BlinkSlow, "Blink_Slow", 128, NULL, TASK_PRIORITY_NORMAL, NULL);
Managing Tasks with Handles
To "manage" a task (e.g., suspend or delete it), you need a reference to it. This is done via a TaskHandle_t.
FreeRTOS Tutorial 2.0 || TASK Operations || STM32 || CUBEIDE
This video provides a practical demonstration of suspending and resuming tasks. While it uses the STM32CubeIDE generator, the underlying FreeRTOS functions (vTaskSuspend, vTaskResume) and concepts are identical.
Watch from 08:07 to 12:08. Pay attention to how a task handle is used as an argument to vTaskSuspend and vTaskResume to control another task's execution.
Let's try it. We'll make the fast-blinking task suspend the slow-blinking task after a few seconds.
Your Turn to Code (Part 4):
-
In
main(), declare a handle and capture it when creating the slow task:// Declare the handle before main() or inside main() before use TaskHandle_t xBlinkSlowHandle = NULL; // ... in main() ... xTaskCreate(vTask_BlinkFast, "Blink_Fast", 128, NULL, TASK_PRIORITY_NORMAL, NULL); xTaskCreate(vTask_BlinkSlow, "Blink_Slow", 128, &xBlinkSlowHandle, TASK_PRIORITY_NORMAL, &xBlinkSlowHandle); -
Modify
vTask_BlinkFastto suspend the other task after 5 seconds.void vTask_BlinkFast(void *pvParameters) { // Suspend the slow task after 5 seconds. // The handle xBlinkSlowHandle must be accessible (e.g., a global variable). vTaskDelay(pdMS_TO_TICKS(5000)); if (xBlinkSlowHandle != NULL) { vTaskSuspend(xBlinkSlowHandle); } // Now enter the normal blinking loop while(1) { BSP_LED_Toggle(); vTaskDelay(pdMS_TO_TICKS(100)); } } -
Compile and flash. You should see the irregular "heartbeat" pattern for 5 seconds, after which the LED will switch to a steady, fast 100ms blink, because
vTask_BlinkSlowhas been suspended and no longer gets scheduled.
Conclusion
Congratulations! You've taken a major step from a static firmware structure to a dynamic, multi-tasking system.
Key Takeaways:
- Tasks are independent functions that run in infinite loops, yielding control with blocking calls like
vTaskDelay(). - The scheduler always runs the highest-priority task that is ready, preempting any lower-priority tasks.
- Assigning priorities should be based on a task's real-time requirements (e.g., hard real-time, normal, background).
- Using macros for priority levels (
TASK_PRIORITY_NORMAL) is a professional standard that improves code readability and maintainability. - You can manage tasks at runtime (e.g.,
vTaskSuspend,vTaskResume) by first capturing theirTaskHandle_tduring creation.
In this lesson, our tasks were completely independent. In any real-world application, tasks need to communicate and share data. In our next lesson, we will explore one of the most fundamental mechanisms for safe inter-task communication: FreeRTOS Queues.