Hello! Welcome back to our series on FreeRTOS.
In our last lesson, you successfully created multiple tasks and managed their execution using priorities and task handles. You saw how vTaskDelay() is not just a HAL_Delay() replacement, but a critical function that yields CPU control to the scheduler. This allows other tasks to run, forming the basis of cooperative multitasking within a preemptive system.
Today, we will dissect the concept of time in FreeRTOS. You'll learn the crucial difference between a relative delay (vTaskDelay) and an absolute delay (vTaskDelayUntil). Understanding this distinction is fundamental for any professional embedded engineer, especially in automotive systems where periodic, predictable actions like sensor reading, control loop calculations, and CAN bus transmissions are non-negotiable.
Your learning outcome for this lesson is to use vTaskDelay and vTaskDelayUntil for relative and absolute time delays. By the end, you'll not only know which function to use but precisely why and what pitfalls to avoid.
1. The Problem with Relative Delays
In the previous lesson, we used vTaskDelay() to block our tasks for a set duration. This function is perfectly fine for simple, non-critical timing, like blinking a status LED. However, it has a significant limitation: the delay is relative to the moment the function is called.
This means the actual period of a task will be the specified delay plus the time it took the task to execute its own code plus any time it was preempted by higher-priority tasks. This cumulative error is called timing drift.
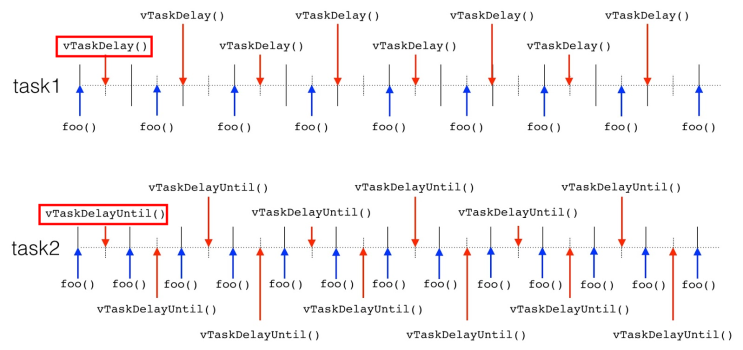
For a professional application like sampling a sensor at exactly 100 Hz, this drift is unacceptable.
2. vTaskDelay(): A Closer Look
Before we solve the drift problem, let's ensure we are using vTaskDelay() correctly. Its parameter is not in milliseconds, but in scheduler ticks. The duration of a tick is defined by configTICK_RATE_HZ in your FreeRTOSConfig.h.
This short video clearly explains the relationship between milliseconds and FreeRTOS ticks, and introduces the standard macro for converting between them.
Watch from the beginning to 03:04. Pay close attention to how configTICK_RATE_HZ affects the delay and why using the pdMS_TO_TICKS() macro is the correct, portable way to specify delays in milliseconds.
As the video shows, the professional way to call vTaskDelay() is:vTaskDelay(pdMS_TO_TICKS(100)); // Block for 100 milliseconds
This makes your code independent of the scheduler's tick rate. The video also notes that vTaskDelay guarantees a delay of at least the specified duration. This is the definition of a relative delay.
3. vTaskDelayUntil(): The Solution for Periodic Tasks
To eliminate timing drift and create truly periodic tasks, FreeRTOS provides vTaskDelayUntil(). This function unblocks a task at an absolute time, calculated from the last time it was unblocked. It automatically compensates for the task's execution time and any preemptions.
void vTaskDelayUntil(
    TickType_t * const pxPreviousWakeTime,
    const TickType_t   xTimeIncrement
);
Its parameters are:
pxPreviousWakeTime: A pointer to a variable that holds the timestamp of the task's last wake-up. You must initialize this variable once before the task's main loop. The function updates this variable automatically on each call.xTimeIncrement: The desired period for the task, specified in ticks.
Let's see how this is implemented.
The PoMAD article provides an excellent, in-depth explanation of vTaskDelayUntil, complete with code examples and diagrams that illustrate how it works under the hood.
First, read section '2. The solution : vTaskDelayUntil()'. This shows the canonical implementation pattern. Then, read section '3. Understanding vTaskDelayUntil()', focusing on '3.1. Basic principles'. This will give you the professional-level understanding of how the scheduler uses the xLastWakeTime variable to achieve precise timing.
The typical structure for a periodic task using vTaskDelayUntil() is:
void vPeriodicTask(void *pvParameters)
{
    // Initialize the wake time variable with the current time.
    TickType_t xLastWakeTime = xTaskGetTickCount();
    const TickType_t xFrequency = pdMS_TO_TICKS(100); // e.g., for a 10Hz task

    while(1)
    {
        // Perform the periodic action here (e.g., read a sensor).

        // Block until the next periodic activation time.
        vTaskDelayUntil(&xLastWakeTime, xFrequency);
    }
}
4. Hands-On: Visualizing Drift with a Logic Analyzer
Now, let's prove the concept on your hardware. You will create two tasks, each toggling an LED. One will use vTaskDelay(), the other vTaskDelayUntil(). By adding a simulated workload to each, we can observe the timing drift on your logic analyzer.
Configuration Check
First, ensure vTaskDelayUntil() is enabled in your project. Open your FreeRTOSConfig.h file and verify that this line is present and set to 1:#define INCLUDE_vTaskDelayUntil 1
If it's not there, add it. This is a manual configuration step that IDEs like STM32CubeIDE often handle with a checkbox.
Your Turn to Code
- Open
main.cin your project. - Define two task functions. For this exercise, let's create a simulated workload by using a blocking
HAL_Delay(). While normally a terrible practice inside an RTOS task, here it serves as a consistent, CPU-intensive operation that will make the timing drift obvious.// This task demonstrates a relative delay. void vRelativeDelayTask(void *pvParameters) { while(1) { HAL_GPIO_TogglePin(GPIOC, GPIO_PIN_13); // Toggle the Blue Pill's LED HAL_Delay(20); // Simulate a 20ms workload vTaskDelay(pdMS_TO_TICKS(200)); // Target a 200ms delay } } // This task demonstrates an absolute, periodic delay. void vAbsoluteDelayTask(void *pvParameters) { TickType_t xLastWakeTime = xTaskGetTickCount(); const TickType_t xFrequency = pdMS_TO_TICKS(200); while(1) { HAL_GPIO_TogglePin(GPIOC, GPIO_PIN_13); // Toggle the same LED HAL_Delay(20); // Simulate the same 20ms workload vTaskDelayUntil(&xLastWakeTime, xFrequency); } } - In
main(), create one of the tasks. Start by creating only thevRelativeDelayTask.// In main() xTaskCreate(vRelativeDelayTask, "Relative", 128, NULL, TASK_PRIORITY_NORMAL, NULL); // xTaskCreate(vAbsoluteDelayTask, "Absolute", 128, NULL, TASK_PRIORITY_NORMAL, NULL); vTaskStartScheduler(); - Connect your logic analyzer to the PC13 pin on your Blue Pill.
- Compile, flash, and run. Capture the waveform on your logic analyzer. Measure the period of the waveform (the time between two rising edges). You should find it is approximately 220ms (200ms delay + 20ms workload).
- Now, modify
main(). Comment out the creation ofvRelativeDelayTaskand uncommentvAbsoluteDelayTask. - Compile, flash, and run again. Capture and measure the new waveform. You should now see a period of almost exactly 200ms.
vTaskDelayUntilhas compensated for the 20ms workload, ensuring the task activates at its precise periodic interval.
This practical exercise, inspired by the "FreeRTOS Timing Accuracy" article, provides undeniable proof of the difference.
5. Advanced Concept: Behavior Under CPU Starvation
What happens if a periodic task is prevented from running for a long time by a higher-priority task? vTaskDelayUntil has a specific behavior for this scenario: it tries to "catch up".
The PoMAD article concludes with a fascinating case study on this exact behavior. Understanding this is key to debugging complex, real-world timing issues.
Read the section '3.2. A case of odd behavior'. The author creates a scenario where a high-priority task starves a periodic task. Pay close attention to the console output and the author's step-by-step analysis of why the starved task executes in a rapid burst after being allowed to run again.
As the article demonstrates, if a task's next wake-up time is already in the past when vTaskDelayUntil is called, the function will return immediately without blocking. The task will loop, and vTaskDelayUntil will be called again. This continues until the calculated wake-up time is in the future. This "catch-up" burst ensures that the task's long-term average frequency is maintained, but it's a critical behavior to be aware of during debugging.
Conclusion
You now have a professional-level understanding of task timing in FreeRTOS. This knowledge is not academic; it is essential for building reliable and predictable embedded systems.
Key Takeaways:
vTaskDelay()provides a relative delay. The task's period will drift due to its own execution time and preemption. It is suitable for non-critical timing.vTaskDelayUntil()provides an absolute delay, enabling precise, periodic task execution. It is the correct choice for control loops, sensor sampling, and protocol handling.- Always use the
pdMS_TO_TICKS()macro to convert millisecond values into scheduler ticks for portability. - A periodic task must initialize its
xLastWakeTimevariable once before its main loop begins. - If a task using
vTaskDelayUntilis starved and misses its deadlines, it will execute in a rapid burst to "catch up" once it gets CPU time.
In this lesson and the last, our tasks have been self-contained. In our next lesson, we will make them cooperate. You will learn how to use FreeRTOS queues, a powerful and thread-safe mechanism for passing data from one task to another—for example, from a periodic sensor task to a data processing task.