Welcome to the first lesson in your journey to designing an app with the help of AI. We'll begin by building a solid conceptual foundation, ensuring you understand how all the different pieces of this modern design workflow fit together. This lesson focuses on explaining the roles of the three key components you'll be using—Figma, Claude Code, and an MCP integration—and clarifies the crucial difference between merely looking at a design and being able to change it with AI. Understanding this "big picture" is the first step toward successfully building your note-taking app prototype.
The Three Core Components
To achieve your goal of designing an app interface with AI assistance, we need to orchestrate three distinct technologies. Think of them as a team with specialized roles:
-
Figma: This is your design canvas. It's the primary environment where the visual and interactive aspects of your app will be created, viewed, and organized. It's the equivalent of a digital artist's studio.
-
Claude Code: This is your AI assistant. While you might think of Claude as just a chatbot, in this context, it acts as both the "brain" and the "hands." It understands your instructions (the brain) and performs actions based on them (the hands). Although you've expressed a preference for using it via the macOS Terminal, the core function remains the same: you give it prompts, and it executes tasks.
-
MCP Integration: This is the specialized bridge between Figma and Claude Code. "MCP" stands for Model-Context Protocol. While the name is technical, its function is simple: it's a standardized connector that allows your AI assistant (Claude) to securely access and interact with another application (Figma).
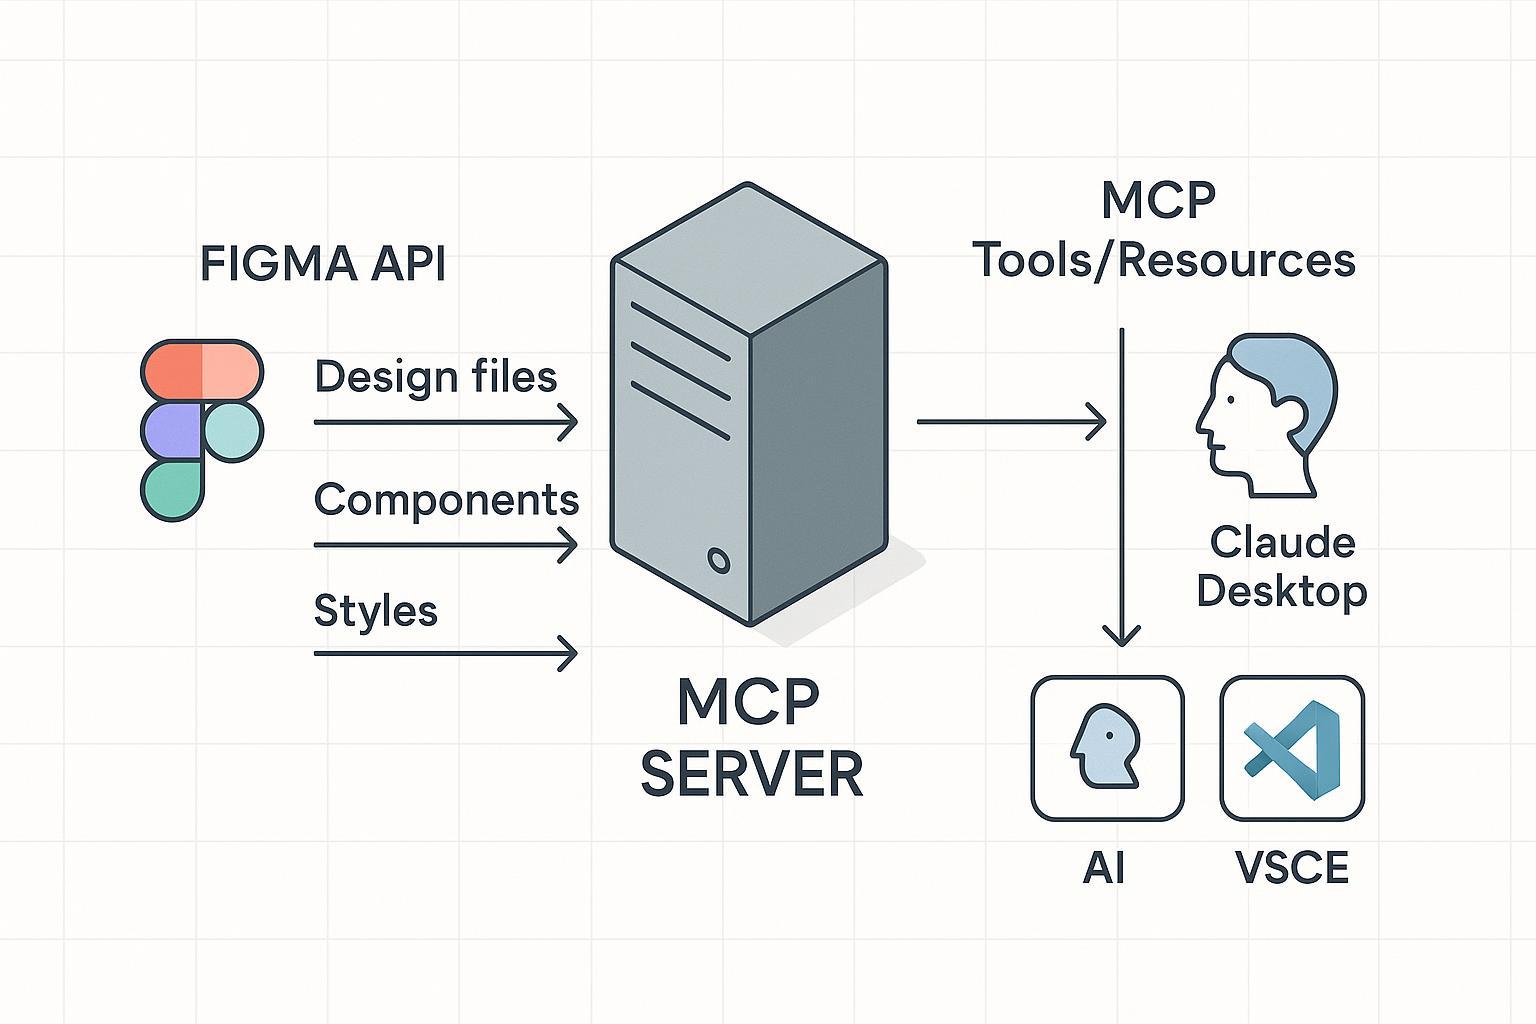
The Bridge: Why MCP is Key
An AI assistant is powerful, but it's sandboxed by default; it can't see or interact with your other applications without explicit permission and a proper connection. The MCP provides that connection.
To grasp the importance of this, let's watch a short segment from the video "MCP for Designers." The presenter uses a simple analogy with Gmail that perfectly explains the two fundamental types of access an MCP can grant.
MCP for Designers: Connect Claude to All Your Tools
In the video "MCP for Designers: Connect Claude to All Your Tools" by Griffin Wooldridge, pay close attention to the explanation of what an MCP is and the Gmail example that follows.
Watch the section from "it's a standardized connector" to understand the MCP's role as a "universal adapter." Then, focus on the Gmail example from "A basic example", where the presenter distinguishes between "read access" (summarizing emails) and "write access" (drafting new emails).
Read-Only vs. Write-Capable: Inspection vs. Editing
The Gmail analogy of reading versus drafting emails introduces the most critical concept for our workflow: the difference between read-only inspection and write-capable editing.
-
Read-Only (Inspection): This is the ability to look at and understand a Figma file. An AI with read-only access could analyze a design, list its colors and fonts, measure spacing, or even translate the design into code. However, it cannot make any changes to the original design on the Figma canvas. It's a viewer with analytical superpowers.
-
Write-Capable (Editing): This is the ability to create, modify, or delete elements directly on the Figma canvas. An AI with write access can add new screens, draw buttons, type out text, and rearrange layouts based on your prompts. This is what enables the workflow you're aiming for: describing a design in words and having the AI build it for you in Figma.
Our project requires write capability. We want Claude to generate the frames of our note-taking app, not just look at a design we've already made. The MCP is what grants Claude this power.
To see how this is separated in Figma's official architecture, let's look at a technical resource. Don't worry about understanding every detail; the goal is to confirm the distinction.
Figma MCP vs Figma API for AI Agents: Which to Build On
This article from ScaleKit compares two ways for AI to connect to Figma. It provides a clear, technical confirmation of the read/write difference.
Please read the section titled Comparing them, focusing on the comparison table that follows. The key row to notice is "Write to canvas: create or modify frames, components." Observe which column has a "Yes" and which has a "No." This single row is the reason we are using an MCP integration.
As the table shows, the Figma "REST API" (an older, more general-purpose connection) cannot write to the canvas, while the "Figma MCP server" can. This is why the MCP is a game-changer for AI-assisted design.

Seeing it in Action
Now, let's watch a demonstration of this write-capable workflow. The following video shows someone prompting Claude to generate a design from scratch, directly inside a Figma file.
Connect Claude to Figma with MCP
In the video "Connect Claude to Figma with MCP" by TD Sunshine, we will watch a segment where a complete webpage design is generated from a simple text prompt.
Please watch from "We have now installed Claude Code". Observe how the user provides a text prompt with a link to an empty Figma file. After a few moments, a fully designed webpage appears in Figma, created by the AI. This is a direct demonstration of the "write-capable" editing we have been discussing.
This is the exact process we will follow. We'll start with an idea (our storyboard), write a prompt, and let Claude build the initial design for us in Figma. From there, we can refine it with more prompts or by making manual edits ourselves.
Conclusion
In this lesson, we established the foundational concepts for our AI-assisted design workflow. You've learned about the distinct roles of Figma as the canvas, Claude Code as the AI assistant, and the MCP integration as the essential bridge that enables them to communicate effectively.
The key takeaways are:
- The MCP (Model-Context Protocol) is a connector that lets AI assistants like Claude securely interact with tools like Figma.
- There is a critical difference between read-only access (inspecting a design) and write-capable access (editing a design).
- For our goal of generating app screens from prompts, we require a write-capable connection, which the Figma MCP provides.
With this conceptual framework in place, you're ready to start shaping the project. In the next lesson, we will move from theory to the first practical step: storyboarding the three-frame flow for our note-taking app. This will become the blueprint for the prompts you'll give to Claude.