Hello! Welcome to the next lesson in our journey through Deep Learning with PyTorch.
In our previous lesson, we explored the powerful optimizers, like SGD and Adam, that use gradients from backpropagation to update our model's weights. We learned how to create an optimizer and use its core functions: zero_grad(), backward(), and step().
Today, we shift our focus to the heart of the system: the neural network model itself. You'll learn how to define the architecture of a feedforward neural network (FNN) for a classification task using PyTorch's elegant and powerful tools. This is where you get to be the architect, designing the layers and connections that will learn from the data.
By the end of this lesson, you will be able to structure, define, and instantiate a complete feedforward neural network class in PyTorch, ready for training.
1. What Are We Building?
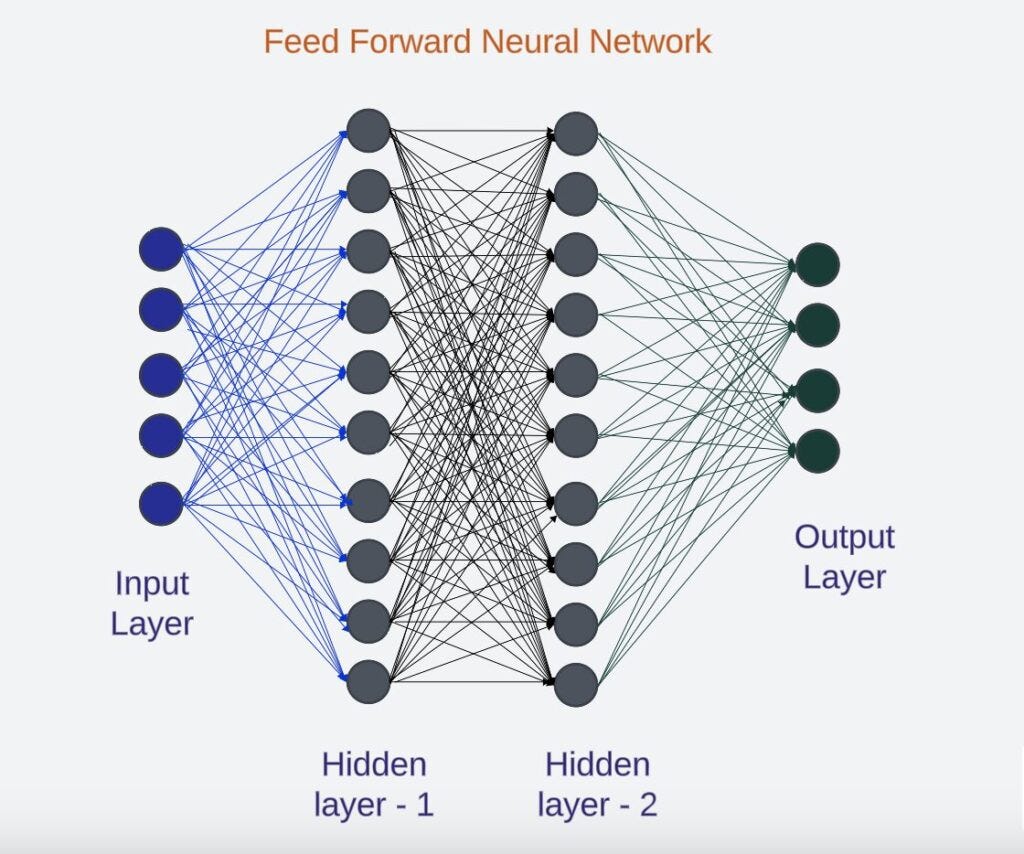
A feedforward neural network is organized in layers: an input layer, one or more hidden layers, and an output layer. Information flows in one direction—forward—from the input, through the hidden layers where computation happens, to the output layer that produces the final prediction.
2. The Core Building Block: nn.Module
In PyTorch, every neural network you build is a Python class that inherits from torch.nn.Module. This base class provides all the essential functionality for a neural network, like tracking its layers and parameters.
Let's start with the official PyTorch documentation to understand the foundational concept of nn.Module.
Read the sections 'Introduction' and 'Define the Class'. Focus on these two key points: All neural network models in PyTorch are subclasses of nn.Module. A model class requires two essential methods: __init__() to define the layers, and forward() to specify how data passes through them.
As the documentation highlights, building a model involves two main steps within your class:
-
__init__()(The Constructor): Here, you define all the layers your network will contain. These are like the Lego bricks of your model. The most common layers for an FNN are:nn.Linear(in_features, out_features): A fully connected layer that applies a linear transformation.in_featuresis the number of input neurons, andout_featuresis the number of output neurons.nn.ReLU(): The Rectified Linear Unit activation function. This introduces non-linearity, allowing the network to learn complex patterns.
-
forward(self, x)(The Forward Pass): Here, you define the sequence of operations. You specify the exact path the input dataxtakes as it flows through the layers you defined in__init__().
3. Building an FNN for Image Classification
Let's make this concrete by building a network to classify handwritten digits from the famous MNIST dataset. This is a classic problem where each input is a 28x28 pixel grayscale image of a digit (0-9).
The process generally follows these steps, which are laid out very clearly in the article "Feedforward Neural Network with PyTorch".
Feedforward Neural Network with PyTorch
This article from DeepLearingWizard provides an excellent step-by-step guide to building an FNN. We'll use its structure as our main reference.
Skim the section 'Building a Feedforward Neural Network with PyTorch' to see the 7-step plan. We will focus on steps 3 and 4 in this lesson, but it's good to see the whole picture.
Step 1: Define Hyperparameters and Load Data
Before we build the model, we need to define some key settings. The video below by Patrick Loeber provides a clear, practical walkthrough of setting up for an FNN project.
PyTorch Tutorial 13 - Feed-Forward Neural Network
Let's watch how to set up the environment, define hyperparameters, and load the MNIST dataset. This provides the context for our model's dimensions.
Watch from 01:18 to 05:39. Pay attention to the definition of these crucial hyperparameters: input_size = 784: This is because we flatten each 28x28 pixel image into a single 1D vector (28 * 28 = 784). hidden_size = 100: This is a design choice for the number of neurons in our hidden layer. num_classes = 10: Because there are 10 possible digits (0 through 9).
Step 2: Create the Model Class
Now for the main event. We will create a class named NeuralNet that inherits from nn.Module. It will have one hidden layer.
PyTorch Tutorial 13 - Feed-Forward Neural Network
Let's continue with the same video to see exactly how to write the NeuralNet class.
Watch from 08:06 to 11:38. This is the core of our lesson. Observe how the layers (nn.Linear, nn.ReLU) are first defined in __init__ and then used in the forward method to process the input x.
Here is the code for the model, as shown in the video. Let's break it down:
import torch.nn as nn

class NeuralNet(nn.Module):
    def __init__(self, input_size, hidden_size, num_classes):
        # Always call the superclass constructor first
        super(NeuralNet, self).__init__()

        # Define the layers
        self.fc1 = nn.Linear(input_size, hidden_size)  # First linear layer (input -> hidden)
        self.relu = nn.ReLU()                          # Activation function
        self.fc2 = nn.Linear(hidden_size, num_classes) # Second linear layer (hidden -> output)

    def forward(self, x):
        # Define the data flow
        out = self.fc1(x)       # Pass input through the first linear layer
        out = self.relu(out)    # Apply the ReLU activation
        out = self.fc2(out)     # Pass through the second linear layer
        # No softmax here!
        return out
A Crucial Note: You might wonder why there is no nn.Softmax layer at the end. For classification tasks, the standard loss function is nn.CrossEntropyLoss. This PyTorch function conveniently combines the Softmax activation and the cross-entropy loss calculation. Doing this is more numerically stable than applying them separately. So, the raw output of our final linear layer (called "logits") is exactly what nn.CrossEntropyLoss expects.
Step 3: Instantiate the Model, Loss, and Optimizer
With our class defined, we can now create an instance of our network. We also set up the loss function and the optimizer, connecting all the pieces we've learned.
PyTorch Tutorial 13 - Feed-Forward Neural Network
Finally, let's see how to create an object from our NeuralNet class and prepare the loss and optimizer.
Watch from 11:23 to 12:50. This short clip shows how to: Create the model object from our class. Instantiate nn.CrossEntropyLoss as the criterion. Instantiate torch.optim.Adam, passing it model.parameters() to tell it which weights to update.
The code to do this is simple and clean:
# Assuming hyperparameters are defined
# input_size = 784
# hidden_size = 100
# num_classes = 10
# learning_rate = 0.001

model = NeuralNet(input_size, hidden_size, num_classes)

# Loss
criterion = nn.CrossEntropyLoss()

# Optimizer
optimizer = torch.optim.Adam(model.parameters(), lr=learning_rate)
At this point, our model is a fully defined neural network, and we have the criterion to measure its error and the optimizer to update its weights. It's ready to be trained!
Test your understanding!
You are building an FNN for a different classification task. The input data is a vector of 50 features. You want to use a hidden layer with 128 neurons and predict one of 4 possible classes.
How would you define the __init__ method for this new model?
Show answer
You would set input_size=50, hidden_size=128, and num_classes=4.
def __init__(self):
    super(MyNewNet, self).__init__()
    self.fc1 = nn.Linear(50, 128)  # Input is 50, hidden is 128
    self.relu = nn.ReLU()
    self.fc2 = nn.Linear(128, 4)   # Hidden is 128, output is 4
Conclusion
Great work! You've successfully designed the blueprint for a feedforward neural network in PyTorch. You now know how to structure a model as a class, define its layers, and specify the forward pass.
Key Takeaways:
- PyTorch neural networks are built by creating a class that inherits from
nn.Module. - The
__init__method is where you declare the network's layers (e.g.,nn.Linear,nn.ReLU). - The
forwardmethod defines the computational graph, specifying how data flows through the layers. - The dimensions of your
nn.Linearlayers must match your data's input size, your desired hidden layer sizes, and the number of output classes. - For multi-class classification, you should output the raw logits from the final linear layer and use
nn.CrossEntropyLoss, as it includes the Softmax function internally.
Preview of the Next Lesson:
We have now defined the data loading, the model architecture, the loss function, and the optimizer. All the pieces are on the table. In the next lesson, "Implement a complete training loop in PyTorch," we will assemble them all into a single script to train our network, watch it learn, and evaluate its performance on the test data.