Hello! Welcome to the next lesson in our "Foundations of Machine Learning" module.
In our previous lesson, we explored logistic regression, a powerful algorithm that learns a single linear boundary to separate two classes. Today, we're going to look at a completely different, yet equally fundamental, classification algorithm: the Decision Tree. Instead of a single equation, a decision tree learns a hierarchical set of rules, creating a model that is remarkably easy to interpret.
Our goal for this lesson is to implement a decision tree for classification using Gini impurity or information gain. By the end, you will understand how a tree is built by asking a series of questions and be able to code one up using Python.
1. What is a Decision Tree?
At its core, a decision tree is like a flowchart. You start at the top (the root) and answer a series of true/false questions about the data's features. Each answer directs you down a path until you reach a final decision at a "leaf" of the tree.
Let's start by getting familiar with the basic structure and terminology.
Decision and Classification Trees, Clearly Explained!!!
The video 'Decision and Classification Trees, Clearly Explained!!!' from the StatQuest channel is one of the best introductions to this topic. This first clip will introduce you to the core concepts and vocabulary.
Please watch from the beginning to 03:21. Pay attention to these key terms: Root Node: The starting point of the tree. Internal Node (or Branch): A point where a decision (a question about a feature) is made. Leaf Node: A terminal node that provides the final classification (the outcome).
To visualize this, look at the following diagram of a decision tree built for a university dataset.
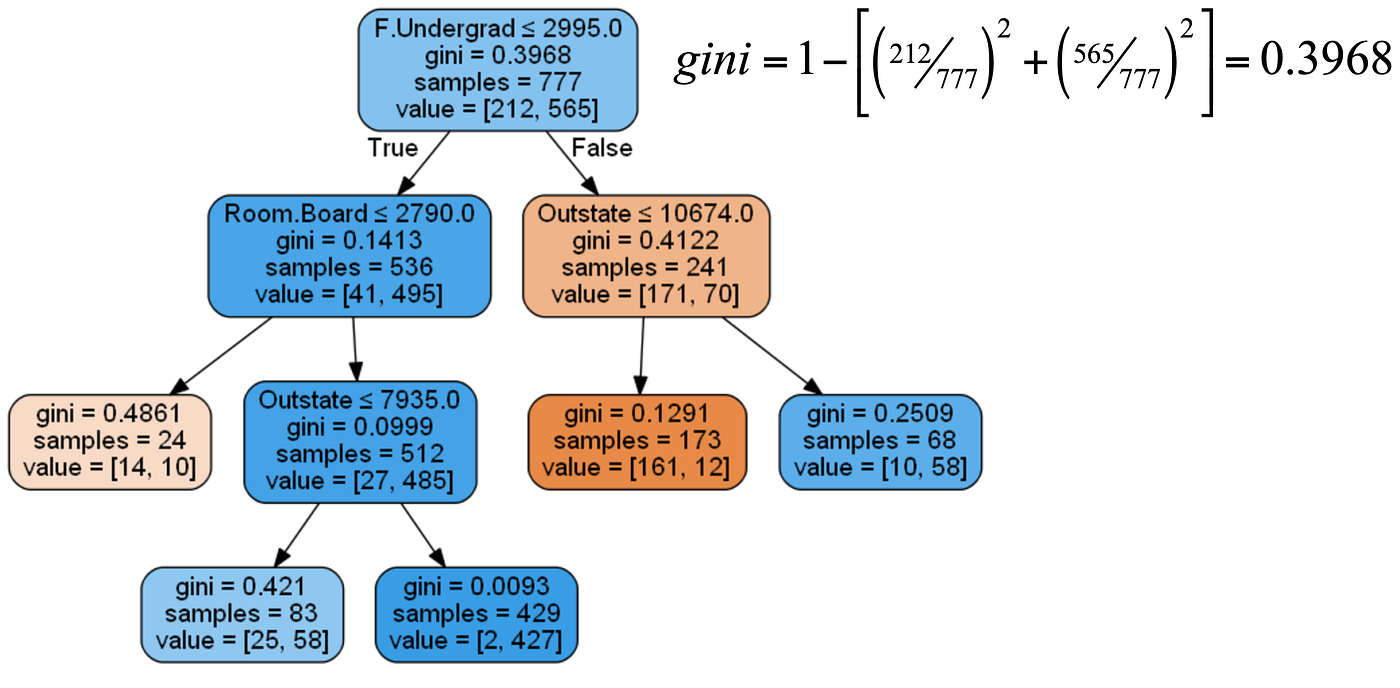
The ultimate goal of the decision tree algorithm is to create splits that result in pure leaf nodes—nodes that, ideally, contain samples from only one class. But how does the algorithm decide which questions to ask and in what order?
2. How a Decision Tree Learns: Finding the Best Split
The "magic" of a decision tree lies in how it chooses the best feature and the best value to split the data at each node. It does this by searching for the split that results in the "purest" possible child nodes. To quantify this purity, we use a metric. The two most common ones are Gini Impurity and Information Gain (based on Entropy).
We'll focus primarily on Gini Impurity, as it's the default criterion in scikit-learn and is very intuitive.
Gini Impurity
Gini Impurity measures the likelihood of incorrectly classifying a new instance from a dataset if it were randomly labeled according to the class distribution in that dataset.
- A Gini Impurity of 0 means a node is perfectly pure (all samples belong to one class).
- A Gini Impurity of 0.5 (for a binary classification problem) means a node is maximally impure (samples are split 50/50 between the two classes).
The formula for the Gini Impurity of a single node is:
where is the number of classes and is the proportion of samples belonging to class in that node.
To evaluate a split, the algorithm calculates a weighted average Gini Impurity of the child nodes. It chooses the split that yields the lowest weighted average Gini.
This might sound complex, but the StatQuest video makes it incredibly clear with a step-by-step example.
Decision and Classification Trees, Clearly Explained!!!
Let's continue with the StatQuest video to see exactly how Gini Impurity is calculated and used to compare different potential splits.
Watch from 03:21 to 12:15. This is the core conceptual part of the lesson. Focus on: How a simple tree is made for each feature to test its splitting power. The step-by-step calculation of Gini Impurity for a single leaf. How to combine the leaf impurities into a total Gini Impurity for the split using a weighted average. How the process works for both categorical ('yes'/'no') and numerical features.
Information Gain (Alternative to Gini)
Another popular metric is Information Gain, which is based on a concept called Entropy. Like Gini Impurity, Entropy measures the level of disorder or impurity in a node. Information Gain calculates the reduction in entropy achieved by a split. The algorithm aims to find the split that provides the highest Information Gain.
Decision Tree Classification in Python Tutorial
For a quick textual reference on both Gini Index and Information Gain, you can refer to this article from DataCamp.
Read the section titled 'Attribute Selection Measures'. You don't need to memorize the formulas, but understand that Gini and Information Gain are two different ways of measuring the same thing: the quality of a split.
Test your understanding!
Imagine a node contains 10 samples: 8 belong to Class A and 2 belong to Class B.
- What is the probability of picking a sample from Class A ()? What about Class B ()?
- Calculate the Gini Impurity for this node using the formula: .
Show answer
- . .
- Gini Impurity = .
Since 0.32 is closer to 0 than 0.5, this node is relatively pure.
3. Building the Tree: The Recursive Process
The algorithm builds the tree by applying this splitting logic recursively:
- Start at the root node with the entire training dataset.
- Find the best split: Test all features and all possible split points to find the one that minimizes the Gini Impurity (or maximizes Information Gain).
- Split the data: Create two child nodes based on the best split.
- Repeat: For each child node, repeat steps 2 and 3.
- Stop: Continue this process until a stopping condition is met. This could be:
- The node is perfectly pure.
- The tree reaches a pre-defined maximum depth.
- The number of samples in a node is too small to split further.
This recursive process is what creates the nested, tree-like structure.
Let’s Write a Decision Tree Classifier from Scratch - Machine Learning Recipes #8
The Google for Developers video 'Let’s Write a Decision Tree Classifier from Scratch' provides an excellent visualization of this recursive algorithm. Watching it will help you connect the splitting logic to the final tree structure.
Watch the segment from 07:05 to 09:12. Observe how the algorithm starts at the root, finds the best question, splits the data, and then calls itself on the new subsets of data until it creates leaf nodes.
4. Implementing a Decision Tree in Python
Now for the practical part. As usual, the scikit-learn library makes it incredibly simple to implement a decision tree. The process follows the familiar fit/predict pattern you saw with logistic regression.
The main class is DecisionTreeClassifier. Let's walk through an example.
Decision Tree Classification in Python Tutorial
The 'Decision Tree Classification in Python Tutorial' from DataCamp provides a perfect, beginner-friendly coding example. We will follow its steps to build our first decision tree.
Please read and follow the code in the sections 'Importing Required Libraries', 'Loading Data', 'Feature Selection', 'Splitting Data', and 'Building Decision Tree Model'. This will guide you through the entire process.
Here's the core code from that tutorial, which you should recognize:
# 1. Import necessary libraries
from sklearn.tree import DecisionTreeClassifier
from sklearn.model_selection import train_test_split
from sklearn import metrics
import pandas as pd

# Assume 'pima' is a loaded Pandas DataFrame
# col_names = ['pregnant', 'glucose', 'bp', 'skin', 'insulin', 'bmi', 'pedigree', 'age', 'label']
# pima = pd.read_csv("diabetes.csv", header=None, names=col_names)
# pima = pima.iloc[1:] # remove header row if present

# 2. Select features and target
feature_cols = ['pregnant', 'insulin', 'bmi', 'age','glucose','bp','pedigree']
X = pima[feature_cols] # Features
y = pima.label # Target variable

# 3. Split data
X_train, X_test, y_train, y_test = train_test_split(X, y, test_size=0.3, random_state=1)

# 4. Create and train the model
# By default, this uses the 'gini' criterion
clf = DecisionTreeClassifier()
clf = clf.fit(X_train, y_train)

# 5. Make predictions
y_pred = clf.predict(X_test)

# 6. Evaluate the model
print("Accuracy:", metrics.accuracy_score(y_test, y_pred))
5. Preventing Overfitting: Pruning the Tree
If you let a decision tree grow to its full depth, it can become extremely complex and "memorize" the training data. This is called overfitting. An overfit model performs perfectly on the data it has seen but fails to generalize to new, unseen data.
To combat this, we can control the tree's complexity. One common method is pre-pruning, where we stop the tree from growing by setting limits. Two important hyperparameters for this are:
max_depth: The maximum number of levels the tree can have.min_samples_leaf: The minimum number of samples required to be at a leaf node.
By tuning these parameters, you can create a simpler, more robust model.
Decision Tree Classification in Python Tutorial
Let's see how to apply pre-pruning in scikit-learn. This section of the DataCamp tutorial demonstrates how to use max_depth.
Read the section 'Optimizing Decision Tree Performance'. Notice how creating a DecisionTreeClassifier with max_depth=3 results in a simpler tree and, in this case, better accuracy on the test set.
By setting max_depth, we force the tree to stop splitting after a certain point, preventing it from learning noise in the training data. This is a crucial step in building practical machine learning models.
Conclusion
Congratulations! You have now learned about decision trees, a powerful and highly interpretable classification algorithm.
Key Takeaways:
- Decision trees create a model that predicts the value of a target variable by learning simple decision rules inferred from the data features.
- They are built by recursively splitting the data. At each node, the algorithm chooses the split that results in the purest child nodes.
- Gini Impurity and Information Gain are the two main metrics used to measure the quality of a split.
- The
scikit-learnlibrary provides theDecisionTreeClassifierclass to easily build, train, and evaluate decision tree models. - Uncontrolled trees can easily overfit. We can prevent this using pre-pruning techniques, such as setting the
max_depthof the tree.
Preview of the Next Lesson:
We've now built a few classification models (Logistic Regression, k-NN, Decision Trees) and used "accuracy" as our primary evaluation metric. But is accuracy always the best measure of performance? What if one class is much rarer than another? In the first lesson of our next module, "Model Evaluation and Improvement," we will dive into a more sophisticated set of evaluation metrics, including precision, recall, and the F1-score, to get a more complete picture of a model's strengths and weaknesses.