Welcome back! In our last lesson, you successfully deployed your first microservice to a local Kubernetes cluster using Deployment and Service manifests. Your application is running with two replicas, providing a basic level of availability.
Today, we'll address a critical aspect of modern software delivery: updating a running application without causing any service interruption. This lesson focuses on configuring a zero-downtime rolling deployment. We will explore Kubernetes' default update mechanism, identify its potential pitfalls, and then systematically configure our Deployment to ensure smooth, professional-grade updates.
By the end of this lesson, you will understand how to orchestrate updates that are completely transparent to your users.
1. The Rolling Update Strategy
When you change a Deployment's Pod template (for example, by updating the container image to a new version), Kubernetes needs a strategy to replace the old Pods with new ones. By default, it uses the RollingUpdate strategy.
This strategy incrementally replaces old Pods with new ones, ensuring that the application remains available throughout the update process.
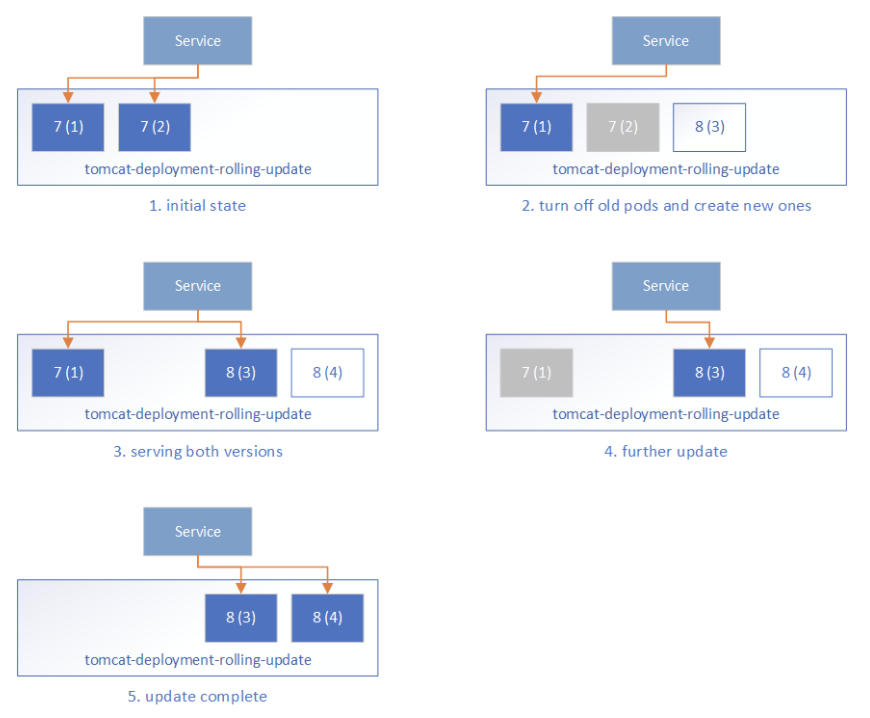
The speed and safety of this process are controlled by two key parameters in your deployment.yaml under spec.strategy.rollingUpdate:
maxUnavailable: The maximum number of Pods that can be unavailable during the update. This can be an absolute number (e.g.,1) or a percentage (e.g.,25%).maxSurge: The maximum number of new Pods that can be created above the desiredreplicascount. This can also be an absolute number or a percentage.
A common and very safe strategy for production systems is to ensure you never have fewer pods than your desired replica count. This is often called a "create-before-destroy" approach.
How to Configure Kubernetes Deployments for Zero-Downtime
This article from OneUptime provides a clear overview of the rolling update mechanism.
Read the sections "How Rolling Updates Work," "Basic Deployment with Rolling Update Strategy," and "Understanding maxUnavailable and maxSurge." Pay close attention to the sequence diagram and the recommended "true zero-downtime" configuration of maxUnavailable: 0 and maxSurge: 1.
2. The Hidden Dangers of a Default Rollout
You might assume that the default rolling update is sufficient for zero downtime. However, it often isn't. Kubernetes, by default, doesn't fully understand your application's internal state. This can lead to two common problems during a rollout:
- Premature Traffic Routing: Kubernetes may start a new Pod and immediately have the Service route traffic to it. If your application takes a few seconds to initialize (e.g., load configuration, establish database connections), it might receive requests before it's ready, resulting in errors.
- Abrupt Connection Termination: Kubernetes might terminate an old Pod while it's in the middle of processing a long-running request. This will cause errors like
connection reset by peerfor the client.
Let's see a practical demonstration of this problem.
Zero downtime with Kubernetes was harder than I expected
The video "Zero downtime with Kubernetes was harder than I expected" by Web Dev Cody provides a concise and clear demonstration of this issue.
Watch the first part of the video, where a load test is run against an application during a rolling deployment (demoing the issue). Notice the "connection reset by peer" errors that appear. This is exactly the kind of downtime we want to prevent.
3. The Three Pillars of a Zero-Downtime Deployment
To solve these problems and achieve true zero-downtime, we need to configure our deployment to work with our application. This relies on three pillars: graceful startup, graceful shutdown, and a robust update strategy.
The video "Zero Downtime Deployments in Kubernetes Explained" by That DevOps Guy provides an excellent, in-depth walkthrough of all the pieces we need. We will use it as our main guide for this section.
Zero Downtime Deployments in Kubernetes Explained
This video covers all the necessary components for achieving zero-downtime deployments in a practical, step-by-step manner.
We will refer to different parts of this video as we explore each concept. You can watch it sequentially. Start by getting familiar with the basic setup and deployment strategy. The video will then guide you through setting up a test client and demonstrating the issues, which we'll then solve.
Pillar 1: Graceful Startup with Readiness Probes
To prevent Kubernetes from sending traffic to a Pod that isn't ready, we use a Readiness Probe. This is a check that Kubernetes periodically performs to ask your application, "Are you ready to serve traffic?" The Service will only route requests to a Pod after its readiness probe succeeds.
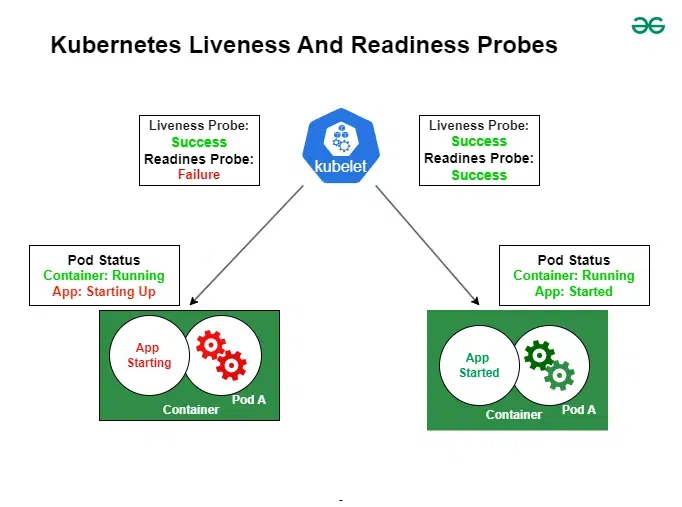
For our FastAPI application, the root path / returns a successful HTTP 200 response, making it a simple but effective readiness check. We add the readinessProbe to the container spec in our deployment.yaml.
Watch how readiness probes are implemented and how they solve the premature startup problem.
Zero Downtime Deployments in Kubernetes Explained
The section on graceful startup is key to understanding this first pillar.
Watch the part of the video covering graceful startup and Readiness probes. Observe how adding the probe prevents the 500-series errors that occurred when traffic was sent to the application before it had fully warmed up.
Pillar 2: Graceful Shutdown with terminationGracePeriodSeconds
When Kubernetes decides to terminate a Pod, it first sends a SIGTERM signal to the main process in the container. It then waits for a certain amount of time before forcefully killing the process with SIGKILL. This waiting period is the termination grace period.
If your application has in-flight requests that take longer than the default grace period (30 seconds), they will be cut off. You must configure terminationGracePeriodSeconds in your Pod spec to a value that is safely longer than your longest expected request time.
Zero Downtime Deployments in Kubernetes Explained
The video provides a perfect demonstration of this concept.
Now, watch the section on graceful shutdown. Pay close attention to the experiment where the application's response time (time.sleep) is made longer than the terminationGracePeriodSeconds, causing a request to be interrupted. This highlights why your application's behavior and this setting must be aligned.
Pillar 3: The preStop Hook for Network Race Conditions
There is one final, subtle race condition. When a pod is terminated, there is a slight delay between the pod being removed from the Service's endpoints and the actual termination signal (SIGTERM) being sent. If your application immediately stops accepting connections upon receiving SIGTERM, it might reject a request that was already in flight from the load balancer.
The solution is to use a preStop lifecycle hook. This hook executes a command after the Pod is marked for termination but before SIGTERM is sent. By adding a small sleep, we give the networking layer enough time to stop sending new traffic to the pod before we begin the application's shutdown process.
Zero downtime with Kubernetes was harder than I expected
The same video from earlier explains this tricky issue and its solution well.
Watch the sections explaining graceful shutdown in code and, crucially, the race condition with IP tables that necessitates a delay (which we implement with a preStop hook).
4. Hands-On: A Production-Ready Rolling Update
Let's apply these three pillars to the deployment.yaml from our previous lesson.
Update your deployment.yaml to match the following. The changes are highlighted with comments.
# deployment.yaml
apiVersion: apps/v1
kind: Deployment
metadata:
  name: fastapi-app
spec:
  replicas: 3 # Increased replicas for more resilience


  # --- Pillar 3: A robust update strategy ---
  strategy:
    type: RollingUpdate
    rollingUpdate:
      maxUnavailable: 0
      maxSurge: 1
  selector:
    matchLabels:
      app: fastapi
  template:
    metadata:
      labels:
        app: fastapi
    spec:


      # --- Pillar 2: Graceful shutdown period ---
      terminationGracePeriodSeconds: 60
      containers:
      - name: api
        image: public.ecr.aws/l6j4t5e6/fastapi-k8s-demo:latest
        ports:
        - containerPort: 8000


        # --- Pillar 1: Graceful startup probe ---
        readinessProbe:
          httpGet:
            path: / # Our app's root path responds with HTTP 200
            port: 8000
          initialDelaySeconds: 5 # Wait 5s before first probe
          periodSeconds: 5       # Probe every 5s
          failureThreshold: 3    # Mark as not ready after 3 failures


        # --- Pillar 3 (cont'd): preStop hook for network race condition ---
        lifecycle:
          preStop:
            exec:
              command: ["/bin/sh", "-c", "sleep 10"]
Now, let's trigger and monitor the update.
-
Apply the new configuration:
Save your updateddeployment.yamland apply it:kubectl apply -f deployment.yaml -
Monitor the rollout status:
Usekubectl rollout statusto watch the update in real time. The-wflag will watch for changes.kubectl rollout status deployment/fastapi-app -wYou will see Kubernetes reporting the progress as it terminates old pods and brings up new ones according to your strategy.
-
Check the history:
Once the rollout is complete, you can view the history of your deployments.kubectl rollout history deployment/fastapi-app -
(Optional) Roll back the deployment:
If you ever deploy a bad version, rolling back is simple. This command will revert to the previous revision.kubectl rollout undo deployment/fastapi-app
Conclusion
In this lesson, you elevated your Kubernetes deployment skills from basic to production-ready. You learned that achieving zero downtime requires a deliberate partnership between the platform's configuration and the application's behavior.
Key Takeaways:
- A Rolling Update is Kubernetes' default strategy for replacing Pods, controlled by
maxSurgeandmaxUnavailable. A setting ofmaxSurge: 1andmaxUnavailable: 0is a very safe starting point. - Readiness Probes are essential for graceful startup. They tell Kubernetes when a new Pod is truly ready to handle traffic, preventing errors from premature routing.
- Graceful shutdown requires setting
terminationGracePeriodSecondsto a value that allows in-flight requests to complete. - A
preStophook with a smallsleepis a best practice to mitigate network race conditions during pod termination.
Preview of the Next Lesson
Our application is now deployed and updatable without downtime. However, when things go wrong, how do we find out what happened? Plain text logs are hard to search and analyze. In the next lesson, we will focus on observability by learning how to configure structured JSON logging in a Python microservice, making our logs machine-readable and far more powerful for debugging in a distributed environment.