Hello! In our previous lesson, we implemented caching with Redis to improve the performance and resilience of our services by reducing database load. We will now tackle another critical aspect of building robust, production-grade systems: protecting our services from being overwhelmed.
This lesson focuses on rate limiting, a crucial defense mechanism against traffic spikes, accidental misuse from buggy clients, and malicious denial-of-service attacks. You will learn how to apply rate limiting at the API Gateway, which acts as the front door to our entire microservices system. We will use a popular Python library in conjunction with Redis to enforce these limits in a distributed-friendly way.
By the end of this lesson, you will be able to apply rate limiting at the API Gateway to protect your downstream services from excessive traffic.
1. Why Rate Limiting is Essential
When you expose an API to the public, you share a set of resources (CPU, memory, database connections) among all its users. Without any controls, a single misbehaving client could consume all those resources, degrading the service for everyone else. This is a classic example of the "Tragedy of the Commons."
Rate limiting prevents this by enforcing a cap on how many requests a client can make in a given time frame. To understand the severe consequences of not having rate limiting, let's look at some real-world production failure scenarios.
This video from Redis explains the fundamental reasons for implementing rate limiting.
Watch the first section on why rate limiting is necessary. Pay close attention to the "Tragedy of the Commons" analogy and the real-world example of a corporate client's script taking down a data store. This illustrates how even unintentional misuse can cause a "dumpster fire."
The API Gateway: The Ideal Place for Rate Limiting
The API Gateway is the single entry point for all external traffic into our system. This makes it the perfect place to enforce cross-cutting concerns like authentication, logging, and, of course, rate limiting.
By placing the rate limiter at the gateway, we can stop excessive traffic before it even reaches our internal microservices, protecting the entire system at its perimeter.
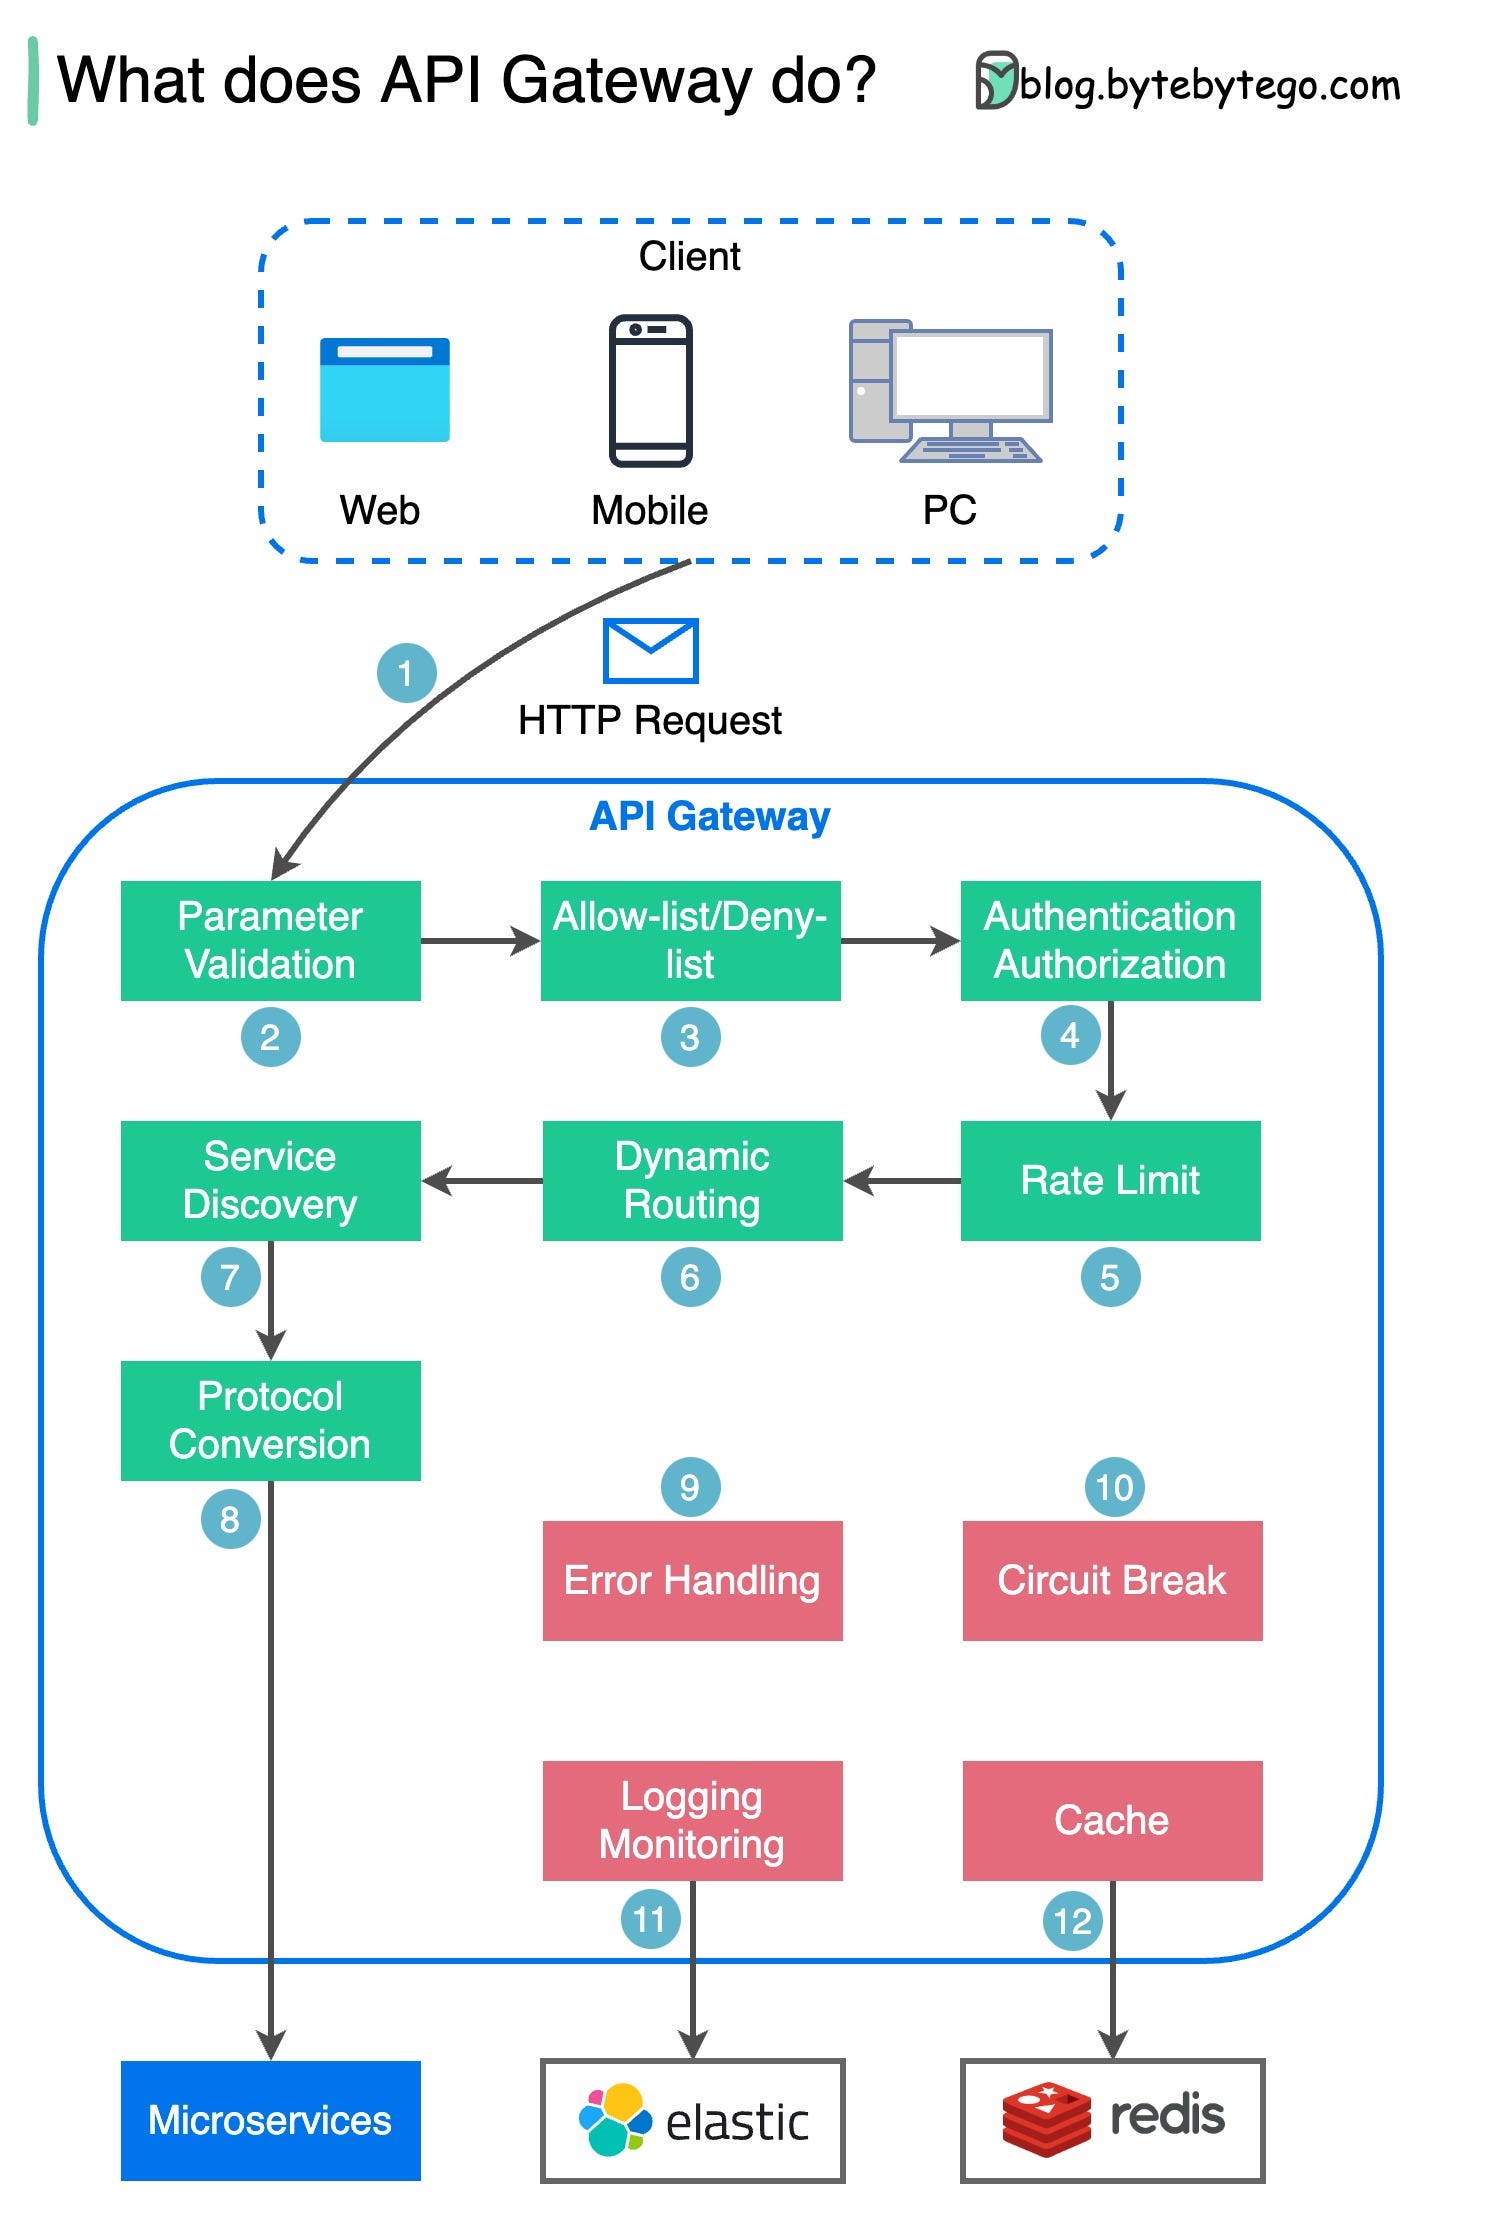
The typical architecture for this involves a rate-limiting middleware within the gateway that communicates with a centralized store, like Redis, to track request counts.

2. Rate Limiting Algorithms and Strategies
Before we implement a rate limiter, it's helpful to understand the common algorithms and strategies. Each has different trade-offs in terms of fairness, performance, and complexity.
Python Rate Limiting for APIs: Concepts
This article provides an excellent overview of the core concepts you need to know.
Read the section titled "Rate Limiting Concepts Every Python API Developer Should Know." Focus on understanding: The difference between Fixed Window, Sliding Window, and Token Bucket algorithms. The "dimensions" for limiting: Per-IP, Per-User, etc. The critical difference between In-Memory vs. Distributed Stores like Redis, and why a distributed store is essential for microservices that scale horizontally.
For our purposes, using a distributed store like Redis is non-negotiable. If each instance of our API Gateway kept its own in-memory counters, a client could bypass the rate limit simply by having their requests distributed across different instances by the load balancer. Redis provides a centralized, shared source of truth for all request counts.
3. Implementing Rate Limiting in FastAPI with SlowAPI
While you can build a rate limiter from scratch using Redis commands as shown in the first video, there are excellent libraries that simplify this process. We will use slowapi, a popular and easy-to-use rate-limiting extension for FastAPI.
The following video provides a practical walkthrough of setting up slowapi, first with an in-memory store and then graduating to a more robust Redis-backed implementation.
SlowAPI and Redis - Rate-Limiting for FastAPI apps!
This tutorial by BugBytes is a perfect guide to using slowapi in a FastAPI application.
First, watch the introduction to understand what slowapi does. Next, watch the detailed setup process from "how to set up the limiter object". This covers instantiating the limiter, handling the RateLimitExceeded exception, and applying limits to an endpoint with a decorator. Then, watch the section on configuring SlowAPI with Redis. This is the most important part, as it explains why a distributed store is necessary for scalability and shows how to connect slowapi to a Redis instance. Finally, watch the discussion on different types of rate limiting to understand where application-level limiting fits within a broader defense strategy.
The key steps for implementing a Redis-backed rate limiter with slowapi are:
- Install the necessary packages:
pip install slowapi redis. - Instantiate a
Limiterobject, providing akey_func(e.g., to identify clients by IP address) and astorage_uripointing to your Redis instance. - Register the limiter and an exception handler with your FastAPI app.
- Apply rate limits to your endpoints using the
@limiter.limit(...)decorator.
4. Hands-On Exercise: Protecting the API Gateway
Now it's time to apply what you've learned. You will add a rate limit to a simple FastAPI application that acts as an API Gateway.
Setup:
- Make sure you have
fastapi,uvicorn,slowapi, andredisinstalled in your virtual environment. - Start a Redis container if you don't already have one running from the previous lesson:
docker run -d --name my-redis -p 6379:6379 redis. - Save the code below into a file named
api_gateway.py.
api_gateway.py (Your workspace)
from fastapi import FastAPI, Request, Response, HTTPException
from slowapi import Limiter, _rate_limit_exceeded_handler
from slowapi.util import get_remote_address
from slowapi.errors import RateLimitExceeded


# --- TODO: Task 1 - Create and configure the Limiter ---
# 1. Create a Limiter instance.
#    - The key_func should be get_remote_address to limit by IP.
#    - The storage_uri should point to your local Redis instance.
#    - You can also set a default_limits string, e.g., "100/minute".
# Hint: limiter = Limiter(...)

limiter = None # Replace this with your Limiter instance

app = FastAPI()


# --- TODO: Task 2 - Register the limiter with the FastAPI app ---
# 1. Add the limiter to the app's state.
# 2. Add the exception handler for RateLimitExceeded.
# Hint: app.state.limiter = ...
# Hint: app.add_exception_handler(...)


@app.get("/")
def read_root():
    return {"message": "API Gateway is running"}


# --- TODO: Task 3 - Apply a rate limit to this endpoint ---
# Apply a specific, stricter rate limit to this endpoint.
# Let's say 5 requests per minute.
# Hint: Use the @limiter.limit(...) decorator.
@app.get("/products")
async def list_products(request: Request):


    # In a real gateway, this would route to the product service.
    return {"products": ["Laptop", "Mouse", "Keyboard"]}


@app.get("/orders")
async def list_orders(request: Request):


    # This endpoint will use the default limit (if you set one).
    return {"orders": [{"id": "abc", "item_count": 2}]}


if __name__ == "__main__":
    import uvicorn
    uvicorn.run(app, host="0.0.0.0", port=8000)
Instructions:
- Task 1: In
api_gateway.py, create aLimiterinstance. Configure it to use the client's IP address as the key and your local Redis instance (redis://localhost:6379) as the storage backend. - Task 2: Register the limiter with the FastAPI app by adding it to
app.stateand setting up the exception handler forRateLimitExceeded. - Task 3: Apply a specific rate limit of 5 requests per minute to the
/productsendpoint using the@limiter.limit()decorator. Remember to include therequest: Requestargument in the endpoint function soslowapican access it.
To Test Your Solution:
- Run the service:
uvicorn api_gateway:app --reload. - Open a terminal and use
curlto make requests to the/productsendpoint:for i in {1..7}; do curl -i http://127.0.0.1:8000/products; echo ""; sleep 1; done - Observe the output. The first 5 requests should return
HTTP/1.1 200 OK. The 6th and 7th requests should returnHTTP/1.1 429 Too Many Requests. - After waiting for a minute, try again. You should be able to make requests successfully.
Solution
from fastapi import FastAPI, Request, Response, HTTPException
from slowapi import Limiter, _rate_limit_exceeded_handler
from slowapi.util import get_remote_address
from slowapi.errors import RateLimitExceeded


# --- Task 1: Create and configure the Limiter ---
limiter = Limiter(key_func=get_remote_address, storage_uri="redis://localhost:6379")

app = FastAPI()


# --- Task 2: Register the limiter with the FastAPI app ---
app.state.limiter = limiter
app.add_exception_handler(RateLimitExceeded, _rate_limit_exceeded_handler)


@app.get("/")
def read_root():
    return {"message": "API Gateway is running"}


# --- Task 3: Apply a rate limit to this endpoint ---
@app.get("/products")
@limiter.limit("5/minute")
async def list_products(request: Request):


    # In a real gateway, this would route to the product service.
    return {"products": ["Laptop", "Mouse", "Keyboard"]}


@app.get("/orders")
async def list_orders(request: Request):


    # This endpoint will use the default limit (if you set one).
    return {"orders": [{"id": "abc", "item_count": 2}]}


if __name__ == "__main__":
    import uvicorn
    uvicorn.run(app, host="0.0.0.0", port=8000)
5. Production Best Practices
Implementing the limiter is the first step. For a production system, providing clear feedback to clients is essential.
Informative Response Headers
When a client is rate-limited, they should know why and when they can try again. When a request is successful, they should know how close they are to the limit. This is accomplished with standard HTTP headers. slowapi adds some of these automatically, but you can customize the response. The most common headers are:
X-RateLimit-Limit: The total number of requests allowed in the time window.X-RateLimit-Remaining: The number of requests remaining in the current window.Retry-After: The number of seconds the client should wait before making a new request (sent with a429response).
The article Python Rate Limiting for APIs has a great section on "Returning Helpful 429 Responses and Headers" that shows how to implement a custom dependency to add these headers. This is a valuable pattern for improving your API's usability.
Conclusion
You have now implemented another critical resilience pattern. By adding a rate limiter at the API Gateway, you are protecting all your downstream services from being overwhelmed by traffic, ensuring fairness, and increasing the overall stability of your system.
Key Takeaways:
- Rate limiting is a crucial defense against service abuse and overload.
- The API Gateway is the ideal location to enforce rate limits for an entire microservices system.
- A distributed store like Redis is essential for enforcing limits consistently across multiple gateway instances.
- Libraries like
slowapimake it straightforward to implement sophisticated rate-limiting strategies in FastAPI. - Returning informative HTTP headers (
X-RateLimit-*,Retry-After) is a best practice that helps clients interact with your API responsibly.
Preview of the Next Lesson
We've now added several resilience and security patterns to our services at runtime. However, securing a system also involves protecting sensitive information during development and deployment. In our next lesson, we will focus on how to manage application secrets securely for local development using Docker Compose and environment files, a foundational practice for building secure applications.