Welcome to the first lesson of Module 6. In the previous module, we laid a comprehensive theoretical foundation for Protocol Buffers and gRPC, culminating in our exploration of the four powerful communication patterns. You now have the "what" and the "why." Today, we shift gears and begin our journey into the "how."
This lesson marks an exciting transition from theory to practice. We will take the service contract we defined in a .proto file and use gRPC's tooling to automatically generate the Python code that forms the skeleton for our service. This process, known as code generation, is a cornerstone of the gRPC workflow.
By the end of this lesson, you will be able to use the grpc_tools library to generate Python server and client stub code directly from your .proto files, preparing the groundwork for building your first fully functional gRPC service.
The gRPC Code Generation Workflow
Before we write any commands, let's visualize the process. At its core, gRPC development follows a three-step workflow: defining your service, compiling that definition into language-specific code, and then implementing your application logic using that generated code.

The magic happens in the "Compile" step. A tool called the Protocol Buffer Compiler, or protoc, reads your language-agnostic .proto file and generates the necessary classes and functions for your chosen language. For us, this means generating Python code.
This generated code includes:
- Message Classes: Python classes that represent the
messagetypes in your.protofile. These handle the efficient serialization and deserialization of your data. - Client Stub: A client-side class that you'll use to make RPC calls. It abstracts away all the complex networking and serialization logic, making a remote call feel like a local function call.
- Server Servicer: A base class that defines the service's interface. Your server implementation will inherit from this class and provide the logic for each RPC method.
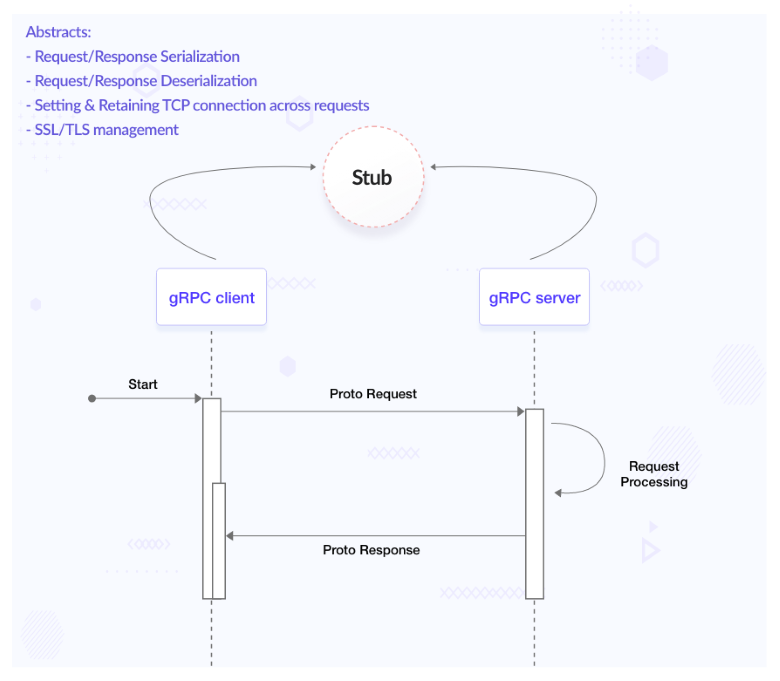
The client stub is a particularly important concept. It's the object that makes remote communication feel local.
Setting Up Your Python Environment
To perform code generation for Python, we need two key packages from the grpcio ecosystem.
grpcio: This is the core gRPC library for Python. It contains the runtime components needed to run gRPC clients and servers.grpcio-tools: This package provides the command-line tools for development, most importantly, theprotoccompiler and the Python plugin it needs to generate Python-specific code.
You can install them using pip. It's good practice to pin versions for production-grade projects, so we'll do that here.
pip install grpcio==1.60.0 grpcio-tools==1.60.0
With these tools installed, you have everything you need to turn a .proto file into Python code.
From .proto to .py: The protoc Command
The command to generate code is invoked by running the grpc_tools.protoc module. Let's start with a practical example from the ground up.
1. Project Structure
A clean project structure is vital for maintainability. It separates the source of truth (the .proto files), the auto-generated code, and your handwritten application logic. We will adopt the following structure, which is a common convention.
myservice/
├── protos/
│   └── user_service.proto
├── generated/
│   ├── __init__.py
│   └── (Generated files will go here)
├── server.py
└── client.py
protos/: Contains all your service definitions.generated/: Will house the auto-generated Python files. Creating an__init__.pyfile inside makes it a regular Python package, which allows for clean imports (e.g.,from generated import user_service_pb2).server.py&client.py: Where we will write our application logic in the upcoming lessons.
2. Defining the Service
Let's create our service definition file, protos/user_service.proto. We'll use a comprehensive example that includes all four communication patterns we discussed in the last lesson.
How to Build gRPC Services with grpcio in Python
This section from an article by OneUptime provides an excellent, production-oriented .proto file for a user service.
Copy the code block under the heading "Defining the Service with Protocol Buffers" into your myservice/protos/user_service.proto file. This file defines several messages (User, GetUserRequest, etc.) and a UserService with unary, server-streaming, client-streaming, and bidirectional-streaming RPCs.
3. Generating the Code
Now, navigate to the root of your myservice/ directory in your terminal. From there, run the following command to generate the Python code.
How to Build gRPC Services with grpcio in Python
This section provides the exact command needed to generate the Python code.
Read the section "Generating Python Code" and run the command provided. I've broken down what each part of the command does below.
Let's analyze the command you just ran:python -m grpc_tools.protoc -I./protos --python_out=./generated --grpc_python_out=./generated ./protos/user_service.proto
python -m grpc_tools.protoc: This invokes theprotoccompiler bundled withgrpcio-tools.-I./protos(or--proto_path=./protos): This flag tellsprotocwhere to find the.protofiles.Istands for "Include".--python_out=./generated: This specifies the output directory (./generated) for the message-related code. It will createuser_service_pb2.py.--grpc_python_out=./generated: This specifies the output directory for the gRPC service-related code. It will createuser_service_pb2_grpc.py../protos/user_service.proto: This is the input file we are compiling.
After running this command, your generated/ directory should now contain two new files:
user_service_pb2.pyuser_service_pb2_grpc.py
Conceptually, this is exactly what the presenter in the "Protocol Buffers Crash Course" video described when talking about the compiler's role, although he was using JavaScript. If you want a quick refresher on that concept, you can review his explanation.
This segment from "Protocol Buffers Crash Course" explains the language-agnostic role of the protoc compiler.
Watch the section on the purpose of the compiler to reinforce your understanding of how a single .proto file can generate code for any supported language.
Inspecting the Generated Files
These two generated files are the foundation of our application. You should never edit them manually, as they will be overwritten every time you re-run the protoc command.
Let's understand what they contain, using the official gRPC documentation as a guide.
Basics tutorial | Python - gRPC
The official gRPC documentation clearly explains the contents of the two generated Python files.
Please read the bulleted list in the section "Generating client and server code". This list details the classes and functions created in the _pb2.py and _pb2_grpc.py files.
To summarize what you've just read and apply it to our user_service example:
-
user_service_pb2.py- This file contains the Python classes that correspond to your
messagedefinitions. - For example, it will have a
Userclass, aGetUserRequestclass, and so on. - You will use these classes to create, populate, and read your request and response objects. They handle the conversion to and from the binary Protobuf format.
- This file contains the Python classes that correspond to your
-
user_service_pb2_grpc.py- This file contains the gRPC-specific components.
UserServiceStub: The client stub. Your client code will instantiate this class. It will have methods that mirror your service's RPCs (e.g.,GetUser,WatchUserUpdates). When you callstub.GetUser(request), it serializes the request, sends it to the server, and deserializes the response.UserServiceServicer: The server-side "interface". This is an abstract base class. Your server implementation must inherit from this class and provide concrete implementations for the methods (GetUser,WatchUserUpdates, etc.).add_UserServiceServicer_to_server: A helper function that takes an instance of your servicer implementation and registers it with agrpc.Serverobject.
Now you have the complete scaffolding. The contract defined in .proto has been translated into a set of Python classes that are ready for you to use.
Conclusion
In this lesson, we took a critical first step into practical gRPC development. We transformed a .proto service definition into a set of ready-to-use Python classes, bridging the gap between design and implementation.
Key Takeaways:
- The
grpcio-toolspackage provides theprotoccompiler for generating Python code from.protofiles. - The command
python -m grpc_tools.protocis the standard way to run the compiler for a Python project. - Code generation produces two key files:
*_pb2.pyfor message serialization classes.*_pb2_grpc.pyfor the client stub and server servicer base class.
- A clean project structure separating
.protodefinitions, generated code, and application logic is crucial for maintainable services. - The generated code acts as the "scaffolding," providing the necessary structure upon which you build your application logic.
Preview of the Next Lesson
We have successfully generated the skeleton of our service. In the next lesson, "Implement a unary RPC service and client using async Python," we will finally breathe life into this skeleton. You will write the server-side logic by implementing a method on your UserServiceServicer and then write a client that uses the UserServiceStub to call it. It's time to make your first async gRPC call.