Welcome to the final lesson of our Airflow module. In our last session, you learned how to implement an efficient incremental ingestion strategy using a high-watermark. This kind of sophisticated logic is powerful, but it also introduces complexity. How can we be certain it works correctly under all conditions? How do we refactor it in the future without breaking it? The answer is automated testing.
Today, you will learn how to write unit tests for your data ingestion functions. We'll use pytest, the industry-standard testing framework for Python, to create robust, automated checks for our code. Specifically, we'll tackle the challenge of testing functions that interact with a database. By the end of this lesson, you will be able to set up an isolated test database, write tests that verify your ingestion logic, and run them automatically, giving you confidence that your data pipeline is both correct and reliable.
Why Test Data Ingestion?
As pipelines grow, the logic within them becomes more complex. An incremental load, an idempotent upsert, or a data validation step are all points where bugs can silently creep in, leading to data loss, corruption, or duplication. Manual verification by querying the database after a run simply doesn't scale.
Automated tests serve three primary purposes:
- Correctness: They verify that your code produces the expected outcome.
- Regression Prevention: They act as a safety net, ensuring that future changes don't unintentionally break existing functionality.
- Documentation: A well-written test clearly describes what a piece of code is supposed to do.
The Anatomy of a Test: Arrange, Act, Assert
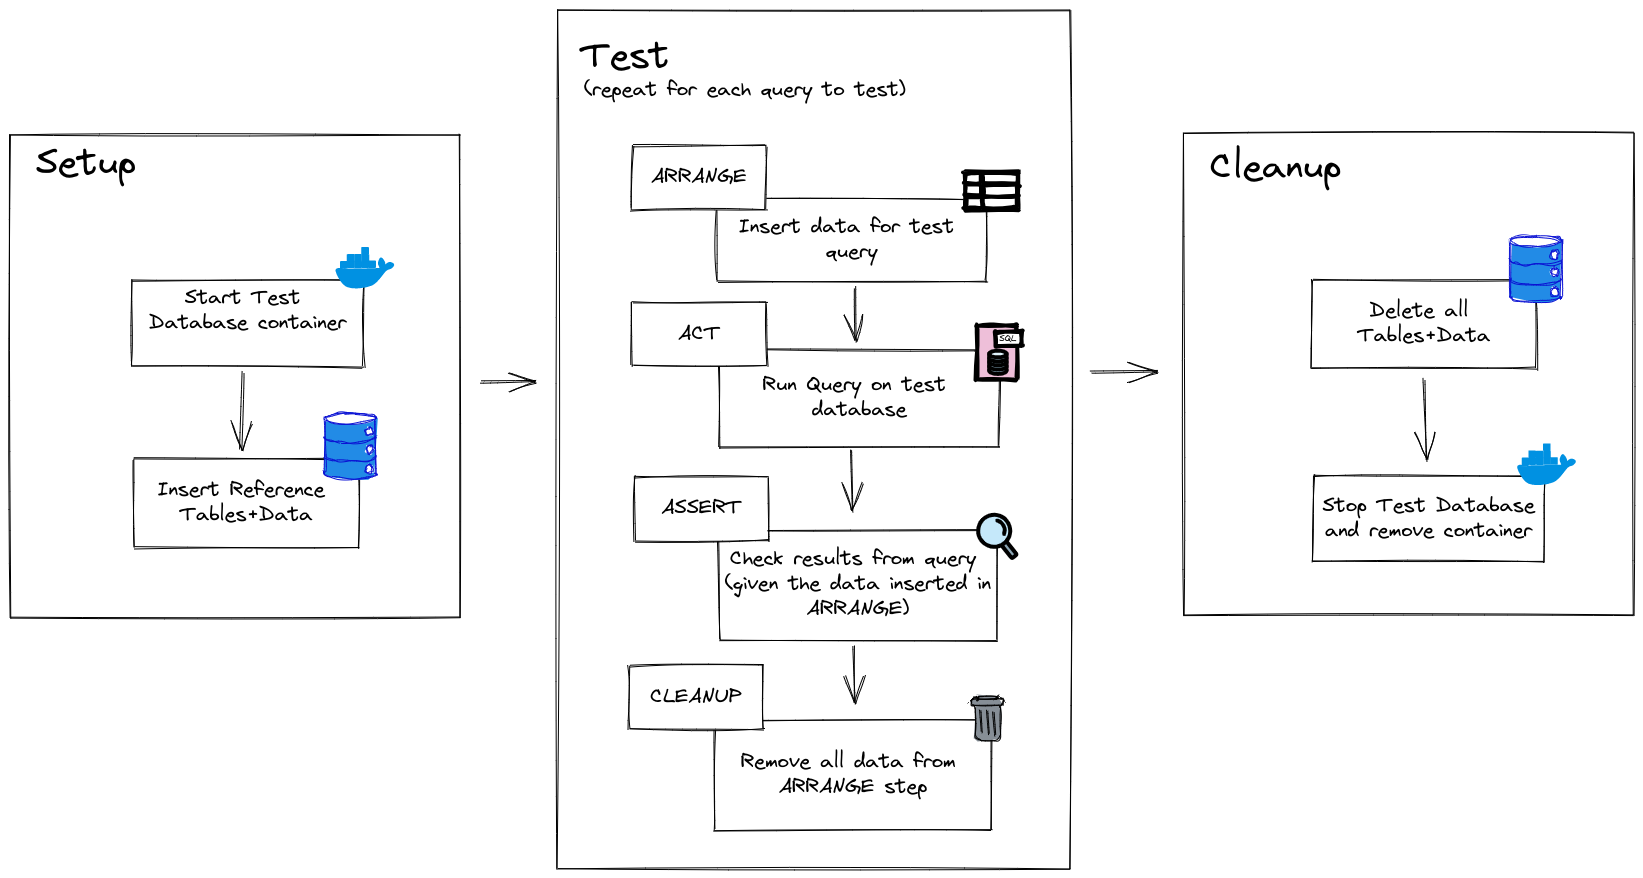
A standard pattern for structuring tests is Arrange-Act-Assert (AAA). It's a simple but powerful way to ensure your tests are clear and focused.
- Arrange: Set up all the preconditions for the test. For a database test, this involves preparing the database state: creating tables, inserting seed data, and setting any initial values (like a starting watermark).
- Act: Execute the single unit of code you want to test. This is typically a single function call, like
ingest_api_data(). - Assert: Verify that the outcome of the action is what you expected. This involves querying the database and asserting that the final state is correct—for example, that new rows were added, existing rows were updated, or an audit log was written.
This entire workflow can be visualized as a self-contained cycle for each test.
The Challenge: Isolating the Database
A core principle of unit testing is isolation. Tests should not interfere with each other, and they certainly shouldn't affect your real development or production databases. Running tests against a live database is slow, unreliable, and dangerous. So, how do we test code that's designed to interact with a database?
There are two main philosophies:
-
Mocking the Database: In this approach, you don't use a real database at all. Instead, you use a "mock" object—a fake, in-memory object that pretends to be a database connection. Your test then asserts that your code called the correct methods on this mock object (e.g.,
"was session.commit() called?").- Pros: Extremely fast; no external dependencies needed.
- Cons: It doesn't actually test your SQL. A typo in your
INSERTstatement or a violation of aUNIQUEconstraint won't be caught, because no real SQL is ever executed. It tests your Python code's intent to talk to the database, not the actual database interaction itself.
-
Using a Real, Ephemeral Database: In this approach, you use a real database engine (like PostgreSQL) but in a temporary, disposable environment. For each test run, you programmatically start a fresh, empty database instance (often in a Docker container), run your tests against it, and then tear it down completely.
- Pros: High confidence. You are testing your Python logic and your SQL against the real database engine. It will catch SQL errors, constraint violations, and trigger failures.
- Cons: Slower than mocking; requires a local Docker setup.
For data engineering, where the correctness of SQL transformations and interactions is paramount, the second approach is generally superior. The confidence it provides is well worth the slightly longer execution time. We will focus on this method using a powerful library called Testcontainers.
Setting Up Your Testing Environment with pytest
Before we dive into the database specifics, let's cover the basics of pytest. It's a framework that makes testing simple and scalable. The "Tech With Tim" YouTube channel has an excellent introductory tutorial.
Please Learn How To Write Tests in Python… • Pytest Tutorial
This video provides a great overview of Pytest. Focus on these key concepts.
Watch the beginning to understand the core idea of pytest: how to write a test file, name a test function, and use the assert statement. Pay close attention to the explanation of pytest fixtures. The section on using fixtures to get a fresh instance of a class for each test demonstrates the principle of test isolation. Finally, the explanation of using yield in a fixture for setup and teardown is the exact pattern we will use to manage our database state.
Implementing Database Tests with Testcontainers
Now, let's combine pytest fixtures with Testcontainers to build our testing framework. Testcontainers is a Python library that makes it easy to spin up Docker containers for your tests.
The goal is to create pytest fixtures that automatically handle the lifecycle of a PostgreSQL container and ensure each test runs against a clean database. The guide "Getting started with Testcontainers for Python" provides a complete walkthrough of this process.
Getting started with Testcontainers for Python
This guide shows a practical, end-to-end example of testing a Python application that uses a PostgreSQL database. We will adapt this pattern for our ingestion functions.
Please read the section "Write tests using Testcontainers". Focus on how it uses two separate pytest fixtures with different scopes: A module-scoped fixture (setup) to start the PostgreSQL container once for the entire test file. It also creates the necessary table schema. A function-scoped fixture (setup_data) to clean the data from the tables before each test. This ensures every test starts with a clean slate, preventing interference. This two-level fixture setup is a robust and efficient pattern for database testing.
Let's break down how you would structure this in your project.
Project Structure
Your test files should live in a tests/ directory, mirroring your application's structure. pytest will automatically discover files that start with test_ or end with _test.py.

Creating the Fixtures
You can place your shared fixtures in a file named tests/conftest.py. pytest automatically discovers and makes fixtures in this file available to all your tests.
Here is a conceptual example of what your conftest.py might look like, combining the patterns from the resources:
# tests/conftest.py
import pytest
import os
from sqlalchemy import create_engine
from testcontainers.postgres import PostgresContainer


# 1. Module-scoped fixture to manage the Docker container
@pytest.fixture(scope="module")
def postgres_container():


    # Start the container
    container = PostgresContainer("postgres:15-alpine")
    container.start()


    # Get connection URL and set environment variables for the application code
    db_url = container.get_connection_url()
    os.environ["DATABASE_URL"] = db_url


    # Yield the container instance to the tests
    yield container


    # Teardown: stop the container after all tests in the module are done
    container.stop()


# 2. Function-scoped fixture to manage the database schema and data
@pytest.fixture(scope="function")
def db_session(postgres_container):


    # Get the connection URL from the running container
    db_url = postgres_container.get_connection_url()
    engine = create_engine(db_url)


    # Setup: Create tables before each test
    # (Assuming you have SQLAlchemy models defined in `my_app.models.Base`)
    # from my_app.models import Base
    # Base.metadata.create_all(engine)

    session = sessionmaker(bind=engine)()

    yield session # This is the object the test will use


    # Teardown: Clean up after each test
    session.close()


    # Base.metadata.drop_all(engine) # Or truncate tables for speed
Writing Your First Ingestion Test
With the fixtures in place, writing the test is straightforward. The fixtures are passed as arguments to your test function, and pytest handles injecting them.
Let's imagine you have a function load_users that performs an upsert into a users table.
# my_app/ingestion.py
def load_users(session, users_data):


    # ... logic to perform INSERT ... ON CONFLICT ...
    pass


# tests/test_ingestion.py
from my_app.ingestion import load_users
from my_app.models import User # Your SQLAlchemy model

def test_load_users_inserts_and_updates(db_session):
    """
    Tests that load_users correctly inserts new users and updates existing ones.
    """


    # ARRANGE
    # An existing user that should be updated
    existing_user = User(id=1, name="Old Name", email="user1@example.com")
    db_session.add(existing_user)
    db_session.commit()


    # Data for the ingestion function to process
    new_data = [
        {"id": 1, "name": "New Name", "email": "user1@example.com"}, # Update user 1
        {"id": 2, "name": "User Two", "email": "user2@example.com"},  # Insert user 2
    ]


    # ACT
    load_users(db_session, new_data)


    # ASSERT
    all_users = db_session.query(User).order_by(User.id).all()


    # Verify the total count
    assert len(all_users) == 2, "Should be two users in the database"


    # Verify the updated user
    assert all_users[0].id == 1
    assert all_users[0].name == "New Name", "Existing user's name should be updated"


    # Verify the inserted user
    assert all_users[1].id == 2
    assert all_users[1].name == "User Two", "New user should be inserted"
This test is clear, isolated, and provides high confidence. If it passes, you know your load_users function works correctly against a real PostgreSQL database.
Conclusion
You've now learned the principles and practice of writing automated tests for data ingestion functions. This is a critical skill for building reliable and maintainable data pipelines.
Here are the key takeaways:
- The Arrange-Act-Assert pattern provides a clear structure for your tests.
- For data-intensive code, testing against a real, ephemeral database provides the highest level of confidence.
- Libraries like
pytestandTestcontainersprovide powerful, reusable abstractions (fixtures) to manage the lifecycle of your test environments. - Well-written tests ensure your code is correct, prevent future regressions, and serve as living documentation for your pipeline's logic.
In the next module, we will move from ingestion to the next stage of our pipeline: transformation. You'll learn how to use dbt to clean, model, and prepare your raw data for analytics. The tests you've learned to write here are the foundation that ensures dbt has clean, correct data to work with.