Welcome to our next session on orchestrating workflows with Airflow. In previous lessons, we explored how to schedule DAGs based on time and how to trigger them based on events like file arrivals. We're now going to address a fundamental challenge in data engineering: efficiency. Running a full data extraction every time a pipeline runs is often wasteful and slow. Today, you'll learn a powerful pattern to process only what has changed since the last run.
This lesson focuses on implementing an incremental ingestion strategy using a high-watermark timestamp stored in Postgres. This technique is central to building efficient, scalable, and cost-effective data pipelines. By mastering this, you will make your pipelines smarter, faster, and more robust—a critical skill for your personal project and any production data platform.
From Full Loads to Incremental Ingestion
So far, our ingestion scripts have been designed to pull all the data from a source. While simple, this "full load" approach becomes increasingly problematic as data volumes grow. Imagine a source table with millions of records, where only a few thousand are new or updated each day. Re-ingesting the entire table every time is highly inefficient.
The solution is incremental ingestion: a strategy where each pipeline run processes only the new or modified data since the previous run. The most common way to achieve this is the high-watermark strategy.
The core idea is simple:
- You track a column in your source data that reliably indicates when a record was created or changed (e.g., an
updated_attimestamp or an auto-incrementingID). - After each successful pipeline run, you save the highest value seen in that column. This saved value is your "high-watermark."
- On the next run, you query the source for records where the tracking column's value is greater than the saved high-watermark.
For a quick and clear visual explanation of this process, watch the first minute of the following video.
Python ETL pipeline how to perform incremental data load | Source Change Detection | Python | ETL
Watch this short segment from "BI Insights Inc" for a conceptual overview.
The video begins by explaining how modified_at and created_at fields are used. Watch from the start until about the conceptual overview is complete.
Now that you have the main idea, let's dive into the practical implementation, step by step.
Step 1: Preparing the Source Database
The high-watermark strategy depends entirely on having a reliable column in your source tables to track changes. An updated_at timestamp column is the gold standard for this. It should be updated every time a row is modified. While application logic can set this, it's far more reliable to enforce this at the database level using a trigger.
Given your experience with PostgreSQL, you'll appreciate how you can automate this. The article "How to Build Timestamp-Based CDC" provides an excellent guide on how to set up your tables correctly.
How to Build Timestamp-Based CDC
This article from OneUptime details the database-side setup required for timestamp-based incremental loading.
Focus on the section Designing Timestamp Columns. Pay close attention to the PostgreSQL examples for creating a table with created_at and updated_at columns, the trigger function update_modified_column, and attaching that trigger to the table. Also, note the critical importance of creating an index on the updated_at column for query performance.
By implementing this pattern, you guarantee that your updated_at column is always accurate, providing a trustworthy foundation for your incremental pipeline.
Step 2: Storing the Watermark Persistently
Your pipeline needs to remember the high-watermark from one run to the next. Since our stack is built around Postgres, the natural place to store this state is in a dedicated table within our database. This table will act as the memory for our pipeline.
A typical watermark table might have the following columns:
pipeline_id: An identifier for the specific data flow (e.g.,customers_from_api).watermark_value: The last successfully processed timestamp.updated_at: A timestamp for when the watermark itself was last updated.
The process of updating this table should be atomic. You can achieve this perfectly with PostgreSQL's INSERT ... ON CONFLICT statement, also known as an "upsert". This command allows you to insert a new row or, if a row for that pipeline_id already exists, update it in a single, non-interruptible operation.
The article we just looked at also contains a superb, production-ready implementation for a PostgresWatermarkStore.
How to Build Timestamp-Based CDC
Let's continue with the same article to see how to implement the watermark storage.
Find the heading Watermark Storage. Read through the description and then focus on the PostgresWatermarkStore class. Study the _ensure_table_exists method to see the CREATE TABLE statement and, most importantly, the set_watermark method, which demonstrates the robust INSERT ... ON CONFLICT pattern for performing an atomic upsert.
Step 3: The Incremental Extraction and Loading Logic
Now we can combine these pieces into the core logic of our pipeline. An Airflow task will execute a Python function that performs the following sequence:
- Get Last Watermark: Query the
cdc_watermarkstable to retrieve the watermark for the current pipeline. If it's the very first run, no watermark will exist. In this case, we use a default "epoch" value (like1970-01-01) to ensure we perform an initial full load. - Extract Changes: Query the source table for all rows
WHERE updated_at >= last_watermark. Using>=is slightly safer than>to handle multiple records with the exact same timestamp. As you iterate through the extracted rows, you must find the maximumupdated_atvalue among them. This will become the next high-watermark. - Load Data: Load the batch of new and updated records into your bronze layer in Postgres. As we covered previously, this load should be idempotent, for example, by using an
INSERT ... ON CONFLICTstatement on the target table as well. - Update Watermark: If—and only if—the load step completes successfully, you call the
set_watermarkfunction to save the new maximum timestamp you found in step 2. This atomicity is crucial: if the loading fails, the watermark is not updated, and the next run will re-process the same batch of data, ensuring no data is lost.
The "How to Build Timestamp-Based CDC" resource provides a complete, class-based implementation of this entire flow. It's a great example of how to structure this logic cleanly.
How to Build Timestamp-Based CDC
This final reading from the article brings everything together into a complete, orchestrated pipeline.
First, briefly look at the TimestampCDCExtractor class under the section Python CDC Extractor to see how the data extraction query is built. Then, move to the section Complete CDC Pipeline and carefully study the run method within the CDCPipeline class. This method is the blueprint for our logic. Trace how it gets the watermark, extracts changes, tracks the new maximum timestamp, calls the loader, and finally updates the watermark upon success. Notice the try...except block that prevents the watermark from being updated on failure.
A Real-World DAG Example
With all the components in place, orchestrating this with Airflow is straightforward. You would create a Python function that encapsulates the logic from the CDCPipeline.run() method and call it using Airflow's PythonOperator.
The DAG below shows a change-data-capture (CDC) pipeline that performs incremental extraction and loading. Notice the tasks for getting the max date (customer_get_max_date), which embodies the high-watermark logic we've discussed. After this, a branching task (check_full_load) decides whether to perform a small incremental update (transform and cdc_load) or a larger full load (full_transform and full_load), depending on how much data was extracted.
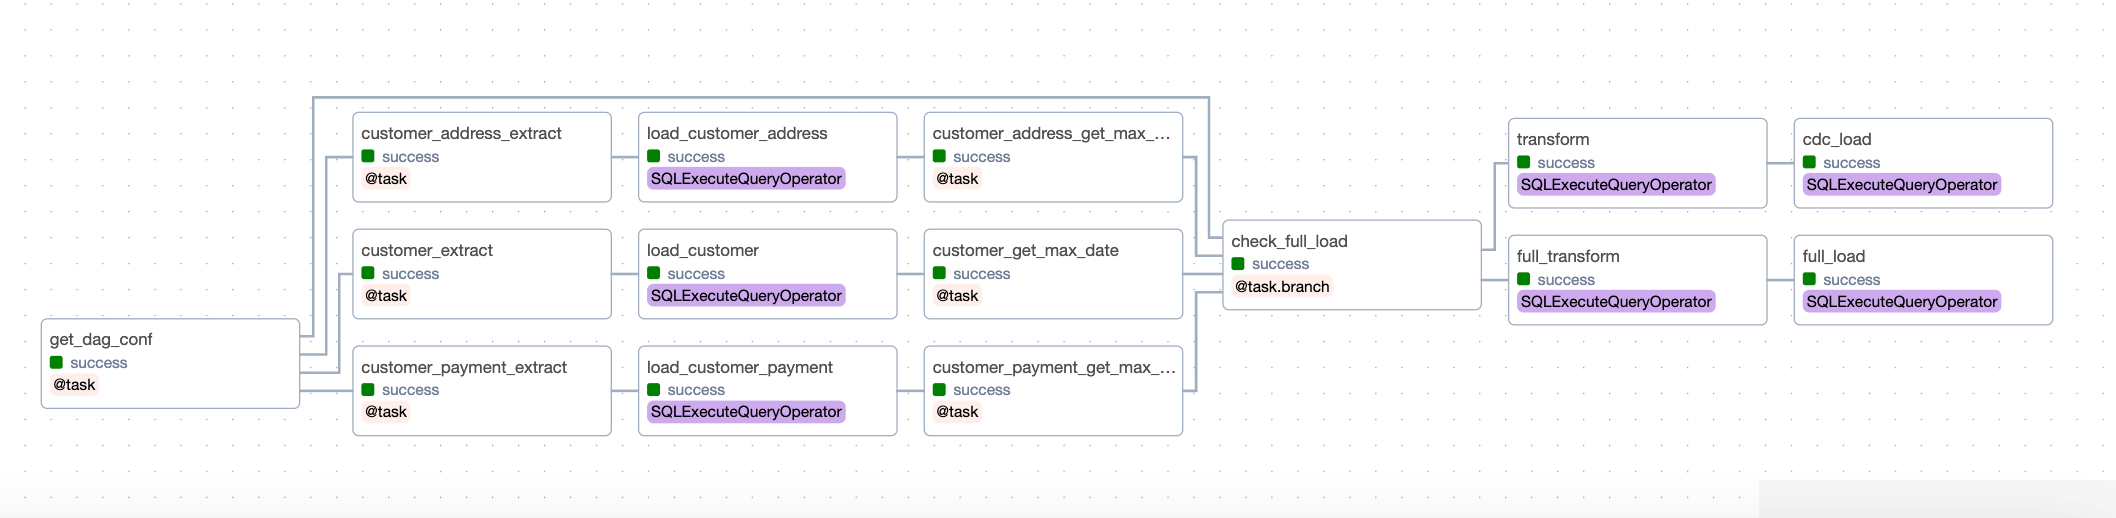
This example shows how the high-watermark pattern fits into a larger, more complex workflow.
Alternative: Watermarking on an ID Column
While we've focused on timestamps, this strategy works equally well with any column that is guaranteed to increase over time. For append-only tables where rows are never updated in place, a simple auto-incrementing integer id is a perfect candidate for a high-watermark. The logic remains identical: you store the max(id) from the last run and query for WHERE id > last_watermark in the next run. This can be simpler and more performant than using timestamps if your use case allows for it. The GitHub project referenced in the resources uses this exact id-based approach.
Conclusion
You have now learned one of the most important patterns in modern data engineering. By moving from inefficient full loads to intelligent incremental ingestion, you can build pipelines that are faster, more scalable, and more reliable.
Let's recap the key takeaways:
- Incremental ingestion processes only new or updated data, which is far more efficient than full loads.
- The high-watermark strategy is the most common way to implement this, using a timestamp or an increasing ID.
- Source tables must be designed to support this, ideally with an automatically updated
updated_atcolumn that is indexed. - The high-watermark value must be stored persistently between runs, for which a dedicated Postgres table is a robust solution.
- The pipeline logic must be atomic: the watermark should only be updated after the data has been successfully loaded to prevent data loss or skipped records.
In our next lesson, we will focus on ensuring the correctness of our work. You will learn how to write unit tests for an ingestion function using pytest and a test database, allowing you to validate logic like this high-watermark implementation automatically.