Hello! Welcome to your daily lesson on advanced architectural patterns.
In our last lesson, we built a robust circuit breaker to protect our services from failing dependencies, a key pattern for system resilience. Today, we shift our focus from resilience to another cornerstone of distributed systems: security. Now that our services can withstand failures, how do we ensure only the right users can access them in the first place?
Your goal for this lesson is to implement stateless authentication using JSON Web Tokens (JWT) and explain its trade-offs. This is the predominant method for securing modern, scalable APIs and microservices. Understanding JWTs "under the hood" is non-negotiable for any elite engineering role.
We will master this fundamental security pattern through five concepts:
- The Problem: State in a Stateless World
- The Solution: Self-Contained JWTs
- Implementing the Full JWT Flow in Python
- Critical Trade-offs: The Revocation Dilemma
- Elite Interview Deep Dive: Refresh Tokens and Asymmetric Keys
1. The Problem: State in a Stateless World (Easy)
-
Technical Explanation:
The HTTP protocol, which powers the web, is stateless. This means each request is treated as an independent transaction, with no memory of previous requests. So, how does a server know you're the same person who logged in a minute ago? The classic solution is session-based (stateful) authentication.The flow works like this:
- A user logs in with their credentials.
- The server verifies the credentials, creates a unique
session_id, and stores user data (like user ID and roles) in a server-side session store (e.g., a Redis cache or a database). - The server sends the
session_idback to the client, usually stored in a cookie. - For every subsequent request, the client's browser automatically sends the cookie containing the
session_id. - The server uses this ID to look up the user's session data from the store, confirming their identity.
While effective, this approach creates a bottleneck in large-scale distributed systems. Every protected request requires a lookup to the session store, and that store must be shared and synchronized across all instances of your service, adding complexity and latency.
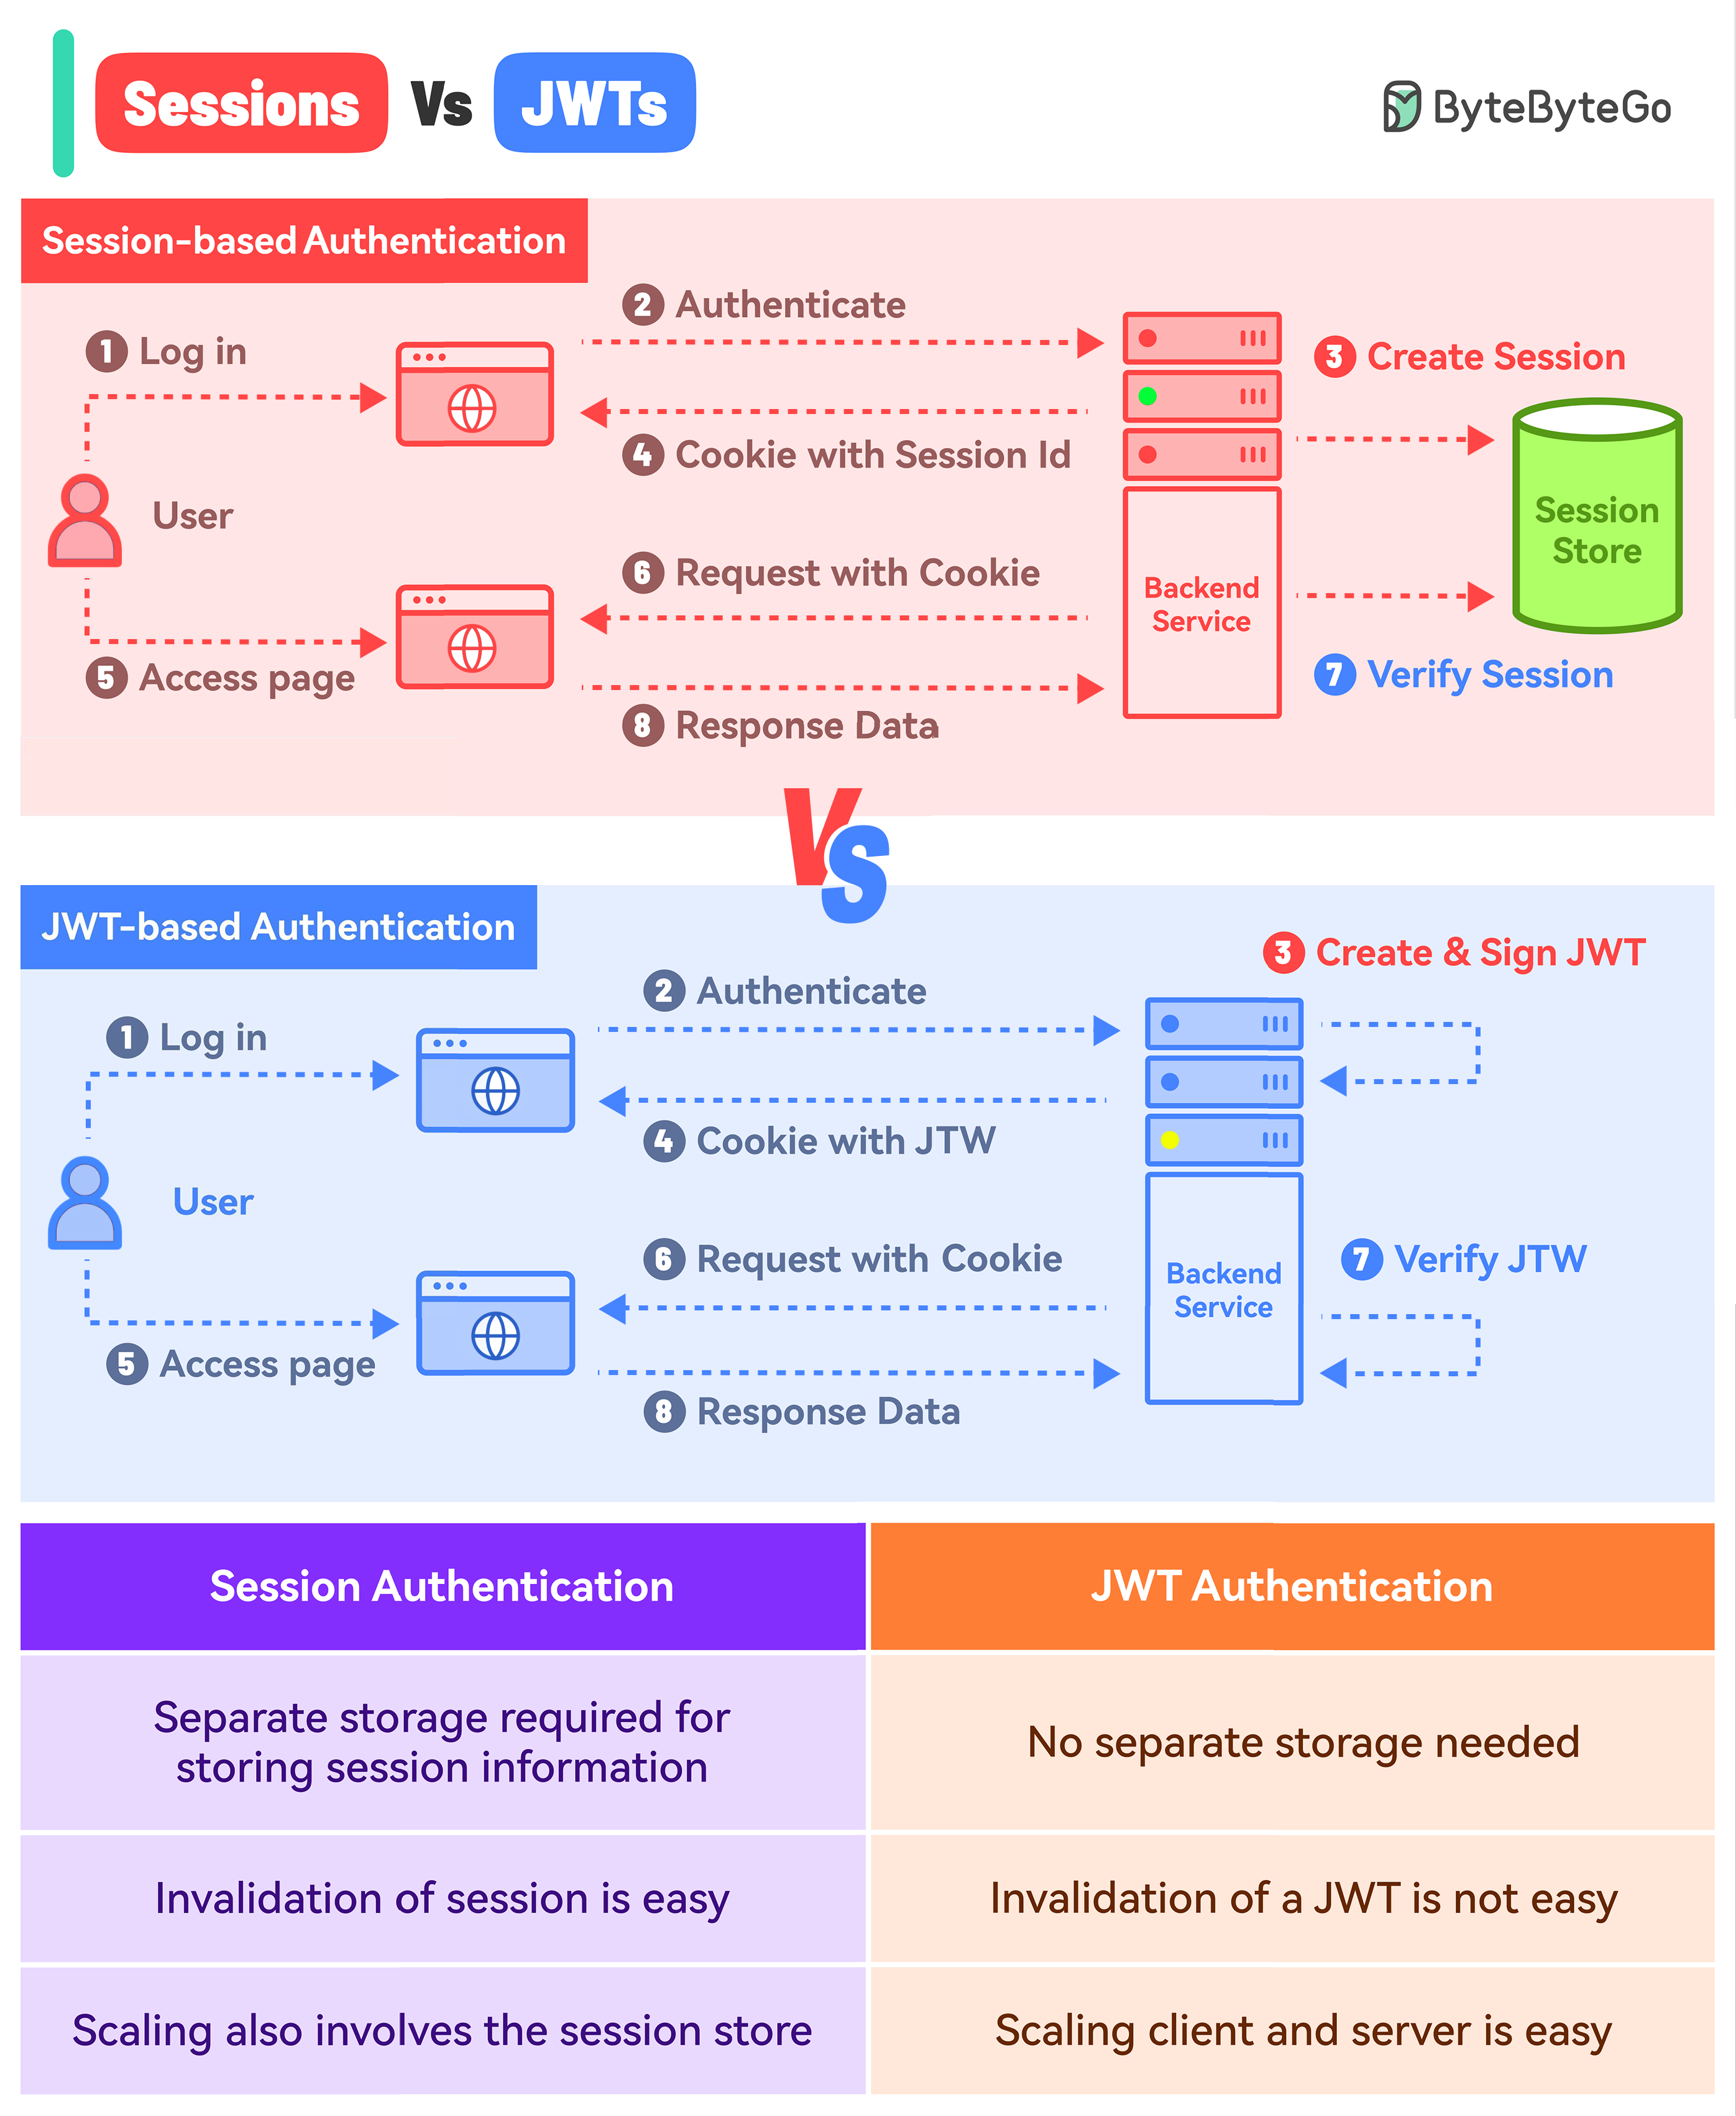
*This diagram visually contrasts stateful session-based authentication (left), which relies on a server-side session store, with stateless JWT-based authentication (right), where the user's state is contained within the token itself.*
-
Metaphor for a 5-Year-Old:
Imagine a big library. With session-based authentication, when you enter, you show your library card and get a special key for a locker (session_id). You put your backpack (your identity info) in the locker. Every time you want to check out a book, you have to go back to your locker with the key to prove who you are. The library has to manage a huge wall of lockers (session store). -
Python Code Snippet (Conceptual Stateful Server):
This simplified code simulates a server maintaining state in a simple dictionary.import uuid # In a real app, this would be a Redis cache or database. SESSION_STORE = {} def login(username, password): # In a real app, you would validate the password against a hashed version in a database. if username == "user" and password == "pass": session_id = str(uuid.uuid4()) SESSION_STORE[session_id] = {"user_id": 123, "username": "user", "roles": ["member"]} print(f"Login successful. Session created: {session_id}") return session_id return None def get_protected_data(session_id): # The server must look up the session on every request. session_data = SESSION_STORE.get(session_id) if session_data: print(f"Access granted for user: {session_data['username']}") return {"data": "This is top secret stuff."} else: print("Access denied. Invalid session.") return None # --- Simulation --- print("--- Simulating Stateful Authentication ---") my_session = login("user", "pass") if my_session: get_protected_data(my_session) get_protected_data("invalid_session_id")
2. The Solution: Self-Contained JWTs (Medium)
-
Technical Explanation:
JSON Web Tokens (JWTs) solve the scalability problem by creating self-contained, stateless tokens. Instead of storing user information on the server, the information is stored directly inside the token on the client side. A JWT consists of three parts, separated by dots:header.payload.signature.- Header: Contains metadata about the token, like the signing algorithm (
alg) and token type (typ). - Payload: Contains the "claims" or data about the user. These include registered claims like
sub(subject/user ID),exp(expiration time), andiat(issued at), as well as any custom claims you need, likerolesorpermissions. Crucially, the payload is just Base64Url encoded, not encrypted. It is publicly readable. - Signature: This is the most important part for security. It's created by taking the encoded header, the encoded payload, a secret key known only to the server, and signing them with the algorithm specified in the header (e.g., HMAC-SHA256).
The signature guarantees two things:
- Integrity: The data in the token hasn't been tampered with. If an attacker changes the payload (e.g.,
"roles": ["admin"]), the signature will no longer be valid. - Authenticity: The token was issued by a party that possesses the secret key.
- Header: Contains metadata about the token, like the signing algorithm (
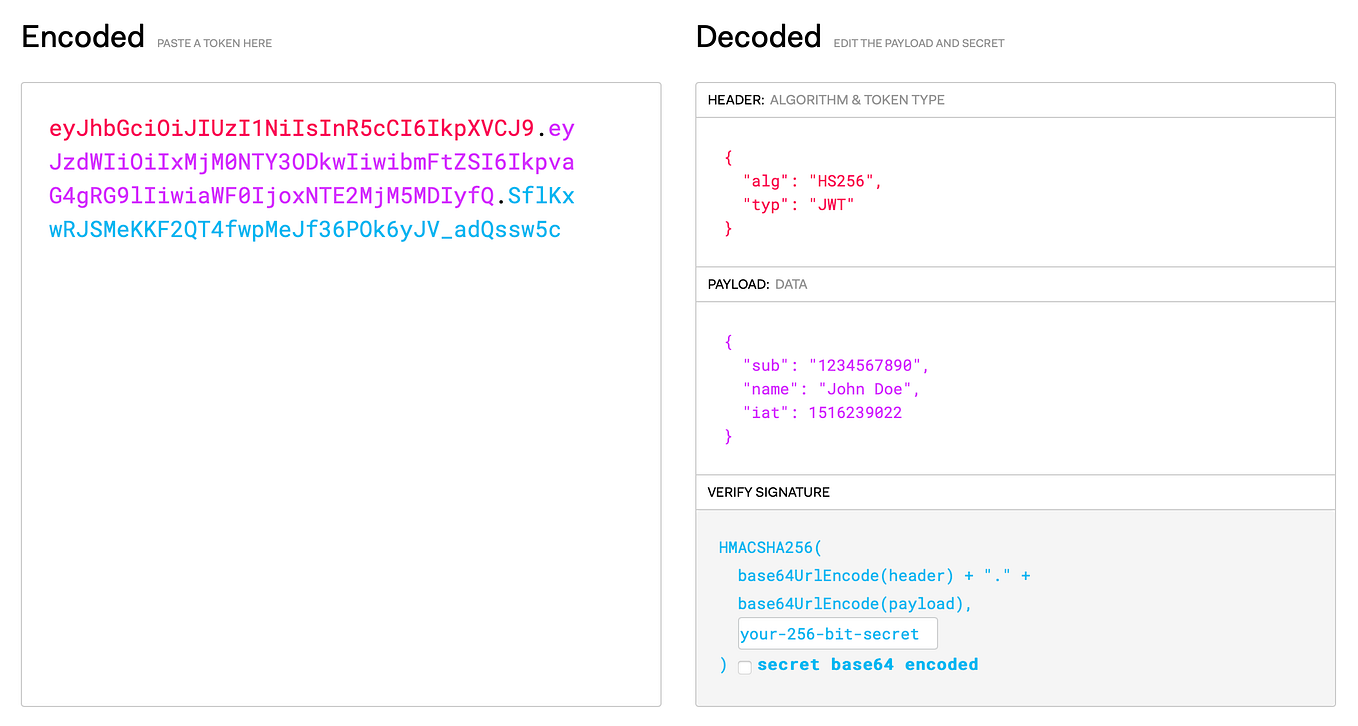
*This image breaks down a JWT into its three parts: the Header (metadata), the Payload (claims), and the Signature. It clearly shows how the signature is a cryptographic hash of the header, payload, and a secret key, ensuring the token's integrity.*
8. Authentication and authorization for backend engineers
Let's begin by understanding the core concepts behind JWTs, including their stateless nature and three-part structure. This video provides a great overview.
Watch the segment from 25:35 to 30:50. The speaker does an excellent job explaining why JWTs were created, how they are structured (header, payload, signature), and the key advantages of statelessness.
-
Metaphor for a 5-Year-Old:
Back to our library. With JWTs, when you show your library card, you get a special, tamper-proof wristband. The wristband has your name, age, and an expiration time printed on it. Every time you want to check out a book, the librarian just glances at your wristband. They don't need to check a locker; all the information is right there on your wrist. If you try to write "adult" over your age, the special ink will smudge, and the librarian will know you cheated (invalid signature). -
Python Code Snippet (Creating a JWT):
We'll use the industry-standardPyJWTlibrary. You can install it withpip install pyjwt cryptography.import jwt import datetime # This secret should be complex and stored securely (e.g., in an environment variable or secrets manager). SECRET_KEY = "your-super-secret-key-that-is-long-and-random" # The payload contains the claims about the user. payload = { 'sub': 123, # Subject (user ID) 'username': 'user', 'roles': ['member', 'reader'], 'exp': datetime.datetime.utcnow() + datetime.timedelta(hours=1), # Expiration time 'iat': datetime.datetime.utcnow() # Issued at time } # Encode the payload into a JWT. encoded_jwt = jwt.encode(payload, SECRET_KEY, algorithm="HS256") print("--- Creating a JWT ---") print(f"Secret Key: {SECRET_KEY}") print(f"Payload: {payload}") print(f"\nGenerated JWT:\n{encoded_jwt}")
3. Implementing the Full JWT Flow in Python (Medium-Hard)
Now let's put it all together in a web application context using Flask. The principles are identical for any web framework like FastAPI or Django.
- Technical Explanation:
The complete stateless authentication flow involves:/loginEndpoint: The client sends credentials. The server validates them and, if successful, generates a signed JWT and returns it in the response body.- Client-Side Storage: The client stores this JWT. Common places are
localStorageorsessionStorage. However, the most secure method for web applications is anHttpOnlycookie, which is inaccessible to JavaScript and mitigates Cross-Site Scripting (XSS) attacks. - Authorization Header: On subsequent requests to protected endpoints, the client includes the JWT in the
Authorizationheader, using theBearerschema:Authorization: Bearer <token>. - Verification Middleware/Decorator: A piece of code runs before your protected endpoint logic. It extracts the token from the header and uses
jwt.decode()to verify the signature and claims (like expiration). If valid, it allows the request to proceed, often attaching the decoded payload (with user info) to the request for use by the endpoint. If invalid, it returns a401 Unauthorizederror.
Let's dive into a complete, practical Python implementation. This article provides excellent code examples for creating, signing, decoding, and verifying JWTs, including a full Flask application with a verification decorator.
First, read the section 'Creating a JWT in Python' to see how to use jwt.encode. Then, study the section 'Verifying a JWT' very carefully. Pay close attention to the Flask example with the @jwt_required decorator, as this is the standard way to protect endpoints in a real application.
-
Metaphor for a 5-Year-Old:
You're at a concert./login: You show your ticket at the main gate and get a wristband (JWT).- Client Storage: You wear the wristband.
- Authorization Header: To get into the VIP section, you hold up your arm to show the security guard your wristband.
- Verification Decorator: The guard (decorator) checks that your wristband is the right color (valid signature) and hasn't been cut (not tampered). If it looks good, they let you into the VIP section (the protected endpoint).
-
Python Code Snippet (Full Flask Example):
This runnable example shows a complete, secure JWT flow.from flask import Flask, request, jsonify import jwt import datetime from functools import wraps app = Flask(__name__) SECRET_KEY = "your-super-secret-key-that-is-long-and-random" # --- Verification Decorator --- def jwt_required(f): @wraps(f) def decorated(*args, **kwargs): token = None if 'Authorization' in request.headers: # Format: "Bearer <token>" token = request.headers['Authorization'].split(" ")[1] if not token: return jsonify({'message': 'Token is missing!'}), 401 try: # Decode the token, this also verifies signature and expiration data = jwt.decode(token, SECRET_KEY, algorithms=["HS256"]) current_user = data['sub'] # Get user ID from payload except jwt.ExpiredSignatureError: return jsonify({'message': 'Token has expired!'}), 401 except jwt.InvalidTokenError: return jsonify({'message': 'Token is invalid!'}), 401 # Pass the user id to the protected route return f(current_user, *args, **kwargs) return decorated # --- Endpoints --- @app.route('/login', methods=['POST']) def login(): # Simple auth for demonstration auth = request.json if auth and auth.get('username') == 'user' and auth.get('password') == 'pass': payload = { 'sub': 123, 'exp': datetime.datetime.utcnow() + datetime.timedelta(minutes=30) } token = jwt.encode(payload, SECRET_KEY, algorithm="HS256") return jsonify({'token': token}) return jsonify({'message': 'Invalid credentials'}), 401 @app.route('/protected') @jwt_required def protected(current_user_id): return jsonify({'message': 'This is a protected route!', 'user_id': current_user_id}) @app.route('/') def public(): return jsonify({'message': 'Anyone can view this.'}) # To run this: save as app.py, run `flask run`, then use a tool like Postman or curl. # 1. POST to /login with {"username": "user", "password": "pass"} to get a token. # 2. GET from /protected with Header `Authorization: Bearer <your_token>`.
4. Critical Trade-offs: The Revocation Dilemma (Hard)
JWTs' greatest strength—statelessness—is also their greatest weakness. This trade-off is a classic system design interview topic.
-
Technical Explanation:
The Problem: Once a JWT is issued, it is valid until it expires. You cannot easily invalidate it from the server. If a user's token is stolen or they log out, the token can still be used to access your system.The Trade-off:
- Pro (Stateless): Highly scalable, no database lookups for authentication, great for microservices.
- Con (Stateless): Difficult token revocation.
Solutions and their own trade-offs:
- Short-Lived Tokens: Keep token expiration times very short (e.g., 5-15 minutes). This limits the window of opportunity for an attacker. The downside is poor user experience, as the user has to log in frequently.
- Blacklisting (Hybrid Approach): Create a blacklist of revoked token IDs (
jticlaim) in a fast cache like Redis. When verifying a token, you check its signature and check if itsjtiis in the blacklist.- New Trade-off: This partially defeats the purpose of JWTs by reintroducing a stateful check on every request, adding latency and a dependency on Redis. However, it provides strong security for session invalidation.
JWT Security: Complete Enterprise Implementation Guide ...
This article offers an enterprise-level perspective on the security challenges of JWTs. It frames their pros and cons as a 'security paradox,' which is a great way to think about the trade-offs.
First, read the section 'The Security Paradox of JWT'. Focus on the Python class JWTSecurityParadox which clearly lists the advantages and risks of statelessness. Then, review 'Critical JWT Security Vulnerabilities', specifically the 'Algorithm Confusion Attacks' to understand common pitfalls.
-
Metaphor for a 5-Year-Old (Revocation Problem):
Your concert wristband is valid until midnight. At 8 PM, you lose it. Someone else picks it up. Even though you tell the concert staff you lost it, the person who found it can still get into the VIP section because the wristband looks valid. The staff has no way to "turn off" that specific wristband. -
Python Code Snippet (Conceptual Blacklist Check):
This shows how you might augment the verification decorator to check a blacklist.import redis # Assume REDIS_BLACKLIST is a connection to a Redis set. REDIS_BLACKLIST = redis.Redis() # For demonstration def jwt_required_with_blacklist(f): @wraps(f) def decorated(*args, **kwargs): # ... (token extraction logic from before) ... try: # First, check if token jti is in our blacklist unverified_payload = jwt.decode(token, options={"verify_signature": False}) jti = unverified_payload.get('jti') if jti and REDIS_BLACKLIST.exists(f"blacklist:{jti}"): return jsonify({'message': 'Token has been revoked!'}), 401 # If not blacklisted, proceed with full verification data = jwt.decode(token, SECRET_KEY, algorithms=["HS256"]) current_user = data['sub'] # ... (exception handling) ... return f(current_user, *args, **kwargs) return decorated # To revoke a token, you would add its 'jti' to the Redis set: # REDIS_BLACKLIST.set(f"blacklist:{jti_to_revoke}", 1, ex=timedelta(hours=1))
5. Elite Interview Deep Dive: Refresh Tokens and Asymmetric Keys (Elite)
How do elite companies like Google and Meta handle the revocation problem without the performance hit of a blacklist on every request? They use the Access/Refresh Token Pattern.
-
Technical Explanation:
Instead of one token, the server issues two:- Access Token: A standard JWT, but with a very short lifespan (e.g., 15 minutes). It contains all the user permissions and is sent with every API request. Because it expires quickly, the risk of a stolen token is minimized.
- Refresh Token: A token with a long lifespan (e.g., 7 days or more). Its only purpose is to get a new access token. It is sent only to a special
/refreshendpoint. This token is stored in a server-side database, linking it to a user and session.
The Flow:
- The user makes API calls with the access token.
- When the access token expires (client gets a 401), the client automatically and silently calls the
/refreshendpoint, sending the refresh token. - The server validates the refresh token against its database. If valid, it issues a brand new access token.
- The client retries the original failed API call with the new access token.
Revocation: To log a user out or invalidate a session, you simply delete their refresh token from the server-side database. They can no longer get new access tokens. This is the perfect compromise: most API calls remain fast and stateless, while the stateful check is only performed infrequently during token refresh.
Bonus: Asymmetric Keys (RS256 vs. HS256)
In a microservice architecture, using a shared secret key (HS256) is a risk. A better approach is asymmetric signing (RS256).- An Auth Service holds a private key and uses it to sign JWTs.
- All other Resource Services hold a corresponding public key to verify the tokens.
- The private key never leaves the Auth Service, significantly improving security.
- Services discover the public key via a standard JSON Web Key Set (JWKS) endpoint (
/.well-known/jwks.json), which allows for seamless key rotation.
Session Vs JWT: The Differences You May Not Know!
The ByteByteGo channel provides an exceptionally clear explanation of the refresh token pattern and the different signing algorithms.
First, watch from 02:40 to 03:52 to understand the differences between signing algorithms (HMAC vs. RSA/ECDSA). Then, watch from 03:52 to 05:06 for a perfect explanation of the access and refresh token pattern. This is a crucial concept for production systems.
Test your understanding! (Interview-Style Question)
You are designing the authentication for a mobile banking application. Security is paramount. You have decided to use JWTs with the access/refresh token pattern. Where on the client device should you store the access token and the refresh token, and why? What are the security trade-offs of your choice?
Show answer
This question tests understanding of client-side security, which is a critical extension of JWT knowledge.
Storage Strategy:
-
Refresh Token: The refresh token is the most sensitive credential as it is long-lived. It must be stored in the most secure location available on the mobile OS. This means using the platform's hardware-backed keystore:
- iOS: Keychain Services. Data stored here is encrypted and sandboxed at the OS level. You can configure it to require biometric authentication (Face ID/Touch ID) for access.
- Android: Android Keystore System combined with
EncryptedSharedPreferences. The Keystore generates and stores cryptographic keys in a secure hardware module (TEE or SE), making them impossible to extract. These keys are then used to encrypt the refresh token before storing it inSharedPreferences.
-
Access Token: The access token is short-lived and used frequently. Storing it in encrypted preferences is good, but for performance, it is often kept in memory for the duration of the application's active session. Upon app startup, it would be loaded from a secure storage location (like
EncryptedSharedPreferences, which is itself encrypted using a key from the Android Keystore). It should never be stored in a plain text file or unencrypted database.
Security Trade-offs:
- Pro (High Security): By using the hardware keystore, the refresh token is protected even on a rooted or jailbroken device. The key material itself cannot be extracted by malware or an attacker with physical access to the device's file system. This is the industry standard for high-security applications.
- Con (Complexity): This approach is more complex to implement than simply storing tokens in a file or unencrypted
SharedPreferences. It requires using platform-specific APIs (Keychain on iOS, Keystore on Android). - Con (User Experience Friction - Optional): If you tie refresh token access to biometrics, the user might be prompted for their fingerprint/face every time they re-launch the app after a long time. This is a trade-off between maximum security and seamless user experience. For a banking app, this friction is generally considered acceptable and even desirable.
Why not LocalStorage/SessionStorage?
These are browser-specific concepts and don't apply to native mobile apps. Their equivalent would be an unencrypted file or database, which is insecure and not an option for a banking application. The key takeaway is leveraging the secure hardware elements provided by the mobile OS.
Conclusion
Today we've done a deep dive into stateless authentication with JWTs, a cornerstone of modern application security. You've learned not just how to implement the pattern, but also how to critically analyze its trade-offs and design production-grade solutions.
Key Takeaways:
- JWTs provide scalable, stateless authentication by moving user state into a self-contained, cryptographically signed token.
- The three parts of a JWT are the Header, Payload (publicly readable), and Signature (for integrity and authenticity).
- The primary trade-off of statelessness is the difficulty of token revocation.
- The Access/Refresh Token Pattern is the elite industry-standard solution to the revocation problem, balancing security and performance.
- For maximum security in microservices, use asymmetric signing (RS256) with a JWKS endpoint for key management.
Next Lesson Preview
We now know how to determine who a user is (authentication). The next logical step is to determine what they are allowed to do.
In our next lesson, we will design an authorization system using Role-Based (RBAC) and Attribute-Based (ABAC) Access Control. This will complete our core understanding of application security.