Hello! Welcome to the final lesson of our module, "Designing Scalable & Resilient Systems."
Throughout this module, we've explored the essential building blocks of modern, large-scale applications. We started with individual components like load balancers, caches, and CDNs, then moved on to powerful patterns like message queues and circuit breakers. In our last lesson, we examined the fundamental choice between synchronous and asynchronous communication that underpins many architectural decisions.
Now, it's time to put it all together. This capstone lesson is designed to help you synthesize this knowledge to achieve today's learning outcome: Design a high-level, scalable architecture for a web application, incorporating at least three scalability concepts.
This exercise is the essence of the "architectural mindset" you're aiming to develop. It's not just about knowing the components, but about understanding how to assemble them to meet specific requirements, how to identify bottlenecks, and how to make deliberate trade-offs.
1. The Architect's Framework
Before we start drawing diagrams, it's crucial to adopt a structured approach. Great architecture isn't about jumping to a solution; it's about a methodical process of inquiry and design. A common framework used in the industry involves four key steps.
To get a feel for this process, let's start with a short video that outlines a practical framework for tackling system design problems.
How to Answer System Design Interview Questions (Complete Guide)
The video 'How to Answer System Design Interview Questions' from Exponent provides a clear, step-by-step framework. We'll adopt this structure for our design exercise.
Watch from 01:15 to 06:21. Focus on the four main steps presented: 1. Define the problem space, 2. Design at a high level, 3. Deep dive into the design, and 4. Identify bottlenecks and scaling opportunities. We will be using a similar structure.
The process can be summarized as:
- Clarify Requirements & Scope: Understand the functional (features) and non-functional (performance, availability) needs. Make estimations to understand the scale.
- Create a High-Level Design: Sketch the main components and their interactions. This is the "bird's-eye view."
- Deep Dive on Components: Zoom in on specific parts of the system, addressing key challenges and making detailed design choices.
- Identify Bottlenecks & Scale: Analyze the design for single points of failure and performance limitations, then apply scaling patterns to resolve them.
2. Case Study: Designing "PhotoShare"
Let's apply this framework to design a simplified photo-sharing web application, which we'll call "PhotoShare."
Step 1: Clarify Requirements & Scope
-
Functional Requirements:
- Users can upload photos.
- Users can view a feed of photos.
- The user interface is a standard web application.
-
Non-Functional Requirements:
- High Availability: The system must be resilient to server failures.
- Low Latency: Viewing photos should be fast for a global user base.
- Scalability: The system must scale to support millions of users.
- Durability: Once a photo is uploaded, it must not be lost.
-
Scale Estimations (Back-of-the-envelope):
- Assume 1 million daily active users (DAU).
- Writes: 100,000 photo uploads per day.
- Reads: Users check their feed 20 times a day -> 20 million feed loads per day.
- Key Insight: The system is very read-heavy (20M reads vs. 100k writes). This will heavily influence our design choices.
Step 2 & 4: Evolving the Architecture (From Zero to a Million Users)
Instead of designing the final system at once, a great way to learn is to see how an architecture evolves by identifying and fixing bottlenecks. We'll use the progression shown in the following video as our guide.
System Design: Scale System From Zero To Million Users | #systemdesign
This video, 'System Design: Scale System From Zero To Million Users' by Dev Sense, provides an excellent, incremental walkthrough of scaling a web application. We will follow its logical steps.
Watch from the beginning to 04:14. This will guide us through the first few iterations of our design, starting from a single server and scaling up the web and database tiers.
Let's walk through that evolution for PhotoShare:
V0: The Monolith
A single server runs the web application (e.g., your Laravel backend and React frontend) and the database (e.g., MySQL).
- Bottleneck: This is a single point of failure. If the server goes down, the entire service is offline. It also has limited capacity for CPU, RAM, and I/O.
V1: Separate Web and Database Servers
We split the system into two distinct servers: one for the web application and one for the database.
- Improvement: We can now scale each layer independently. If the database needs more RAM (vertical scaling), we don't have to touch the web server.
- Bottleneck: We still have single points of failure in both the web and database tiers. The web server can only handle a finite number of connections.
V2: Horizontal Scaling with a Load Balancer
To handle more traffic and provide redundancy, we add multiple web servers and place them behind a load balancer.
- Scalability Concept #1: Load Balancing. The load balancer distributes incoming requests across our pool of web servers. This improves both performance and availability. If one web server fails, the load balancer automatically redirects traffic to the healthy ones.
- Key Consideration: The application servers must be stateless. This means any user-specific session data can't be stored on the web server itself; otherwise, a user's subsequent requests might go to a different server that doesn't have their session information.
V3: Database Replication
Our read-heavy workload (20M reads/day) will quickly overwhelm a single database server. We can scale the database tier by introducing replication.
- We create a master-slave (or primary-replica) setup. The master handles all write operations (uploads), while multiple slave replicas handle the read operations (fetching feeds). Data is automatically replicated from the master to the slaves.
- Improvement: This dramatically increases our read capacity. We can add more slaves as read traffic grows.
At this point, our architecture is more robust, but it still has major performance bottlenecks for a global, media-heavy application.
Step 3: Deep Dive and Applying Advanced Scalability Concepts
Now we'll address the remaining bottlenecks by applying more of the concepts we've learned in this module.
Bottleneck: High Latency for Global Users
Problem: A user in Europe accessing a photo stored on a server in North America will experience significant latency.
Solution: A Content Delivery Network (CDN).
System Design: Scale System From Zero To Million Users | #systemdesign
Let's continue with the Dev Sense video to see how a CDN is integrated.
Watch from 05:12 to 06:35. Notice how the CDN serves static content (images, JS, CSS) from a server geographically close to the user.
- Scalability Concept #2: CDN. We configure a CDN to cache our static assets—the photos themselves. When a user requests a photo, the request goes to the nearest CDN edge location. If the photo is cached there, it's served immediately, resulting in very low latency. If not, the CDN fetches it from our origin server (or cloud storage like S3) and caches it for future requests.
Bottleneck: Repetitive Database Queries
Problem: Every time a user's profile is viewed or a popular photo's metadata is fetched, we hit our database. Many of these queries are identical and place unnecessary load on our database replicas.
Solution: A caching layer.
System Design: Scale System From Zero To Million Users | #systemdesign
The next logical step is to add a cache to reduce database load. Let's see how that fits in.
Watch from 04:14 to 05:12. This explains the 'cache-aside' pattern, where the application checks the cache first before querying the database.
- Scalability Concept #3: Caching. We add a distributed in-memory cache (like Redis or Memcached) between our application servers and the database.
- Flow: When a request for data arrives (e.g., user profile), the application server first checks the cache.
- Cache Hit: If the data is in the cache, it's returned immediately without touching the database.
- Cache Miss: If the data is not in the cache, the application queries the database, returns the data to the client, and stores the result in the cache for next time.
Bottleneck: Slow Upload Process
Problem: When a user uploads a photo, we might need to perform several time-consuming tasks: generate thumbnails of different sizes, run AI analysis for content moderation, and update followers' feeds. Performing these tasks synchronously would make the user wait a long time for the upload to complete.
Solution: Asynchronous Processing with a Message Queue.
This directly applies the concepts from our previous lesson. Instead of doing all the work in the initial request, we decouple it.
System Design: Scale System From Zero To Million Users | #systemdesign
The final piece for our core design is decoupling heavy tasks using a message queue.
Watch from 07:36 to 08:18. This shows how a message queue and worker services can handle background tasks like logging, which is analogous to our thumbnail generation needs.
- Scalability Concept #4: Message Queues.
- Flow:
- The user's upload request hits an application server.
- The server saves the original photo to a durable object store (like AWS S3) and its metadata to the master database.
- The server then places a
PhotoUploadedmessage onto a message queue (like RabbitMQ or AWS SQS). This message contains information like the photo ID and user ID. - The server immediately returns a "Success" response to the user.
- Separate, independent worker services listen to the queue. When they receive a message, they perform the long-running tasks: one worker generates thumbnails, another runs AI analysis, etc. This makes the user experience fast and decouples our system components for better resilience.
- Flow:
3. The Final Architecture
By combining these components, we arrive at a robust, high-level architecture.
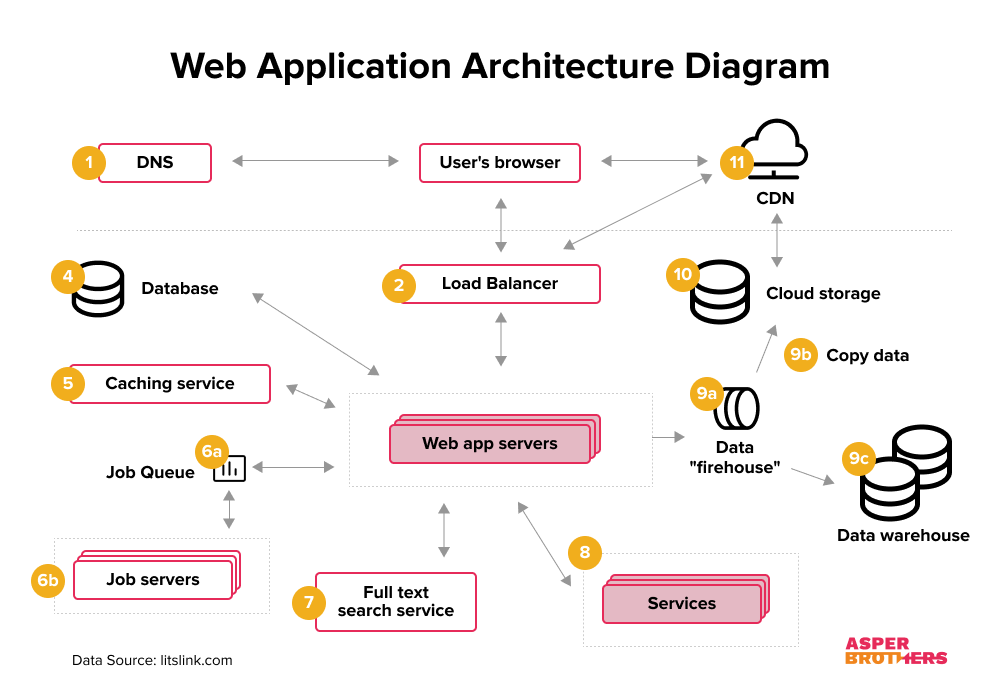
Let's trace the two main user flows:
-
Read Flow (Viewing a photo):
- User's browser requests a photo.
- DNS directs the request to the CDN.
- If cached in CDN (Cache Hit): The photo is served instantly from a nearby edge server. (Fast Path)
- If not cached (Cache Miss): The request goes to our Load Balancer, then to a Web App Server. The server fetches metadata from the Cache or Database Replica, gets the photo's location from an Object Store, and returns the photo to the user (and the CDN caches it).
-
Write Flow (Uploading a photo):
- User uploads a photo.
- Request goes through the Load Balancer to a Web App Server.
- The server writes the original photo to an Object Store (e.g., S3) and metadata to the Master Database.
- The server publishes a job to the Message Queue.
- The server returns
HTTP 202 Acceptedto the user. (Fast Response) - Asynchronously, worker services consume the job from the queue and perform thumbnail generation, analysis, etc.
Test your understanding!
In our "PhotoShare" design, we used a message queue for post-upload processing (like thumbnail generation). What would be the consequences for user experience and system resilience if we performed these tasks synchronously within the initial API request instead?
Show answer
- User Experience: The user would have to wait for all processing to finish before getting a confirmation. If thumbnail generation and AI analysis take 5-10 seconds, the UI would be frozen for that duration, leading to a very poor experience. The user might think the upload failed and try again, creating duplicate work.
- System Resilience: This would create tight coupling. If the thumbnail generation service fails, the entire upload request fails, even if the photo was stored correctly. With a message queue, the original photo is safely stored, and the thumbnail job can be retried later without affecting the user or the core upload functionality. The system is also more vulnerable to traffic spikes; a sudden increase in uploads could overwhelm the web servers as they are tied up doing synchronous work, potentially leading to cascading failures.
Conclusion
Congratulations on completing this module! You have successfully designed a high-level architecture that is scalable, resilient, and performant by systematically applying the principles and patterns we've discussed.
Key Takeaways:
- System design is an iterative process of identifying requirements, creating a baseline design, finding bottlenecks, and applying scaling patterns.
- A read-heavy application benefits immensely from read replicas, caching, and a CDN.
- Long-running or heavy tasks should be processed asynchronously using message queues to improve user experience and system resilience.
- Load balancers are fundamental for achieving horizontal scalability and high availability for your stateless application tier.
- Every architectural choice is a trade-off. Our design is more complex than a single server, but this complexity buys us scalability and resilience.
Preview of the Next Course Module:
This concludes our deep dive into data structures, algorithms, and system design fundamentals. You've learned how to build efficient components and how to assemble them into large-scale systems. In the next module, "SOLID Design Principles," we will shift our focus from the macro-level (architecture) to the micro-level (code design). You will learn how to write classes and modules that are maintainable, flexible, and robust—the essential qualities of the building blocks that make up the great architectures we've been designing.