Hello! Welcome back to our module on Advanced Modeling & Design Refinement.
In the last lesson, we explored how to create construction planes and axes to place geometry anywhere in 3D space. We specifically highlighted the Plane Along Path tool as a bridge to our topic today. Now, it's time to use that concept to create sophisticated shapes that would be very difficult to model otherwise.
Today's Goal: Your learning outcome is to create complex shapes along a custom path using the Sweep operation.
The Sweep tool is a powerhouse for design. It works by taking a 2D sketch, called a profile, and extruding it along a 2D or 3D curve, called a path. This is perfect for creating parts like pipes, cables, springs, custom grips for gaming controllers, and even decorative trim for your future desk project.
1. The Core Components of a Sweep: Profile and Path
At its heart, the Sweep command is simple: it needs a shape to sweep (the profile) and a line to follow (the path). However, there is one critical rule that is the most common point of failure for beginners.
Let's watch a short video that explains this fundamental requirement.
Fusion 360 Sweep (10 Things You Should Know) 2020
This video from Tyler Beck of Tech & Espresso clearly explains the two essential components of a Sweep and the crucial relationship between them.
Watch from 0:12 to 1:51. Pay close attention to the core concept: the sketch containing the path and the sketch containing the profile must be on planes that are perpendicular (at 90 degrees) to each other.
As the video demonstrated, if you draw both your path and profile on the same plane, Fusion 360 won't know how to extrude the shape.
So, how do you create a sketch plane that is perfectly perpendicular to the start of your path? This is where the Plane Along Path construction tool from our last lesson becomes essential.
Let's see how it's used to set up a sweep correctly.
Fusion 360 Sweep (10 Things You Should Know) 2020
Let's jump to the end of the same video, where the presenter shows the standard workflow for creating a profile plane when your path exists in open 3D space.
Watch from 10:22 to 11:20. This demonstrates how to use Construct > Plane Along Path to create a new plane at the exact end of a path, ready for you to sketch your profile.
The standard workflow is:
- Create a sketch for your Path.
- Finish the sketch.
- Use Construct > Plane Along Path to create a new plane at the start (or end) of your path.
- Create a new sketch on this new plane for your Profile.
- Activate the Sweep command.
2. Powerful Options Within the Sweep Tool
The basic Sweep is powerful, but the real magic lies in its options, which give you fine-grained control over the final shape.

Let's explore three of the most useful options.
Fusion 360 Sweep (10 Things You Should Know) 2020
We'll return to Tyler Beck's video to see demonstrations of three key features: Orientation, Guide Rails, and Twist Angle.
Please watch the following segments: Orientation (Perpendicular vs. Parallel) (2:59 - 3:39): This controls how the profile is oriented as it travels along a curved path. Guide Rail (6:16 - 7:44): This shows how you can use a second path to control the shape and scale of your profile. This is fantastic for creating ergonomic forms like a custom mouse or controller grip. Twist Angle (7:44 - 10:22): This allows you to twist the profile as it moves along the path, perfect for modeling things like screw threads, springs, or creating decorative patterns on custom cables for your PC build.
The Twist Angle option, in particular, can produce dramatically different results depending on where the path is located relative to the profile.
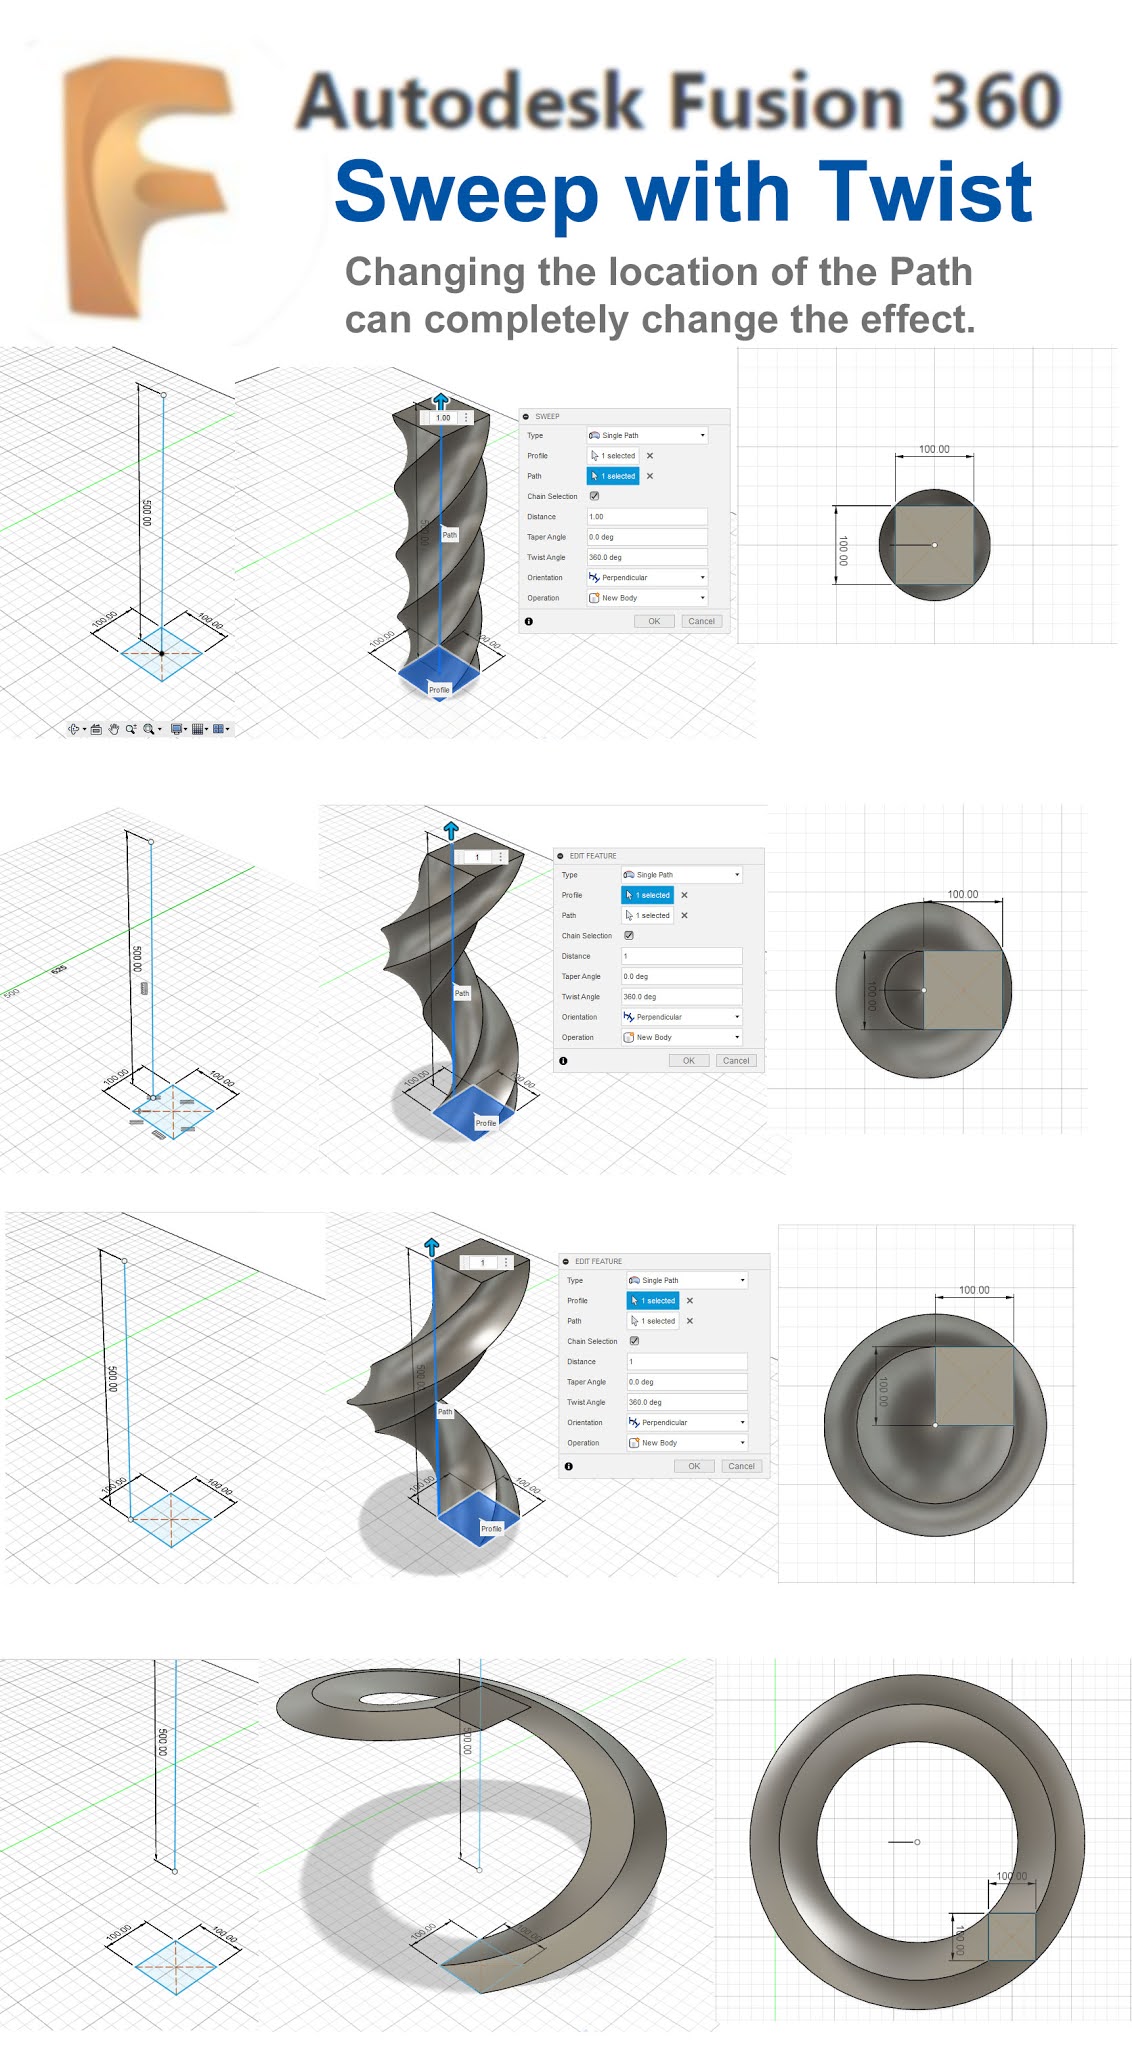
3. Practical Application: Solving a Design Challenge
Now, let's use the Sweep tool to solve a common design problem that also reinforces what you learned about construction geometry in the last lesson.
The Challenge: Connect two cylindrical pipes that are not aligned with each other, using a smooth, tangent elbow joint. A simple arc won't work because it's difficult to make it tangent to both ends, resulting in an awkward connection.
This tutorial provides an elegant solution. We won't model the initial part, but will focus on the process of creating the path and executing the sweep.
Autodesk Fusion 360 - Sweep Tutorial - User Request for Help (2024)
This video from the Learn It! channel addresses a user's request to connect two tubes. We'll watch the core of the solution, which involves creating custom construction geometry and a special type of curve for the path.
Watch from 5:18 to 8:38. The presenter demonstrates a powerful workflow: Create Construction Axes: He first creates an axis through the center of each cylinder. Create a Construction Plane: He then creates a Plane Through Two Edges, using the two axes as the edges. This creates a plane that perfectly slices through the center of both tubes, no matter their position. Create a Spline Path: Instead of an arc, he uses a Fit Point Spline between the two center points and applies Tangency constraints. This ensures a perfectly smooth, fluid path for the elbow joint.
Your Turn:
Try to replicate this process in Fusion 360. You don't need to build the exact same starting part.
- Create a Base: Create two non-aligned cylinders of different sizes on a base block.
- Create Axes and Plane: Follow the video's method. Use
Construct > Axis Through Cylinderfor each, thenConstruct > Plane Through Two Edgesto create the sketch plane for your path. - Sketch the Path: Create a new sketch on your new construction plane. Use
Project(press 'P') to get the center points of the circles. Draw construction lines from the centers. Then use aFit Point SplineandTangencyconstraints to create the smooth path. - Create the Profile & Sweep: The profile is simply the circular face of one of the openings. You can select it directly. Activate the
Sweeptool, select the circular face as theProfileand your spline as thePath. Set the operation toJoin.
This exercise demonstrates how multiple advanced tools come together to solve a single, complex problem.
4. Other Advanced Sweep Techniques
As you progress, you'll encounter situations where the standard Sweep needs a bit more help. Here are two other techniques to be aware of for future projects:
- Sweeping along a Solid Edge: You don't always need a sketch for a path. You can select a chain of edges on an existing solid body. This is extremely useful for adding trim or creating a routed edge on a piece of wood for your desk project, as the sweep will automatically create mitered corners. Tyler Beck's video demonstrates this from 4:33 to 6:16.
- Path + Guided Surface: Sometimes, a complex sweep can fail because the geometry folds in on itself. A common example is sweeping around a tight helix. In these cases, you can change the Sweep
TypetoPath + Guided Surface. This lets you select a surface (like the central shaft of an auger) to keep the sweep from self-intersecting. The "Auger" tutorial (resource LINK) you have shows a great example of this.
Conclusion
Today you've added a versatile and powerful modeling tool to your skillset. You've learned how to move beyond simple extrusions and revolves to create complex geometry that follows any path you can define.
Key Takeaways:
- A Sweep requires a Profile sketch and a Path sketch that are on perpendicular planes.
- The
Plane Along Pathconstruction tool is the standard method for creating your profile sketch plane. - Advanced options like Guide Rails and Twist Angle give you precise control for creating ergonomic and helical shapes.
- For complex, non-linear paths between two points, a Fit Point Spline with Tangency constraints is often a better choice than a simple arc.
- You can solve many sweep errors and create complex forms by using solid edges as paths or adding guide surfaces.
Next Lesson Preview:
In our next lesson, we will explore the Loft operation. While Sweep drags a single profile along a path, Loft creates a smooth transition between multiple, different profiles. This is the tool you'll use to create objects that change shape along their length, like a handle that transitions from a circle to an oval.