Hello! Welcome back to our course on mechanical design.
In the last lesson, we covered the essential first step of any design: creating a new sketch on either a default origin plane or the face of an existing 3D body. You now know how to set up your digital "drawing board."
Today, we'll start drawing. This lesson focuses on the four most fundamental sketch tools you'll use constantly: lines, rectangles, circles, and arcs. Mastering these is like learning the alphabet before writing sentences. Every complex part you'll eventually design, whether it's a bracket for your gaming PC or a simple household replacement part, will be built from these basic geometric shapes.

Let's begin by opening a new design in Fusion 360 and creating a new sketch on any of the origin planes.
1. The Line Tool
The Line tool is the most basic sketch element, creating a straight line segment between two points. While simple, it's incredibly versatile.
[PDF] Fusion 360: Sketching for makers
This PDF guide from the MakeICT Wiki provides a concise overview of the fundamental sketch tools. We'll start with the section on lines.
Please navigate to page 11, titled 'Line (L)'. Read the brief description and then follow the 'Try it' exercise on that page to practice creating a few lines. The keyboard shortcut for the Line tool is 'L'.
A useful tip: if you click and hold the mouse button while dragging away from the endpoint of a line, the tool will switch to creating a tangent arc. We'll cover arcs in more detail shortly, but it's a good feature to be aware of for building smooth, flowing shapes quickly.
2. The Rectangle Tool
Rectangles are one of the most common starting points for a design. While there are a few ways to create them, the 2-Point Rectangle is the most frequently used.
Day 1 of Learn Fusion 360 in 30 Days for Complete Beginners! - 2023 EDITION
Let's watch a short clip from Product Design Online that demonstrates how to create a 2-Point Rectangle. Notice how you can type dimensions directly as you draw.
Watch from 03:19 to 04:24. The video shows how to activate the rectangle tool, start from the origin, and use the 'Tab' key to switch between the length and width dimension fields. The keyboard shortcut for this tool is 'R'.
As you saw, you can define the size of the rectangle as you create it. Don't worry too much about getting the dimensions perfect right away; we will dedicate a future lesson to dimensioning and editing your sketches.
For a look at other rectangle types, such as the Center Rectangle (which is very useful for symmetrical designs), you can refer back to the "Fusion 360: Sketching for makers" PDF on pages 20-21.
3. The Circle Tool
Circles are essential for creating holes, pins, dials, and any other cylindrical feature. The most common method is the Center Diameter Circle.
Day 1 of Learn Fusion 360 in 30 Days for Complete Beginners! - 2023 EDITION
This next clip from the same video demonstrates creating a circle. The process is very similar to creating a rectangle: you define a point and then a dimension.
Watch from 06:23 to 07:11. Observe how a circle is created on the face of an existing block. The presenter places the center point first and then types in the diameter. The keyboard shortcut for this tool is 'C'.
After drawing the circle, you might have noticed it's blue and can be dragged around freely. The video then shows the use of the Dimension tool to lock its position. This process of locking down geometry is called constraining, which is the single most important concept in parametric modeling and the topic of our next two lessons. For now, just focus on the drawing itself.
4. The Arc Tool
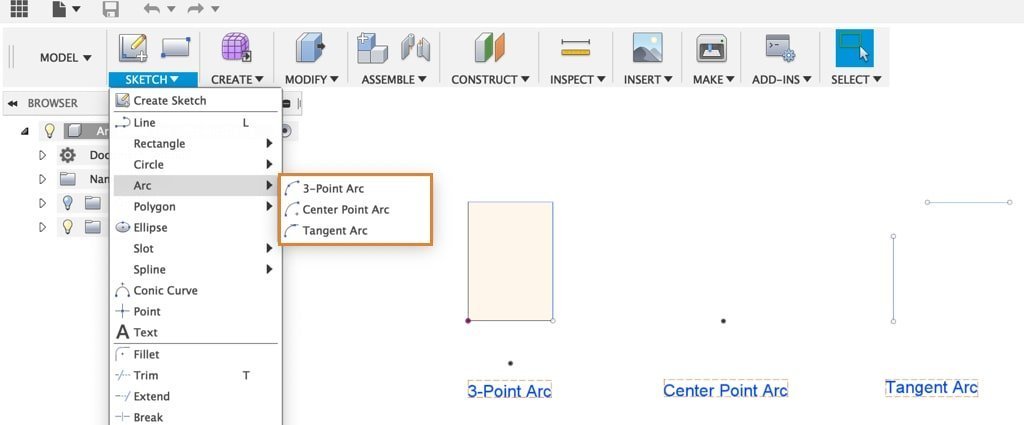
Arcs are used to create curved geometry, like rounded corners or slotted holes. Fusion 360 offers three different arc tools, and choosing the right one depends on the geometry you already have.
How to Create Arcs in Fusion 360 (all 3 explained)
This video from Product Design Online is dedicated entirely to arcs. It does an excellent job of explaining and demonstrating when and how to use each of the three types.
Watch the video from 01:02 to 07:02. It will cover the: 3-Point Arc (01:02): Useful for connecting two existing points with a curve. Center Point Arc (02:26): Best for creating arcs that are concentric with other features. Tangent Arc (04:42): Ideal for creating a smooth, tangent transition from a line or another curve. Summary (06:21): A helpful recap of when to use each tool.
To summarize the video's excellent advice:
- Use a 3-Point Arc when you know the start and end points of the curve.
- Use a Center Point Arc when you know the center and radius of the curve.
- Use a Tangent Arc when you need a curve to flow smoothly from an existing line or arc.
Practice Exercise: Sketch a Simple Tag
Let's put these four tools into practice by sketching a simple luggage tag shape.
- If you're not already in a sketch, create a new one.
- Select the Center Rectangle tool (you can find it under
Create > Rectangle > Center Rectangle). - Click on the origin to place the center, then draw a rectangle of any size.
- Select the Center Diameter Circle tool (
C). Click on the origin and draw a small circle inside the rectangle. This will be the hole for attaching the tag. - Select the 3-Point Arc tool (
Create > Arc > 3-Point Arc). - To round one of the corners, click on one end of a short edge, then the other end of the same edge. Move your mouse outwards and click a third time to create a gentle curve.
- Select the Line tool (
L). In the Sketch Palette on the right, click the Construction option. Now draw a vertical line straight through the origin. This dashed line is a construction line—it's used for reference and won't be part of the final 3D shape.
Your sketch should look something like a rectangle with a hole in the middle and one rounded end. Notice that most of your sketch geometry is blue. This indicates it is "under-constrained," meaning it's not yet fully defined by dimensions and relationships. This is perfectly fine for now.
Conclusion
Well done. You've now used the four fundamental tools to create 2D geometry. These simple commands are the foundation of everything you will model in Fusion 360.
Key Takeaways:
- The Line (
L), Rectangle (R), Circle (C), and Arc tools are your primary drawing instruments. - Most tools allow you to enter dimensions as you draw, which is a fast and efficient workflow.
- Different creation methods exist for tools like Rectangles, Circles, and Arcs. The one you choose depends on the geometry you are trying to create or reference.
- Blue geometry is free to move, while black geometry is locked in place.
In our next lesson, we will begin to explore how to turn that blue geometry black by using Geometric Constraints. You'll learn how to tell Fusion 360 that you want lines to be parallel, circles to be concentric, or an arc to be tangent to a line. This is where the real power of parametric CAD begins.