Hello! Welcome to the next lesson in our journey through 2D sketching in Fusion 360.
In our last session, we focused on the "why" behind fully constrained sketches, establishing that they are the foundation for creating stable and predictable models. You learned that by locking down your sketch's geometry and dimensions, you are embedding your design intent, which is crucial for complex projects like the custom desk you plan to build.
Today, we'll expand your sketching toolkit with three powerful modification tools: Trim, Extend, and Offset. While the drawing tools (line, circle, rectangle) create the initial geometry, these modification tools allow you to refine, clean up, and build upon that geometry with precision and speed. Mastering them is a key step in moving from basic shapes to creating the complex, functional parts needed for your gaming accessories and DIY projects.
1. The Trim Tool: Cleaning Up Your Sketches
Often when you're sketching, you'll create construction geometry or draw lines that overlap and intersect. The Trim tool is your go-to for cleaning up these intersections by removing unwanted segments of a sketch line or curve. It works by cutting a line back to the nearest point where it intersects with another piece of geometry.
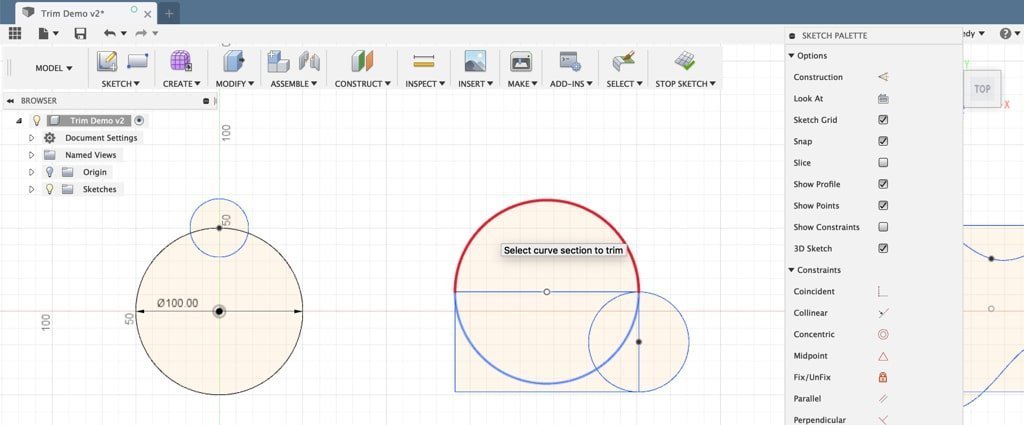
Let's watch a video that demonstrates how to use this essential tool.
How to Trim Sketch Geometry in Fusion 360
This video from Product Design Online provides a clear, concise guide to the Trim tool. It's activated with the 'T' key, making it very quick to access.
Please watch from the beginning until 04:23. Pay attention to: How to activate the tool (0:29). The basic trimming of overlapping circles (0:58). The warning about how trimming can remove existing constraints and dimensions (2:23). The useful click-and-drag method for trimming multiple lines at once (3:34).
A critical point from the video is that using the Trim tool can sometimes delete the constraints or dimensions associated with the geometry you're cutting. This directly relates to our last lesson. After trimming, always check if any lines have turned from black back to blue, indicating they are no longer fully constrained, and re-apply constraints or dimensions as needed.
2. The Extend Tool: Closing the Gaps
The Extend tool is the logical opposite of Trim. Instead of removing a line segment, it lengthens it until it meets the nearest intersecting piece of sketch geometry. This is incredibly useful for closing gaps in a profile to ensure you have a closed loop, which is necessary for creating a 3D solid.
Your experience with manual drafting might bring to mind the process of ensuring lines meet perfectly at a corner; the Extend tool accomplishes this digitally with a single click.

Let's see how it works in practice.
How to Extend Sketch Geometry in Fusion 360
The same creator, Product Design Online, has a companion video for the Extend tool. Notice how it's located in the same dropdown menu as Trim.
Please watch from 00:29 to 03:53. Focus on: The basic function of extending a line to close a corner (1:02). How cursor placement matters when selecting a line to extend (1:45). The demonstration of extending an arc to form a complete circle (3:00).
As the video highlights, Trim and Extend are a powerful duo. You'll often find yourself using them back-to-back to quickly refine the contours of your sketch.
3. The Offset Tool: Creating Consistent Thickness
The Offset tool creates a copy of a line, curve, or an entire chain of connected lines at a specified, consistent distance. This is one of the most important tools for mechanical design, especially for 3D printing.
When you design a case for a gaming controller, a replacement part, or an enclosure, you'll need to define a wall thickness. The Offset tool is perfect for this. You can sketch the outer profile of your part and then use Offset to create the inner profile instantly, guaranteeing a uniform wall thickness.
[PDF] Autodesk Fusion 360 Black Book
Let's read a brief section from the "Autodesk Fusion 360 Black Book" that explains the Offset tool. It's a straightforward but powerful command.
Please read the section titled 'Offset' (page 56). It begins after the 'Sketch Scale' section and ends before the 'Mirror' section. Pay close attention to the 'Chain Selection' option, which allows you to offset a complete profile in one go.
The Chain Selection option mentioned in the text is key. With it checked, clicking on any single line in a closed or continuous shape will select the entire chain, allowing you to create a parallel profile of the whole shape at once. This is the feature you'll use most often when creating outlines for walls or shells.
4. Practice Exercise
Now, let's put these three tools into practice. This is a short, self-guided exercise to help solidify your understanding.
- Open Fusion 360 and create a new sketch on any plane.
- Draw two circles of different sizes that do not overlap.
- Draw two straight lines that are tangent to both circles, creating a shape like a basic connecting rod or slot. You will have lines crossing inside the circles.
- Use the Trim tool (shortcut:
T) to remove the inner arcs of the circles, leaving you with a single, closed profile with rounded ends. - Now, use the Offset tool (shortcut:
O) to create a smaller, identical slot shape inside the first one. Make sure "Chain Selection" is active. - Finally, draw a random line that falls short of touching one of the outer edges of your slot. Use the Extend tool to make it connect to the slot's boundary.
This simple exercise mimics a common workflow: creating a base shape, cleaning it up with Trim, creating a wall or inner feature with Offset, and closing any gaps with Extend.
Conclusion
You've now added three essential sketch modification tools to your skillset. These tools are less about creating new geometry and more about refining and manipulating existing geometry efficiently.
Key Takeaways:
- Trim (
T): Removes sketch segments up to the nearest intersection. Essential for cleaning up overlapping geometry but be mindful that it can remove constraints. - Extend: The opposite of Trim. It lengthens sketch geometry to the nearest intersection, perfect for closing gaps in profiles.
- Offset (
O): Creates parallel copies of sketch geometry at a set distance. Incredibly useful for creating parts with uniform wall thickness, a common requirement in 3D printing.
In our next lesson, we will continue exploring efficient sketching techniques by learning how to create symmetrical geometry using construction lines and the Mirror command. This will allow you to design complex, symmetrical parts by modeling only half of the geometry, saving significant time and effort.