Hello! Welcome to the next lesson in your journey to mastering Fusion 360.
In our last session, we focused on the "Golden Workflow" for creating multi-part designs: Save > New Component > Activate > Design. This top-down method is the ideal way to start a project, ensuring your model is structured correctly for assemblies from the very beginning.
However, sometimes you might start modeling an idea quickly without thinking about structure, or you might import a 3D model from another source. In these cases, you often end up with bodies instead of components. Today's lesson addresses this exact scenario. You will learn how to convert an existing body into a component to properly structure a design. This is an essential skill for organizing your work and preparing any model for assembly.
1. From Unstructured Bodies to Organized Components
Let's quickly recap the core difference. As we've discussed, bodies are simple 3D shapes, while components are like real-world parts that can have motion, properties, and contain other design objects.

If you have a design made of only bodies, you cannot apply joints, create a parts list, or manage it as an assembly. The solution is to convert those bodies into components.
2. The Conversion Process
Fortunately, Fusion 360 makes this process very straightforward. The core action is simple:
- In the Browser tree on the left, expand the
Bodiesfolder. - Right-click on the body you want to convert.
- Select Create Components from Bodies from the context menu.
That's it. Fusion 360 will create a new component and automatically place the body inside it.
This animated GIF shows the process in action.
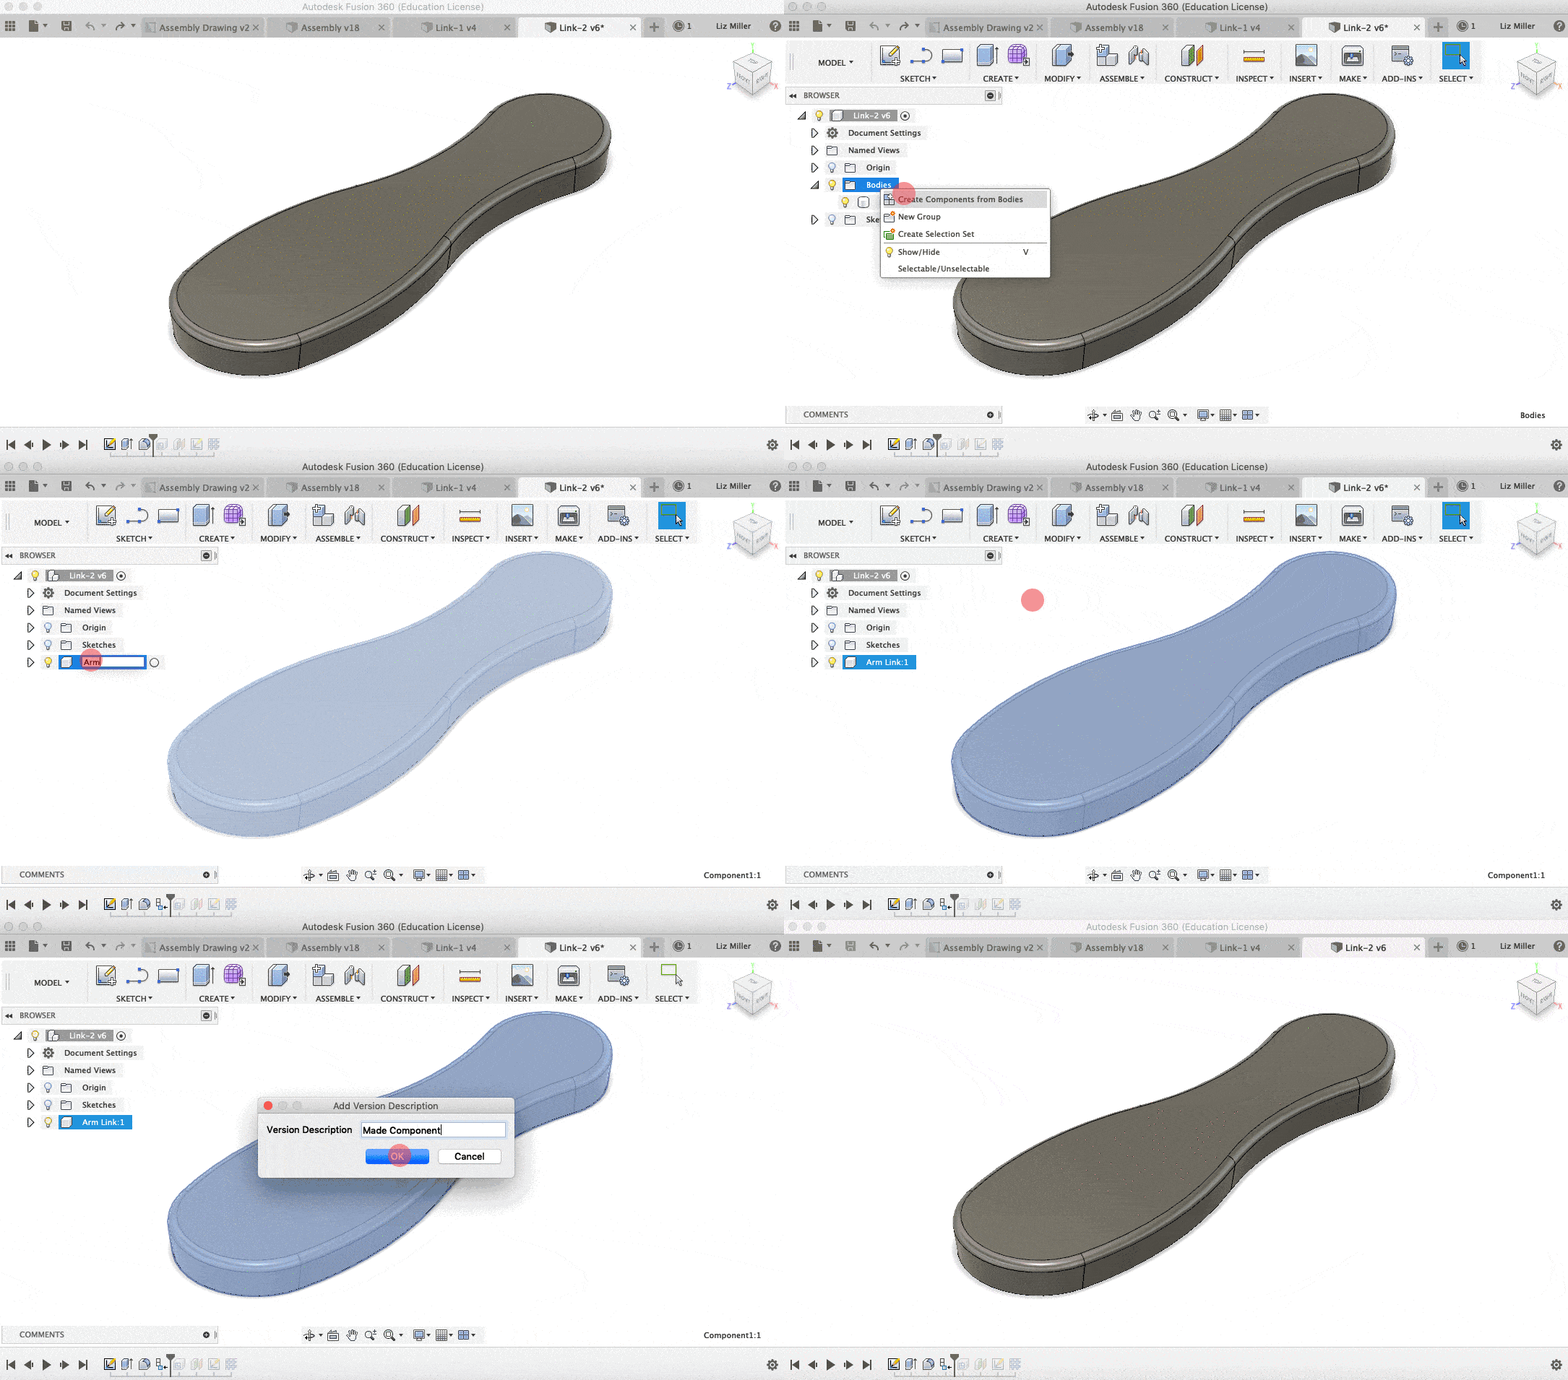
To hear this explained and to reinforce the benefits, the following video provides an excellent summary.
Bodies vs Components in Fusion 360 Explained - Learn Autodesk Fusion 360 in 30 Days: Day #13
This video from Product Design Online will walk you through the process of converting bodies into components and reiterate the benefits you gain by doing so.
Please watch from 04:57 to 09:02. The first part (until 06:12) demonstrates the exact steps for conversion. The second part (from 07:30) explains the key advantages you unlock by using components, such as applying joints and better organization—the very reasons we perform this conversion.
3. Hands-On Practice: Structuring a Simple Design
Now, let's put this into practice. Imagine you are quickly prototyping a simple stand for a gaming controller. In your haste, you modeled the base and the upright support as two separate bodies. Now, you want to fix the structure.
Follow these steps in Fusion 360:
- Create the Bodies:
- Start a new, empty design. Do not create a component first. We are intentionally breaking "Rule #1" for this exercise.
- Create a sketch on the bottom (XY) plane. Draw a center rectangle with dimensions of
150 mmby100 mm. - Finish the sketch and Extrude the rectangle up by
10 mm. This is yourBase. - Now, create a new sketch on the top face of the base you just created.
- Draw another rectangle, perhaps
80 mmby15 mm, near the back of the base. - Finish the sketch and Extrude this new rectangle up by
60 mmto form theSupport. In the Extrude dialog, ensure theOperationis set to New Body. This is crucial. If it's set toJoin, you will only have one body.
- Inspect the Structure:
- Look at your Browser. You should see a
Bodiesfolder containingBody1andBody2. This is the unstructured design we need to fix.
- Look at your Browser. You should see a
- Convert to Components:
- Right-click on
Body1in the browser and select Create Components from Bodies. - The browser updates. You now have a component named
Component1. Click on its name slowly twice to rename it toBase. - Right-click on
Body2in the browser and select Create Components from Bodies. - Rename this new
Component2toSupport.
- Right-click on
- Review the Final Structure:
- Your browser should now show the top-level assembly name, with two components listed beneath it:
BaseandSupport. Each component has its own icon and contains its ownBodiesfolder.
- Your browser should now show the top-level assembly name, with two components listed beneath it:
You have successfully taken an unstructured design and given it the proper component-based hierarchy needed for an assembly.
4. Workflow Implications: "Fixing It" vs. "Doing It Right"
While it's easy to convert bodies to components, it's important to understand the implications for your design history.
When you use the "Create Components from Bodies" command, Fusion 360 adds that action to the end of your main timeline. The original sketch and extrude features that created the body remain at the beginning of the timeline, outside of the component's own history.
This can sometimes make a design harder to edit later, as the creation history is not neatly contained within the component. This is the primary reason why "Rule #1"—starting with components—is the superior workflow.
Think of it this way:
- Starting with Components: The "clean" top-down method. All design history is perfectly organized.
- Converting Bodies: A powerful and necessary tool for fixing structure, organizing ideas, or working with imported models. It's a clean-up step, not the ideal starting point.
To understand the difference, take a look at the "lamp" exercise in the training guide below. It follows the exact workflow you just performed.
This guide from Autodesk provides a practical example of converting bodies to components in the context of designing a lamp.
Please read 'Step 1: Modify the Arm' on pages 48-49. You don't need to build the lamp, just notice how the instructions guide you to convert the pre-existing 'lampshade' and 'arm' bodies into components before assembling them. This reinforces the workflow you just practiced.
Conclusion
In this lesson, you've added a crucial tool to your Fusion 360 skillset. You now know how to impose structure on a design that was initially created with only bodies.
Key Takeaways:
- You can convert a body into a component by right-clicking it in the browser and selecting Create Components from Bodies.
- This process is essential for preparing a model for assembly operations, like adding joints.
- Converting bodies is a "recovery" or organizational workflow. The best practice for multi-part designs remains the top-down method of creating components from the start.
You now have two solid methods for arriving at a well-structured assembly, making your design process more flexible and robust.
In our next lesson, we will finally begin assembling our parts. You'll learn how to use the Rigid Joint to fix a component's position relative to another, which is the first step in defining a mechanical assembly.