Hello! Welcome to the next lesson in our journey through Azure Cosmos DB.
In our previous session, we explored how to query data using SQL. A critical takeaway was that every operation, from a simple read to a complex query, has an associated cost measured in Request Units (RUs). You saw firsthand how in-partition queries are significantly cheaper than cross-partition queries. This naturally leads to the question: how do we manage this RU budget?
Today's lesson answers that question directly. We will address the learning outcome: Provision and manage throughput (RU/s) at the database and container level. You will learn how to configure the capacity for your Cosmos DB resources, which is a crucial skill for balancing performance, cost, and scalability.
1. What Are Request Units and Throughput?
Let's start by solidifying our understanding of Request Units. An RU is an abstraction of the physical resources—CPU, IOPS, and memory—required to perform a database operation. Instead of juggling these three resources independently, Cosmos DB simplifies capacity planning into a single, logical currency.
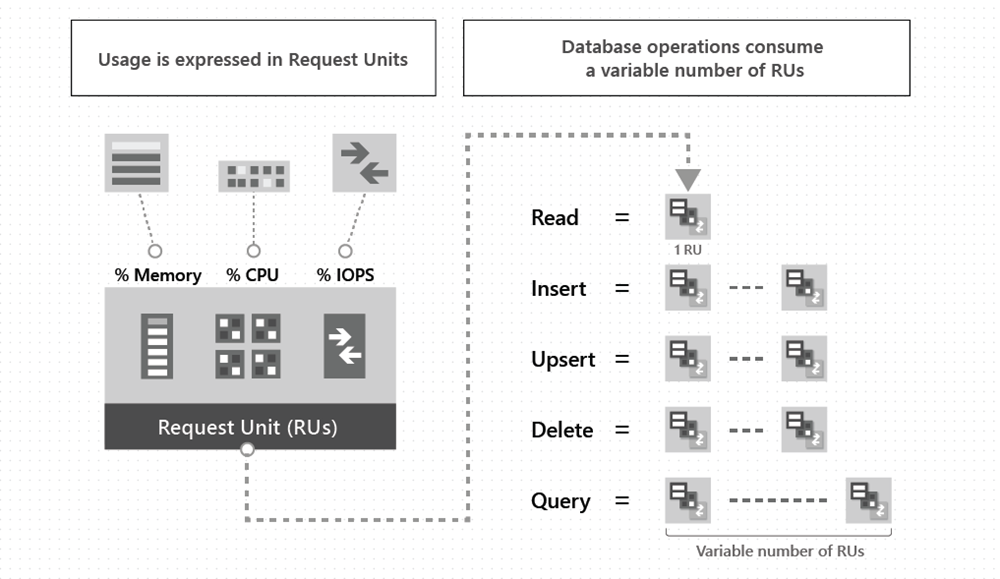
Throughput is the rate at which you can perform operations, provisioned and measured in Request Units per second (RU/s). If your application's requests consume more RU/s than you have provisioned, you will be "rate-limited" (receive HTTP 429 errors), and the requests will need to be retried.
To get a clear and detailed explanation of this fundamental concept, please watch the following video.
What is a Request Unit? | Azure Cosmos DB Essentials Season 2
This video from the Microsoft Azure channel provides an excellent explanation of what a Request Unit is and how it simplifies capacity planning compared to traditional VM-based database hosting.
Watch the segment from 00:30 to 03:24. Focus on how RUs abstract away CPU, memory, and IOPS, and how you can use them to estimate the capacity your application needs.
2. Provisioning Models: Deciding How to Allocate Throughput
Now that you understand what throughput is, you need to decide how you want to provision it. Azure Cosmos DB offers two main models for provisioned throughput, each suited for different workload patterns.
- Standard (Manual) Throughput: You specify a fixed number of RU/s that are reserved for your resource at all times. You are billed for this amount hourly, regardless of how much you use.
- Autoscale Throughput: You set a maximum RU/s, and Azure Cosmos DB will automatically and instantly scale the available throughput between 10% of that maximum and the full maximum, based on your application's real-time needs.
The choice between these two models has significant implications for both cost and performance. The next segment of the video you just started provides a superb visual breakdown of which model to use for different traffic patterns.
What is a Request Unit? | Azure Cosmos DB Essentials Season 2
Continuing with the same video, let's look at the different provisioning models. The speaker illustrates three common workload shapes—intermittent, bursty, and predictable—and maps them to the ideal provisioning model (Serverless, Autoscale, and Manual).
Watch the segment from 03:24 to 08:05. Pay close attention to the graphs that illustrate the different workload patterns and how Autoscale can save costs by avoiding payment for unused, over-provisioned capacity.
As the video explained, Autoscale is often the best starting point for new applications with variable or unpredictable traffic, while manual throughput is ideal for steady, predictable workloads where you can maintain high utilization.
3. Provisioning Granularity: Deciding Where to Allocate Throughput
The second key decision is where to provision your throughput. You have two options:
- At the container level: The throughput is dedicated exclusively to a single container. This guarantees predictable performance for that container, as its RU/s are not shared. This is the most common approach.
- At the database level: The throughput is shared among all containers within that database. This can be more cost-effective if you have many small containers that can share a pool of RUs, such as in a multi-tenant application where each tenant has its own container.
You can even use a hybrid approach, where a database has shared throughput, but one or more specific containers within it are configured with their own dedicated throughput for performance-critical workloads.

The following reading from the official Microsoft documentation provides the detailed breakdown of these options.
Introduction to provisioned throughput in Azure Cosmos DB
This document, 'Introduction to provisioned throughput in Azure Cosmos DB', is the definitive guide on the topic. We'll focus on the sections that detail the two levels of granularity.
Please read the sections titled 'Set throughput on a container', 'Set throughput on a database', and 'Set throughput on a database and a container'. This will clarify the use cases and guarantees for each approach.
4. Managing Throughput with the .NET SDK
Given your strong background in C# and .NET, let's translate these concepts into code. The Azure.Cosmos SDK provides simple and intuitive methods to create resources with specific throughput settings and to modify them programmatically.
Here’s how you can implement these patterns in your console application.
Creating a Container with Manual Throughput
You can provision manual throughput when creating a container by passing an integer value to the CreateContainerAsync method.
// In Program.cs, inside your main method, after getting the database object
Database database = client.GetDatabase("TasksDB");

// Define container properties
ContainerProperties manualContainerProps = new ContainerProperties
{
    Id = "items-manual",
    PartitionKeyPath = "/category"
};

// Create a container with 400 RU/s manual throughput
int manualThroughput = 400;
Container manualContainer = await database.CreateContainerAsync(
    manualContainerProps,
    throughput: manualThroughput
);

Console.WriteLine($"Created container '{manualContainer.Id}' with {manualThroughput} RU/s.");
Creating a Container with Autoscale Throughput
To use autoscale, you create a ThroughputProperties object using the CreateAutoscaleThroughput factory method.
// Define container properties for an autoscale container
ContainerProperties autoscaleContainerProps = new ContainerProperties
{
    Id = "items-autoscale",
    PartitionKeyPath = "/category"
};

// Specify autoscale with a maximum of 4000 RU/s
// The system will scale between 400 (10%) and 4000 RU/s
ThroughputProperties autoscaleThroughput = ThroughputProperties.CreateAutoscaleThroughput(maxThroughput: 4000);

Container autoscaleContainer = await database.CreateContainerAsync(
    autoscaleContainerProps,
    throughputProperties: autoscaleThroughput
);

Console.WriteLine($"Created container '{autoscaleContainer.Id}' with autoscale max {autoscaleThroughput.AutoscaleMaxThroughput} RU/s.");
Updating Throughput Programmatically
You can also change the throughput of an existing container using the ReplaceThroughputAsync method.
// Get a reference to the existing autoscale container
Container containerToUpdate = database.GetContainer("items-autoscale");

// Read the current throughput
ThroughputResponse currentThroughputResponse = await containerToUpdate.ReadThroughputAsync();

if (currentThroughputResponse.Resource.AutoscaleMaxThroughput.HasValue)
{
    Console.WriteLine($"Current autoscale max throughput: {currentThroughputResponse.Resource.AutoscaleMaxThroughput} RU/s.");

    // Define the new throughput properties
    ThroughputProperties newAutoscaleThroughput = ThroughputProperties.CreateAutoscaleThroughput(maxThroughput: 5000);

    // Update the throughput
    await containerToUpdate.ReplaceThroughputAsync(newAutoscaleThroughput);
    Console.WriteLine($"Updated autoscale max throughput to {newAutoscaleThroughput.AutoscaleMaxThroughput} RU/s.");
}
For a complete video demonstration of these C# operations, including setting up both manual and autoscale throughput for databases and containers, you can watch the following resource.
What is Throughput in Azure Cosmos DB?
This video by Will Velida provides a full, practical demonstration of provisioning and managing throughput using the .NET SDK. It covers the same concepts we just implemented in code.
Watch the segment from 10:10 to 14:35. This will reinforce what you've just learned by showing you a live coding demo that creates and verifies throughput settings in the Azure Portal.
5. Best Practices for Throughput Management
Choosing the right throughput strategy is key to optimizing your Cosmos DB solution. Here are some consolidated best practices:
- Start with Autoscale: For new workloads where traffic patterns are unknown, autoscale is the safest and often most cost-effective choice. You can always switch to manual later if the workload proves to be highly predictable.
- When is Manual Cheaper? As a rule of thumb, if your average RU/s utilization is consistently above 66% of your peak, manual throughput will be more economical. Below that, autoscale is typically cheaper, even with its slightly higher per-RU price.
- Set the Max RU/s Wisely: When using autoscale, set the maximum throughput slightly above your expected peak to handle unexpected surges. Don't set it excessively high, as you are billed for at least 10% of the maximum value, even during idle periods.
- Monitor Your Consumption: Use Azure Monitor to track the
Normalized RU Consumptionmetric for your containers. If it's consistently high (e.g., >80%), it's a sign you may need to increase your provisioned throughput. If it's very low, you may be over-provisioned. - Combine Database and Container Throughput: For applications with many small containers (e.g., metadata tables) and one large, busy container, consider a hybrid model. Put the small containers in a database with shared throughput and give the large container its own dedicated throughput.
Conclusion
Excellent work! You are now equipped with the knowledge to make informed decisions about one of the most critical aspects of Cosmos DB development: performance and cost management.
Key Takeaways:
- Request Units (RUs) are the currency of Cosmos DB, abstracting compute, memory, and I/O.
- You provision throughput in RU/s, which determines your application's performance capacity.
- You can provision throughput in two ways: manual (fixed) for predictable workloads and autoscale (variable) for unpredictable workloads.
- You can apply these settings at either the database level (shared) or the container level (dedicated).
- The .NET SDK provides straightforward methods (
CreateContainerAsync,ReplaceThroughputAsync) to manage these settings programmatically.
Next Steps
So far, we have covered how to create, query, and manage the performance of data in Cosmos DB. But what about reacting to changes in your data as they happen?
In our next lesson, we will dive into one of the most powerful features of Cosmos DB: the Change Feed. You will learn to implement a Cosmos DB change feed processor using an Azure Functions trigger, enabling you to build powerful, event-driven architectures that respond to data modifications in real-time.