Introduction
Hello and welcome back. In our last lesson, you did a great job connecting an HTTP-triggered function to Azure Blob Storage using input and output bindings. You saw how bindings abstract away the boilerplate code for service integration, allowing you to focus purely on your business logic.
Today, we'll explore a different kind of trigger that's essential for automation and background processing. This lesson focuses on the learning outcome: Implement a timer-triggered Azure Function for scheduled tasks.
Instead of responding to an external event like an HTTP request, timer-triggered functions run on a schedule you define. This is perfect for tasks like nightly data cleanup, generating hourly reports, or periodically syncing data between systems. Given your experience, you can think of this as the serverless equivalent of a traditional cron job on Linux or a scheduled task in Windows.
We will cover:
- Understanding the CRON expression used for scheduling.
- Creating, testing, and deploying a timer-triggered function using Visual Studio.
- Exploring the
TimerInfoobject to get schedule-related information. - Implementing best practices, such as making schedules configurable.
1. Defining the Schedule: The NCRONTAB Expression
The heart of a timer trigger is its schedule, which is defined using an NCRONTAB expression. This is a string that tells the Azure Functions runtime when to execute your function. It's a slight variation of the standard CRON format, with an important addition: a field for seconds.
The format consists of six fields:{second} {minute} {hour} {day} {month} {day-of-week}
Let's break down what each field represents:
| Field | Allowed Values | Allowed Special Characters |
|---|---|---|
second |
0-59 | *, ,, -, / |
minute |
0-59 | *, ,, -, / |
hour |
0-23 | *, ,, -, / |
day |
1-31 | *, ,, - |
month |
1-12 or JAN-DEC | *, ,, - |
day-of-week |
0-6 or SUN-SAT | *, ,, - |
*(asterisk) means "every". For example,*in theminutefield means every minute./(slash) specifies an interval.*/5in theminutefield means every 5 minutes.,(comma) specifies a list of values.0,15,30,45in theminutefield means at minutes 0, 15, 30, and 45.-(hyphen) specifies a range.9-17in thehourfield means every hour from 9 AM to 5 PM (17:00).
For a deeper dive into the syntax and to see more examples, please read the official documentation.
Timer trigger for Azure Functions: NCRONTAB expressions
The Microsoft Learn documentation provides the definitive guide to NCRONTAB expressions used in Azure Functions.
Please read the section titled 'NCRONTAB expressions'. Focus on the six-field format and the table of examples to understand how different schedules are constructed.
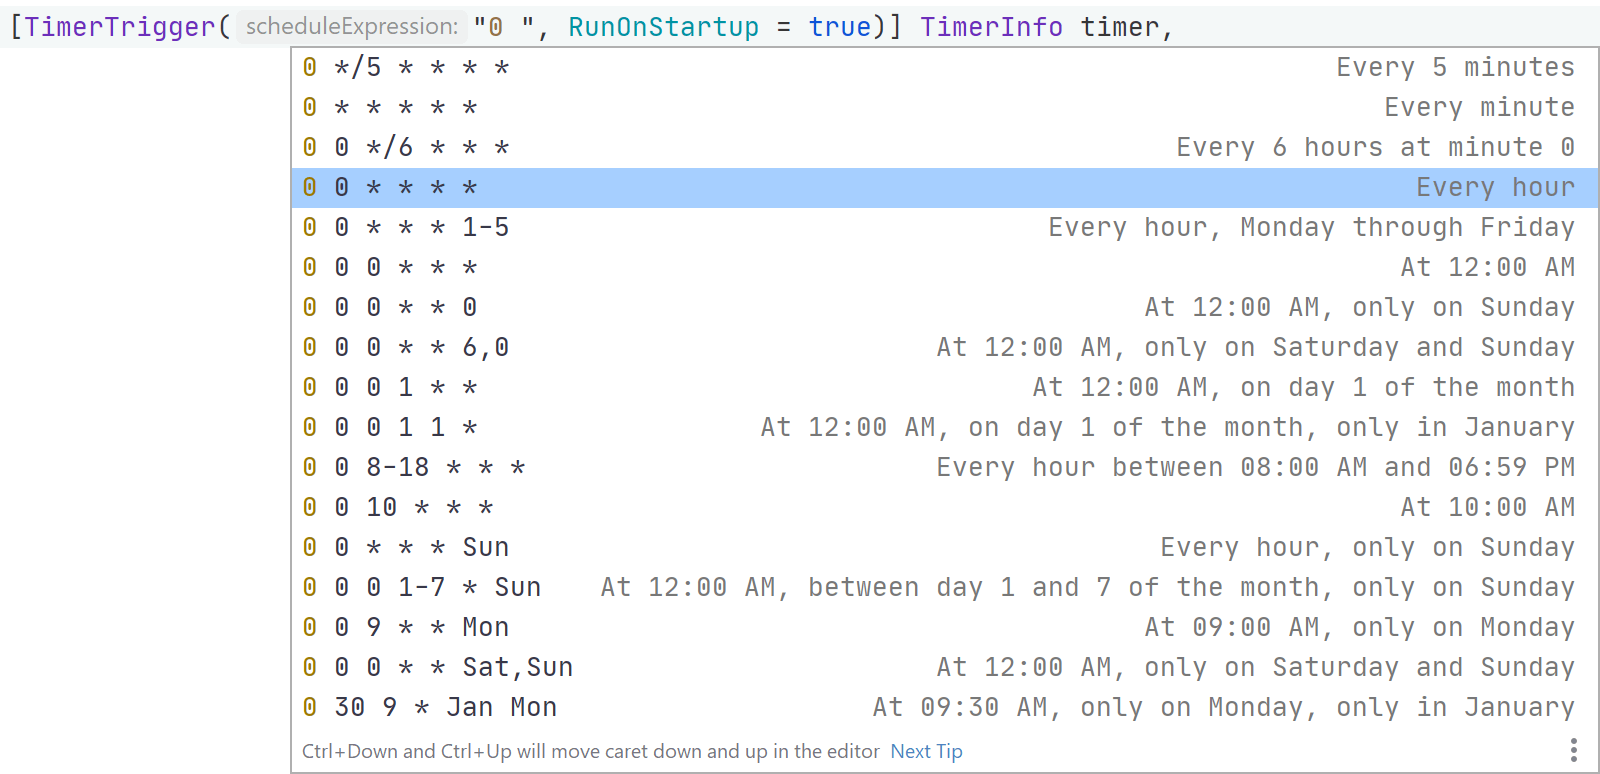
As you write code in Visual Studio, you'll often get helpful IntelliSense suggestions for common CRON expressions, which is a great way to learn.
2. Hands-On: Building a Scheduled Task
Now, let's build and deploy a simple timer-triggered function. We'll create a function that runs every 15 seconds and logs a message. The following video provides a clear, step-by-step walkthrough of the entire process, from creation to deployment.
Azure Functions creation with Time Trigger and deployment from Visual Studio - with simple steps
This video from Cloud and AI Academy demonstrates the end-to-end process of creating, testing, deploying, and monitoring a timer-triggered function.
Follow along with the video to complete these steps: Create a new Azure Functions project in Visual Studio with a Timer Trigger template. Modify the CRON schedule to a short interval for easy testing (e.g., */15 * * * * * for every 15 seconds). Run the function locally and observe the console output to confirm it's triggering on schedule. Publish the function to your existing Function App in Azure. Navigate to the Azure portal to monitor the function and verify its successful execution in the cloud.
After deploying, you can check the Monitor blade for your function in the Azure portal. You should see successful invocation traces appearing at the interval you specified.

3. Advanced Configuration and Best Practices
While a basic timer function is simple, real-world applications require more robust configuration.
The TimerInfo Object
The runtime passes a TimerInfo object as a parameter to your function's Run method. This object contains useful information about the current timer invocation.
[Function("Heartbeat")]
public void Run([TimerTrigger("0 * * * * *")] TimerInfo myTimer, FunctionContext context)
{
    var logger = context.GetLogger("Heartbeat");
    logger.LogInformation($"C# Timer trigger function executed at: {DateTime.Now}");

    // Check if this invocation is late. This can happen if the function app was
    // restarting or offline during the scheduled time.
    if (myTimer.IsPastDue)
    {
        logger.LogWarning("The timer is running late!");
    }

    // You can also get info about the schedule itself
    if (myTimer.ScheduleStatus is not null)
    {
        logger.LogInformation($"Next timer schedule = {myTimer.ScheduleStatus.Next}");
    }
}
The IsPastDue property is particularly important for jobs that must run reliably. It allows you to implement catch-up logic if an execution was missed.
Making Schedules Configurable
Hard-coding CRON expressions in your attributes is not ideal for production environments. If you need to change a schedule, you have to redeploy your code. A better approach is to reference a value from your application settings.
You can do this by wrapping the setting name in % signs in the TimerTrigger attribute.
-
Modify the C# Code:
[Function("ConfigurableTask")] public void Run([TimerTrigger("%Tasks:CleanupSchedule%")] TimerInfo myTimer, FunctionContext context) { var logger = context.GetLogger("ConfigurableTask"); logger.LogInformation("Configurable cleanup task executed."); } -
Update
local.settings.json:{ "IsEncrypted": false, "Values": { "AzureWebJobsStorage": "...", "FUNCTIONS_WORKER_RUNTIME": "dotnet-isolated", "Tasks:CleanupSchedule": "0 */5 * * * *" // Every 5 minutes } }
Now, the schedule is controlled by the Tasks:CleanupSchedule setting. You can change this value in your local.settings.json for local testing or, more importantly, in the Configuration -> Application settings of your Function App in Azure without needing a new deployment. This practice is crucial for maintainability.
Handling Time Zones
By default, all CRON expressions are interpreted in Coordinated Universal Time (UTC). If your schedule needs to align with a specific local time (e.g., "9:00 AM Eastern Time"), you must configure the time zone for your Function App.
You can do this by adding an application setting named WEBSITE_TIME_ZONE.
- For a Windows-hosted app, you would set it to a value like
"Eastern Standard Time". - For a Linux-hosted app, you use an IANA time zone name like
"America/New_York".
With this setting in place, a CRON expression like 0 0 9 * * * will correctly trigger at 9:00 AM in the specified time zone, automatically accounting for Daylight Saving Time changes.
For more details on these advanced topics, this article provides excellent, concise examples.
How to Use Azure Functions Timer Trigger for Scheduled Tasks
This blog post from OneUptime gives practical C# examples for timer trigger best practices.
Quickly review the sections 'Using the TimerInfo Object' and 'Making Schedules Configurable'. These reinforce the concepts we just discussed with clean code examples.
A Note on Scaling
It's important to know that even if your Function App scales out to multiple instances (e.g., under a Consumption plan), only a single instance of a specific timer-triggered function will run at any given time. The Functions runtime uses a storage lock behind the scenes to ensure the scheduled job is not executed multiple times in parallel.
Conclusion
In this lesson, you have learned how to build and configure functions that run on a recurring schedule. This is a fundamental building block for automating a wide range of operational tasks in the cloud.
Key Takeaways:
- Timer triggers execute functions based on a six-field NCRONTAB expression.
- The
TimerInfoobject provides context about the current execution, including whether it'sIsPastDue. - For production systems, always make your schedules configurable using application settings (e.g.,
[TimerTrigger("%MySchedule%")]). - By default, schedules are in UTC. Use the
WEBSITE_TIME_ZONEapplication setting to align with a local time zone. - The Azure Functions runtime guarantees that only a single instance of a timer function runs on schedule, even in a scaled-out environment.
Next Steps
So far, our functions have been stateless and designed to complete a single, self-contained operation. But what if you need to orchestrate a long-running, complex workflow with multiple steps?
In our next lesson, we will dive into a powerful extension of Azure Functions. You will learn to describe the architecture and components of Durable Functions for stateful workflows, opening the door to building reliable, stateful serverless applications.