Introduction
Hello! In our last lesson, we explored how to make your App Service application resilient and cost-effective by configuring manual and automatic scaling. A key challenge that arises with scaled-out applications is updating them without disrupting your users. If you have multiple instances running, how do you deploy a new version to all of them simultaneously without any of them going offline?
Today, we'll answer that question by focusing on the learning outcome: Configure deployment slots and perform a slot swap for a zero-downtime deployment. This is one of the most powerful features of Azure App Service, enabling professional-grade deployment strategies like blue-green deployments and A/B testing.
This lesson will cover:
- The concept and benefits of deployment slots.
- Creating a "staging" slot for your web app.
- Deploying a new version of your .NET application to the staging slot.
- Performing a "swap" to promote the new version to production with zero downtime.
- Key concepts like "sticky" settings and advanced swap options.
By the end of this lesson, you'll be able to confidently deploy updates to your applications without your users ever noticing a disruption.
The "Why" of Deployment Slots
Before we jump into the "how," let's solidify the "why." Deploying new code directly over your production application is risky. It can cause downtime while files are being updated, and if a bug is discovered after deployment, rolling back can be a slow and stressful process.
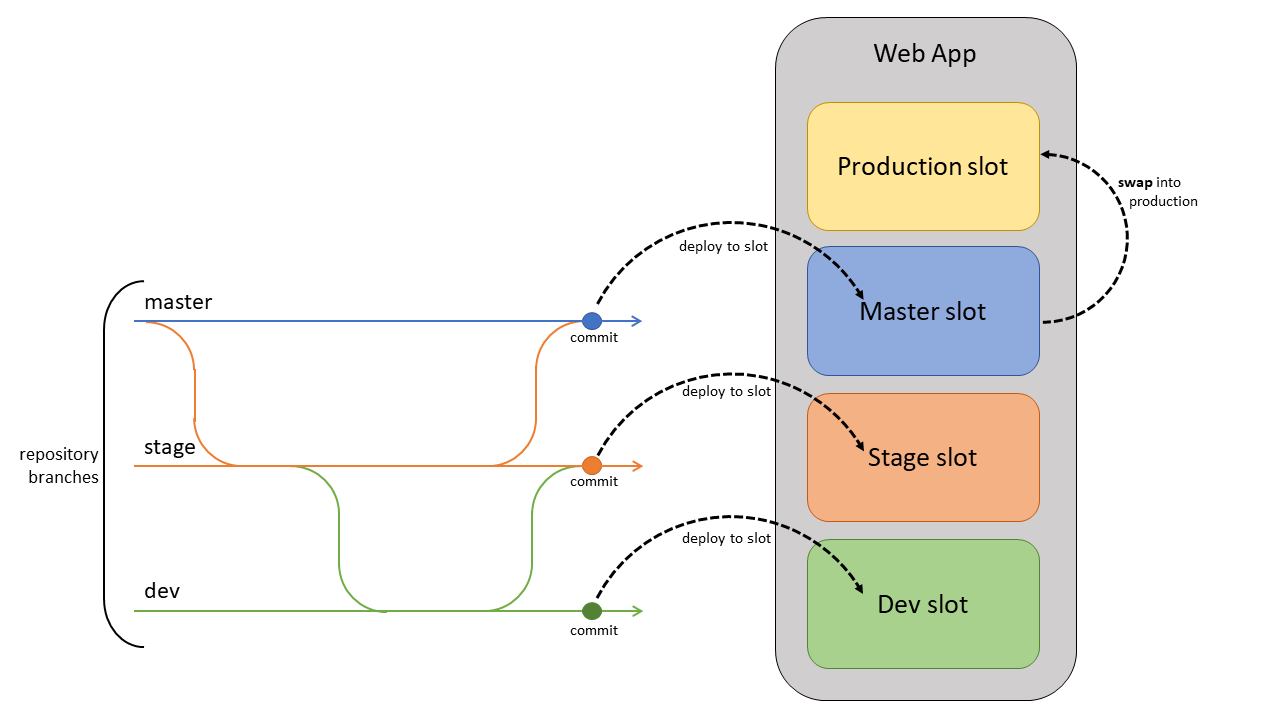
Deployment slots solve this problem by providing parallel, live environments for your application. Each slot is a fully functional App Service instance with its own hostname, but they share the same App Service Plan resources. The default slot is always the production slot. You can create additional slots, such as staging, dev, or testing.
To get a clear picture of this, let's start with a short video that expertly explains the core concept.
Deployment Slots Explained | Azure Web App Deployment Slots
The video 'Deployment Slots Explained' from AzureTeach.Net provides an excellent visual introduction to the problem that deployment slots solve and how they enable zero-downtime deployments and easy rollbacks.
Please watch the first two minutes of the video (00:00 - 02:02). Pay close attention to the diagrams that illustrate the transition from a single production environment to one with a staging slot, and how the 'swap' operation redirects user traffic.
As the video illustrates, the workflow becomes:
- Deploy the new version of your app to a non-production slot (e.g.,
staging). - Test the new version in this staging environment using its unique URL.
- When you're confident the new version is ready, you perform a swap. Azure seamlessly redirects all production traffic to the staging slot.
- The previous production code is now in the staging slot, providing an instant rollback path if needed.
This strategy is often visualized by mapping code repository branches to specific slots, a practice you're likely familiar with from your development work.
Creating and Deploying to a Staging Slot
Let's put this theory into practice. Our first step is to create a new deployment slot.
Prerequisite: Remember from our last lesson on scaling that features like deployment slots require your App Service Plan to be in the Standard, Premium, or Isolated tier. If you scaled down after the last exercise, ensure you are on a supported tier before proceeding.
Now, let's see how to create a slot and deploy to it from Visual Studio.
How to use Deployment Slots in Azure App Service | Azure Tips & Tricks
The video 'How to use Deployment Slots in Azure App Service' from Microsoft Azure provides a quick, practical walkthrough. We'll use it to see the creation, deployment, and swap process in action.
Please watch the following segments to see the process from start to finish: Identifying the Production Slot (00:42 - 01:01): Shows where to find the deployment slots feature. Adding a New Slot (01:01 - 01:31): Demonstrates creating a new slot named 'staging' and cloning the configuration. Publishing to the Slot (01:45 - 02:27): Shows how to select the specific deployment slot as the publishing target in Visual Studio.
Hands-On: Create a Staging Slot and Deploy
Now, it's your turn to follow those steps.
-
Create the Staging Slot:
- Navigate to your
MyFirstAzureWebAppApp Service in the Azure Portal. - In the left menu, select Deployment slots under the Deployment section.
- Click + Add Slot.
- Name the slot staging.
- For Clone settings from, select your main app (
MyFirstAzureWebApp). This copies all your application settings, connection strings, etc., to the new slot. - Click Add.
- Navigate to your
-
Prepare Your Application for V2:
- In Visual Studio, open the solution for your
MyFirstAzureWebApp. - Go to
Pages/Index.cshtml. - Change the heading or add a new paragraph to make a visible change. For example, change
<h1>Welcome</h1>to<h1>Welcome to Version 2.0!</h1>. - Save the file.
- In Visual Studio, open the solution for your
-
Deploy to the Staging Slot:
- Right-click the project in Solution Explorer and select Publish.
- You should see your existing publish profile. Instead of using it, click New.
- In the dialog, select Azure -> Azure App Service (Windows).
- In the next screen, you will see your App Service. Expand it, and you should now see the staging slot listed underneath the main production app.
- Select the staging slot and click Finish.
- A new publish profile for the staging slot will be created. Click Publish.
Once publishing is complete, Visual Studio will open a browser window pointing to your staging URL (e.g., https-myfirstazurewebapp-staging.azurewebsites.net). You should see "Welcome to Version 2.0!". If you visit your main production URL, you will still see the original version.
Performing the Swap for a Zero-Downtime Deployment
You've now successfully staged a new version of your application. The final step is to promote it to production. This is done with the swap operation.
What Happens During a Swap?
The swap is more than just a simple URL change. To ensure zero downtime and a smooth transition, Azure performs a sophisticated series of steps. This is a crucial concept for the AZ-204 exam.
Set Up Staging Environments - Azure App Service
The official Microsoft documentation, 'Set up staging environments in Azure App Service', details the inner workings of the swap operation. Understanding this process is key to appreciating how zero downtime is achieved.
Please read the section titled 'Understand what happens during a swap'. Pay special attention to two parts: Swap operation steps: This numbered list explains how Azure applies settings to the source slot and 'warms it up' before switching the traffic. Which settings are swapped: This section details which configuration elements move with the code (e.g., framework versions) and which ones stay with the slot (e.g., custom domain names, scale settings).
In essence, the key steps are:
- Warm-up: Azure applies the production slot's settings to the staging slot and restarts its instances. It then sends requests to the staging slot to ensure the application is fully loaded, connected to databases, and ready to serve traffic. This prevents "cold starts" for users hitting the new version for the first time.
- Redirect: Once the staging slot is fully warmed up, Azure swaps the routing rules. All traffic intended for the production URL is now sent to the instances that were previously running the staging code.
- Complete: The instances that were previously running the production code now receive traffic for the staging URL.
Sticky Settings
As you read, some settings are swapped, and some are not. A critical feature is the ability to make an application setting or connection string "sticky." This means it stays with the slot and is not swapped.
This is essential for scenarios where your staging environment should connect to a different database than your production environment.
- Production Slot:
ConnectionStringpoints to the production database. - Staging Slot:
ConnectionStringpoints to a staging/test database.
By marking the ConnectionString as a "Deployment slot setting" (making it sticky), you ensure that when you swap, the new code will automatically start using the production connection string, and the old code (now in staging) will revert to using the staging database connection.
You configure this in the Configuration blade of a specific slot by checking the "Deployment slot setting" box for any app setting or connection string.
Hands-On: Perform the Swap
- In the Azure Portal, go back to the Deployment slots page for your App Service.
- Click the Swap button in the top menu bar.
- In the Swap dialog:
- The Source should be
staging. - The Target should be
production. - You can review the configuration changes that will occur.
- The Source should be
- Click Swap.
The operation will take a moment. Once complete, refresh your production URL. You should now see "Welcome to Version 2.0!". If you refresh your staging URL, you will see your original application. You have successfully performed a zero-downtime deployment and now have an instant rollback path by simply swapping again.
Advanced Swap Options
For the AZ-204 exam, you should also be aware of a few more advanced features:
- Swap with Preview: This is a two-phase swap. The first phase performs the warm-up but stops before redirecting traffic. This gives you a chance to browse the staging slot (which is now running with production settings) to perform final verification before committing to the swap.
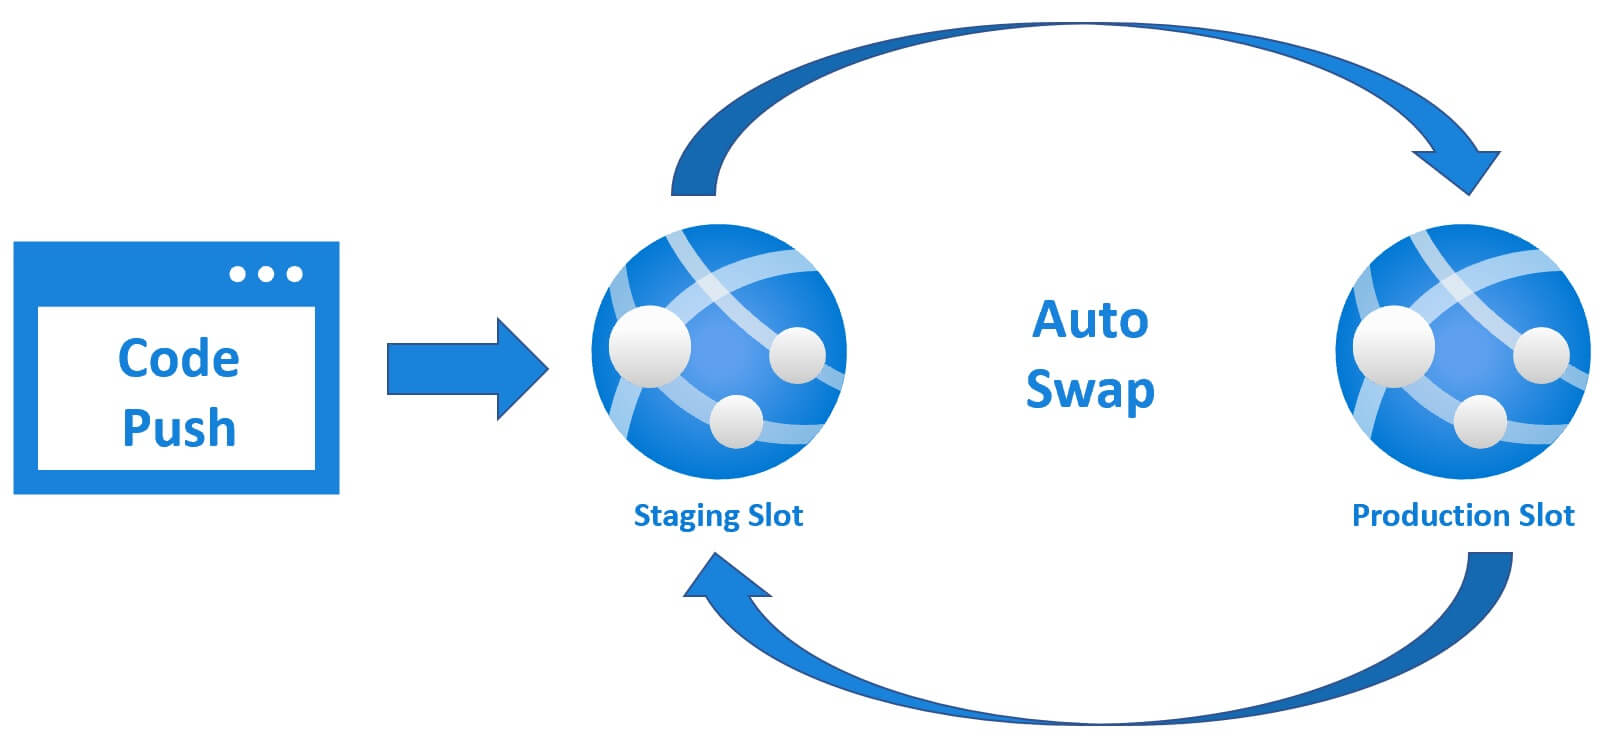
- Auto Swap: You can configure a slot to automatically swap into production as soon as new code is deployed to it. This is powerful for CI/CD pipelines but should be used with caution and thorough automated testing.
- Traffic Routing: On the Deployment Slots page, you can specify a percentage of production traffic to be routed to a non-production slot. This is excellent for A/B testing new features with a subset of users or performing "canary releases."
Conclusion
You have now mastered a core competency for any Azure developer. Deployment slots are fundamental to building and maintaining professional, highly-available web applications on Azure.
Key Takeaways:
- Deployment slots are live App Service instances that enable zero-downtime deployments and easy rollbacks.
- They require a Standard tier or higher App Service Plan.
- The swap process involves a warm-up phase to prevent cold starts and ensure a seamless transition for users.
- Sticky settings are crucial for maintaining environment-specific configurations (like database connection strings) that should not be swapped with the code.
- Advanced features like Swap with Preview, Auto Swap, and Traffic Routing provide powerful control over your deployment strategy.
Next Steps
Now that your application is live on a production-ready infrastructure, the next logical step is to make it accessible via a professional, branded URL. In our next lesson, we will cover the final outcome in this module: "Describe conceptually how custom domains and TLS/SSL bindings are configured for an App Service app." We will explore how to move from the default .azurewebsites.net domain to your own custom domain name.