Hello! Welcome back to your AZ-204 certification journey.
In our last session, we successfully set up your local development environment by installing the Azure CLI and configuring Visual Studio. With our tools sharpened and ready, it's time to take our first concrete step into the Azure cloud.
Introduction
Today, we'll put your new tools to work by creating and managing one of the most fundamental components in Azure: the resource group. This lesson directly addresses the learning outcome: Create and manage a resource group using both the Azure Portal and Azure CLI commands.
Think of a resource group as a logical folder for your project. Just as you organize files for a software project into a single directory, you'll organize all the Azure services (like web apps, databases, and storage) for a solution into a single resource group. This practice is crucial for management, billing, and controlling access.
We will cover:
- The concept and purpose of resource groups in the Azure hierarchy.
- How to create and manage resource groups using the user-friendly Azure Portal.
- How to perform the same tasks efficiently using the Azure CLI, a skill essential for automation and a developer-centric workflow.
By the end of this lesson, you will have hands-on experience creating, inspecting, and deleting the foundational containers for all your future Azure deployments.
Part 1: What is a Resource Group?
Before we start creating things, let's solidify our understanding of what resources and resource groups are and where they fit within Azure's structure. Every service you use in Azure—a virtual machine, a database, a web app—is an individual resource. A resource group is a container that holds these related resources for an Azure solution.
To get a clear overview of these concepts and common strategies for organizing your resources, please watch the following video segment.
AZ-900 Episode 8 | Resources, Resource Groups & Resource Manager | Azure Fundamentals Course
This clip from Adam Marczak's 'Azure for Everyone' series provides a concise explanation of Azure resources and resource groups. It covers their role as logical containers and discusses different strategies for grouping resources, such as by application lifecycle or department.
Watch from 00:35 to 04:00. Pay close attention to the idea that a resource group is a mandatory container for any resource and the different organizational strategies mentioned. Given your experience leading projects, you'll recognize the value of grouping assets by their lifecycle (dev, test, prod).
A resource group exists within a Subscription, which is tied to your billing account. A subscription can have many resource groups. This creates a clear hierarchy for management and governance.
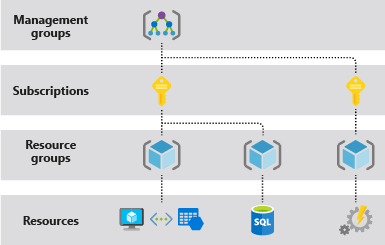
A key takeaway is that a resource group has a location (e.g., 'East US', 'West Europe'), which determines where the metadata for that group is stored. The resources inside the group can actually be in different locations.
Part 2: Managing Resource Groups with the Azure Portal
The Azure Portal is the web-based, unified console for managing your Azure resources. It's a great place to start because it provides a visual way to interact with Azure services.
Hands-On 1: Create a Resource Group in the Portal
Let's create your first resource group. The following article provides a detailed, step-by-step guide.
Use the Azure portal to Manage Azure resource groups
This official Microsoft Learn documentation walks you through managing resource groups in the Azure Portal. We will focus on the creation process first.
Read the sections 'What is a resource group' and 'Create resource groups'. Then, follow the steps in the portal to create your own resource group. Use the name az204-portal-rg and choose a region close to you (e.g., West Europe or East US).
After following the steps, you will have a live resource group in your Azure subscription.
Hands-On 2: Manage the Resource Group
Creating a group is just the first step. Good management practices involve organizing and protecting your resources. Two common management tasks are tagging and locking.
- Tags are key-value pairs that help you organize resources and consolidate billing. For example, you might tag resources with a project name or cost center.
- Locks help prevent accidental deletion or modification of critical resources. A
ReadOnlylock prevents any changes, while aCanNotDeletelock allows modifications but prevents deletion.
Now, let's apply these to the resource group you just created.
- Navigate to your
az204-portal-rgresource group in the Azure Portal. - In the left-hand menu, find Tags. Add a new tag with the Key
environmentand the Valuelearning. - Next, find Locks in the menu. Add a new lock with the Lock type set to
Deleteand give it a name likeprevent-accidental-delete.
These simple actions are fundamental to governing an Azure environment effectively.
Part 3: Managing Resource Groups with the Azure CLI
While the portal is great for visualization, the Azure CLI is faster for experienced users and essential for automating tasks. Since you'll be writing code and scripts to manage infrastructure, becoming proficient with the CLI is a core skill for the AZ-204 exam.
When you run a command like az group create, the CLI sends a secure REST API call to the Azure Resource Manager (ARM), which is the management service that handles the request.

Hands-On 3: Create, List, and Delete with the CLI
Now, let's perform the same lifecycle operations (create, list, delete) using the command line. We'll use the official Microsoft documentation as our guide for the commands.
How to manage Azure resource groups with the Azure CLI
This Microsoft Learn article is a concise reference for managing resource groups with the Azure CLI. It provides the exact commands you'll need.
Skim this article to see the primary commands: az group create, az group list, az group delete, and az config set. We will use these commands in the following steps.
Open your terminal (PowerShell or Windows Terminal) where you logged in with az login in the last lesson, and follow these steps.
1. Create a Resource Group:
Create a second resource group, this time with the CLI.
# Create a new resource group in the West Europe region
az group create --name az204-cli-rg --location westeurope
2. List All Resource Groups:
Now, view all the resource groups in your subscription. The --output table argument formats the JSON response into a more human-readable table.
az group list --output table
You should see both az204-portal-rg and az204-cli-rg in the list.
3. Set a Default Resource Group (Pro Tip):
For a specific project, you can tell the CLI to use a default resource group so you don't have to specify it in every command.
az config set defaults.group=az204-cli-rg
Now, any command that requires a resource group (like creating a web app) will automatically use az204-cli-rg if you don't specify one.
4. Clean Up Your Resources:
It is crucial to delete resources you are no longer using to avoid incurring costs. Deleting a resource group deletes all the resources contained within it.
First, you must remove the lock you placed on the portal-created group. You can do this in the portal, or you can do it via the CLI:
# Find the name of the lock
az lock list --resource-group az204-portal-rg --output table


# Delete the lock using its name
az lock delete --name prevent-accidental-delete --resource-group az204-portal-rg
Now, delete both resource groups. The --no-wait flag returns control to the command line immediately while the deletion happens in the background. The -y flag confirms the deletion without a prompt.
# Delete the resource group created via the portal
az group delete --name az204-portal-rg -y --no-wait


# Delete the resource group created via the CLI
az group delete --name az204-cli-rg -y
You have now completed a full create-manage-delete lifecycle using both the Azure Portal and the Azure CLI.
Conclusion
In this lesson, you took your first practical steps in Azure, moving from theory and setup to hands-on resource management. You now have a solid, practical understanding of Azure's fundamental organizational unit.
Key Takeaways:
- Resource Groups are mandatory logical containers for Azure resources that share a common lifecycle.
- The Azure Portal provides a visual, user-friendly interface for creating and managing resources, including applying tags and locks.
- The Azure CLI offers a powerful, scriptable command-line interface for all management tasks, which is essential for developer workflows and automation.
- Key CLI commands for resource group management include
az group create,az group list, andaz group delete. - Always clean up your resources to manage costs effectively. Deleting a resource group permanently deletes all resources within it.
Next Steps
Now that you know how to create the "folders" (resource groups) for your applications, our next lesson will focus on how to define the "files" (resources) that go inside them. We will explore Infrastructure as Code (IaC), looking at the relationship between ARM templates and Bicep, and you'll write your first Bicep file to declaratively define an Azure resource.