Hello! Welcome back to our module on optimizing Azure applications.
In our last lesson, you built an ICacheService to connect your .NET application to Azure Cache for Redis. You've already written the code to set and get data. Today, we'll formalize that logic into one of the most common and important caching strategies in the industry.
This lesson focuses on the learning outcome: Implement the cache-aside pattern to reduce database load and improve response times. We will take the foundational ICacheService and use it to implement a robust pattern that intelligently decides when to fetch data from the database and when to serve it from the much faster in-memory cache. This is a cornerstone technique for building high-performance, scalable applications.
1. Understanding the Cache-Aside Pattern
The cache-aside pattern (also known as "lazy loading") is a read-caching strategy. Instead of the application blindly querying the database for every request, it follows a simple but powerful logic:
- Check the Cache First: The application first asks the cache for the required data.
- Cache Hit: If the data is in the cache (a "cache hit"), it's returned directly to the client. The database is not involved.
- Cache Miss: If the data is not in the cache (a "cache miss"), the application queries the primary data source (e.g., your SQL database).
- Populate and Return: The application then stores a copy of this data in the cache before returning it to the client. Subsequent requests for the same data will now result in a cache hit.
This flow dramatically reduces the number of read operations on your database, leading to lower costs, reduced database load, and significantly faster response times for frequently accessed data.
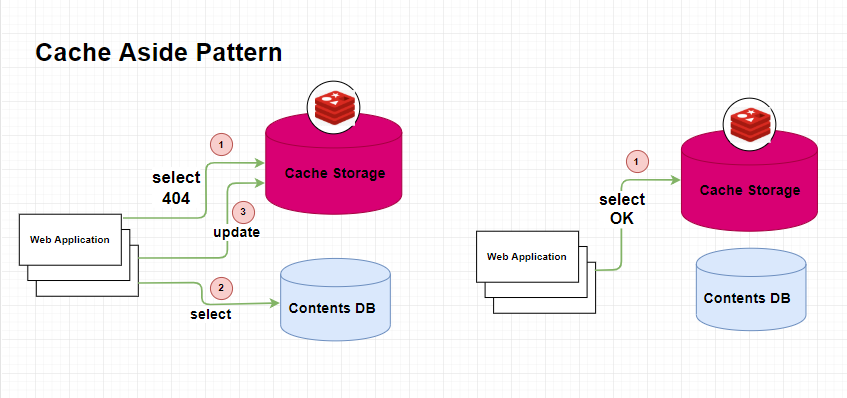
To get the official definition and context, please read the introductory sections from the Microsoft Azure Architecture Center.
Cache-Aside pattern - Azure Architecture Center
This document from Microsoft provides the definitive guide to the Cache-Aside pattern. It explains the context, solution, and key considerations.
Please read the sections 'Context and problem' and 'Solution'. Pay close attention to the diagram and the three numbered steps that describe the core logic of the pattern.
2. Implementing the Cache-Aside Read Path
Let's put this pattern into practice. We'll refactor the logic within an API endpoint to correctly implement the cache-aside flow for reading data. You'll see how the ICacheService you built previously becomes the key component for this implementation.
The following video provides an excellent, practical walkthrough of integrating this logic into a .NET API controller.
How Azure Redis Cache can make your .NET 7 API Super Fast!
This segment from the video 'How Azure Redis Cache can make your .NET 7 API Super Fast!' demonstrates the implementation of the cache-aside pattern within an API endpoint.
Please watch from 08:29 to 11:06. The presenter refactors a 'Get Teams' endpoint. Focus on: Injecting the Redis cache service into the controller. The if/else logic: first checking the cache with GetCacheData. On a cache hit (data is not null), returning the cached data immediately. On a cache miss, fetching from the repository, calling SetCacheData to populate the cache, and then returning the data.
As you saw, the implementation follows the pattern precisely. Here's a structured example of what this logic would look like inside a service that encapsulates data access. This approach is often cleaner than putting the logic directly in the controller.
Let's imagine a ProductService that uses the ICacheService from our previous lesson.
public class ProductService
{
    private readonly ICacheService _cacheService;
    private readonly IProductRepository _productRepository; // Represents the connection to your database

    public ProductService(ICacheService cacheService, IProductRepository productRepository)
    {
        _cacheService = cacheService;
        _productRepository = productRepository;
    }

    public async Task<Product> GetProductByIdAsync(int productId)
    {
        // Define a unique key for this specific product
        string cacheKey = $"product:{productId}";

        // 1. Try to get data from the cache
        var cachedProduct = await _cacheService.GetData<Product>(cacheKey);

        if (cachedProduct != null)
        {
            // 2. Cache Hit: Data found, return it immediately
            return cachedProduct;
        }

        // 3. Cache Miss: Data not found, get it from the database
        var productFromDb = await _productRepository.GetByIdAsync(productId);

        if (productFromDb != null)
        {
            // 4. Store the data in the cache for next time
            // Set an expiration time, e.g., 5 minutes
            var expiration = DateTimeOffset.Now.AddMinutes(5);
            await _cacheService.SetData(cacheKey, productFromDb, expiration);
        }

        // Return the data fetched from the database
        return productFromDb;
    }
}
This code is the essence of the cache-aside pattern for reads. It's efficient, clean, and leverages the abstractions we've already built.
3. Handling Data Updates: Cache Invalidation
The cache-aside pattern works beautifully for reads, but what happens when data is changed? If you update a product's price in the database, the old version might still exist in the cache. Serving this outdated information is called serving "stale data".
The standard strategy to handle this is cache invalidation. The rule is simple and very important:
After successfully updating the data in the database, delete the corresponding entry from the cache.
Order is critical:
- Write the change to the database (the source of truth).
- Delete the item from the cache.
If you delete from the cache first, a read request could come in before the database is updated. This would cause a cache miss, and the application would read the old data from the database and put it back into the cache, overwriting your invalidation.
The Microsoft documentation provides a clear C# example of this.
Cache-Aside pattern - Azure Architecture Center
Let's return to the Microsoft Learn article. This time, focus on the example for handling updates.
In the 'Example' section, find the UpdateEntityAsync method. Read the code and the note that follows it, which explains why the order of operations (update data store before removing from cache) is so important.
Here is a similar implementation for our ProductService:
public async Task UpdateProductAsync(Product productToUpdate)
{
    // 1. Update the object in the original data store FIRST
    await _productRepository.UpdateAsync(productToUpdate);

    // 2. Invalidate (delete) the corresponding cache object
    string cacheKey = $"product:{productToUpdate.ProductId}";
    await _cacheService.RemoveData(cacheKey);
}
When the next read request for this product arrives, it will be a cache miss. The application will fetch the newly updated data from the database and populate the cache with the fresh version.
4. Advanced Consideration: The "Cache Stampede" Problem
A common issue in high-traffic systems occurs when a very popular cached item expires. Suddenly, dozens or hundreds of concurrent requests will all experience a cache miss at the same time and will all try to hit the database simultaneously. This surge of load is called a cache stampede and can overwhelm your database.
A common solution is to use a distributed lock. Only the first request that experiences the cache miss acquires a lock, fetches the data, and repopulates the cache. Other concurrent requests wait briefly and then re-check the cache, where they will now find the data populated by the first request.
While a full implementation is beyond this lesson's scope, the StackExchange.Redis library provides primitives to build this. The StringSetAsync method has an overload that can act as a simple lock.
// Inside your Get method, after a cache miss:

string lockKey = $"lock:product:{productId}";
// Attempt to acquire a lock with a short expiry, only if it doesn't already exist.
bool lockAcquired = await _db.StringSetAsync(lockKey, "1", TimeSpan.FromSeconds(10), When.NotExists);

if (lockAcquired)
{
    try
    {
        // You have the lock. Fetch from DB and populate cache.
        var productFromDb = await _productRepository.GetByIdAsync(productId);
        if (productFromDb != null)
        {
            await _cacheService.SetData(cacheKey, productFromDb, expiration);
        }
        return productFromDb;
    }
    finally
    {
        // Release the lock
        await _db.KeyDeleteAsync(lockKey);
    }
}
else
{
    // Lock was not acquired. Wait a moment and retry the whole method.
    await Task.Delay(100);
    return await GetProductByIdAsync(productId); // Recursive call
}
This is a sophisticated technique, but seeing the logic is valuable for understanding how to build truly resilient, production-grade caching.
Conclusion
You have now mastered the implementation of the cache-aside pattern, a fundamental skill for any cloud developer. By adding this pattern to your toolkit, you can drastically improve the performance and scalability of your applications.
Key Takeaways:
- Cache-Aside Flow: Check cache -> on miss -> get from data source -> populate cache -> return.
- Read Path: This pattern primarily optimizes read operations, serving data from memory whenever possible.
- Write Path (Invalidation): For updates or deletes, you must invalidate the cache by first writing to the database and then deleting the item from the cache.
- Benefits: The pattern reduces database load, lowers latency, and improves application responsiveness.
Next Steps
So far, we've focused on server-side caching, where the cache lives close to your application logic. In the next lesson, we will explore a different type of caching. We'll learn how to describe the purpose and benefits of an Azure Content Delivery Network (CDN), which caches your content at network edges around the globe, even closer to your end-users.