Hello! Welcome back to our module on optimizing applications.
In our previous lesson, we covered the "what" and "why" of Azure Cache for Redis. You learned that it's a managed, in-memory data store used to significantly boost application performance and scalability. We explored its common use cases, like the cache-aside pattern, and the different service tiers that determine features like high availability and data persistence.
Today, we transition from theory to practice. This lesson is focused on a hands-on learning outcome: Create and configure an Azure Cache for Redis instance. We will walk through the process of provisioning your first Redis cache using the Azure Portal, making the key configuration decisions required to get it up and running. This sets the stage for our next lesson, where you'll connect to this cache from a .NET application.
1. Preparing for Creation: Key Decisions
Before we jump into the Azure Portal, let's quickly review the primary settings you'll need to configure. These were introduced in the last lesson, but now you'll be applying them.
- Resource Group: A logical container for your Azure resources. You should use the same resource group you've been using for this course to keep everything organized.
- Region: The Azure region where your cache will be hosted. It's a best practice to co-locate your cache and your application in the same region to minimize network latency.
- Pricing Tier (SKU): This is a critical choice.
- Basic: Single node, no replication. Ideal for development, testing, and non-critical workloads.
- Standard: A replicated cache with a primary and secondary node for high availability. This is the recommended minimum for production.
- Premium & Enterprise: Offer advanced features like clustering, data persistence, and enhanced security.
- Cache Size: Determines the amount of memory available. This ranges from 250 MB to multiple terabytes, depending on the tier.
For today's exercise, we will use the Basic C0 (250 MB) tier. It's the most cost-effective option and is perfectly suited for our learning objectives.
2. Hands-On: Creating the Cache in the Azure Portal
It's time to create the resource. The most straightforward way to start is through the Azure Portal. The following reading from Microsoft Learn provides a detailed, step-by-step guide that we will follow.
Quickstart: Create an Azure Cache for Redis instance
This official quickstart guide will be our primary reference for creating the cache. It details every step in the creation wizard.
Please read the section titled 'Create a cache'. Follow the numbered steps to create your own cache instance in the Azure Portal. Use the configuration details I'll provide below. You don't need to read the 'Related content' at the end.
As you follow the guide, use these specific settings for your new cache:
On the Basics tab:
- Subscription: Your Azure subscription.
- Resource group: Select the one you've used for previous lessons (e.g.,
az204-learn-rg). - Name: Give it a globally unique DNS name. Something like
az204-cache-<your-initials>-<date>is a good practice. For example:az204-cache-sa-20231027. - Region: Choose a region close to you.
- Cache SKU:
Basic. - Cache size:
C0 (250 MB Cache).
The Basics tab in the portal will look similar to this:

On the Networking tab:
- For this exercise, you can leave the Connectivity method as Public endpoint. In a production environment, you would use a Private Endpoint to ensure the cache is only accessible from within your virtual network, which is a more secure approach.
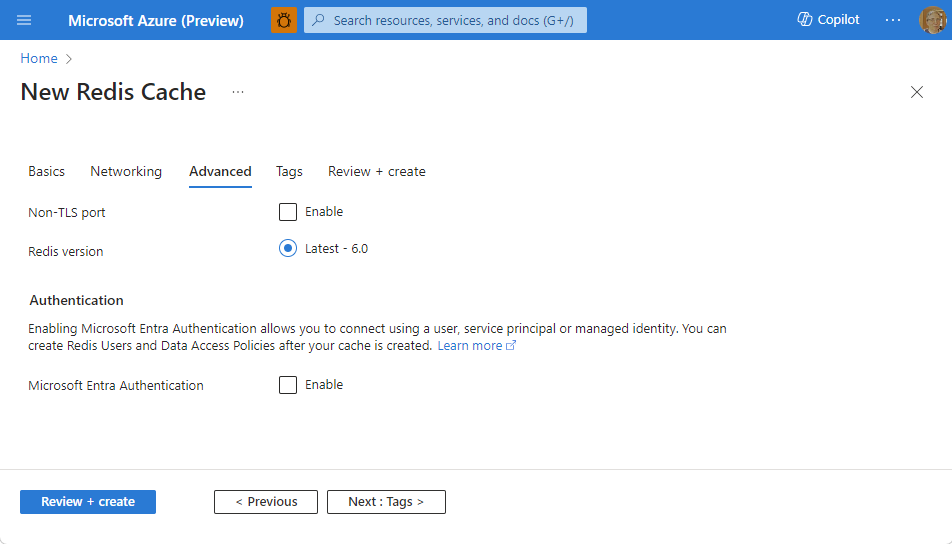
On the Advanced tab:
- Non-TLS port: Leave this disabled. For security, all client connections should use TLS encryption.
- Microsoft Entra Authentication: Leave this enabled. This is the modern, recommended approach for authentication. It allows for passwordless access using identities, which we'll explore in a later module.
- Redis version:
Latest (6).
The Advanced tab will look like this, showing the authentication and version settings:
After configuring these tabs, proceed to Review + create and then Create. The deployment will take several minutes. You can monitor its progress on the deployment page.
If you'd like a quick video walkthrough of this process, the following clip provides a good visual summary.
Azure Cache for Redis (.NET 6)
This video from DotNetMastery demonstrates the same creation process you are performing. It can be a helpful visual aid to ensure you're on the right track.
Watch the segment from 06:49 to 08:38, where the presenter walks through creating a Basic tier cache in the Azure Portal.
Once the deployment is complete and the resource status shows as Running, your cache is ready to use!
3. Exploring Your New Cache Instance
With the cache provisioned, let's familiarize ourselves with its settings in the Azure Portal. Navigate to the resource you just created.
Retrieving Connection Information
To connect an application to your cache, you need two key pieces of information: the host name and an access key (connection string).
- Host Name: On the Overview page of your cache resource, you will find the Host name. This is the DNS address of your cache (e.g.,
az204-cache-sa-20231027.redis.cache.windows.net). - Access Keys:
- In the resource menu on the left, under Settings, select Access keys.
- Here you will find two keys: a Primary and a Secondary. These are long-lived connection strings that grant full access to your cache. The secondary key exists to allow for key regeneration without downtime.
- For now, copy the Primary connection string. You will need it in the next lesson.
This short video clip clearly shows where to find and copy the connection string.
How Azure Redis Cache can make your .NET 7 API Super Fast!
Let's see exactly where to find the access keys in the portal. This is a critical step for connecting any client application.
Watch the short segment from 11:48 to 12:04. The presenter navigates to 'Access keys' and shows how to copy the primary connection string.
Key Configuration Settings
After creation, you can still modify many settings. Let's look at one of the most important ones: memory management.
How to configure Azure Cache for Redis
Now, let's briefly explore the advanced configuration options available after the cache is created. This documentation explains some of the key settings you can tune.
Read the section titled 'Advanced settings', focusing on the subsection 'Memory policies'. Pay close attention to the description of 'Maxmemory policy' and the different eviction policies like volatile-lru.
From the reading, you learned about eviction policies. When your cache runs out of memory, it needs a strategy to decide which items to remove (evict) to make space for new ones. The default policy is volatile-lru, which means it will remove the "least recently used" key among all keys that have an expiration time set. Understanding and choosing the right eviction policy is crucial for optimizing cache performance for your specific application's access patterns.
Conclusion
Congratulations! You have successfully provisioned and configured your first Azure Cache for Redis instance. You now have a running cache in the cloud, ready to be used by an application.
Key Takeaways:
- You can create an Azure Cache for Redis instance through the Azure Portal by defining its resource group, name, region, and pricing tier.
- For development and learning, the Basic tier is the most economical choice.
- Security best practices include disabling the non-TLS port and using modern authentication methods like Microsoft Entra ID.
- After creation, you can retrieve the Host name and Access Keys (connection strings), which are required for a client application to connect.
- You can configure advanced settings post-deployment, such as the memory eviction policy, to fine-tune the cache's behavior under memory pressure.
Next Steps
You've set up the infrastructure. In the next lesson, we will get into the code. We will address the learning outcome: "Connect to Azure Cache for Redis from a .NET application using the StackExchange.Redis library." You will write C# code to connect to the cache you just created, store data, and retrieve it. This is where you'll see the direct performance benefits of caching in action.