Hello! Welcome back.
In our last lesson, we created the identifyVisualDataPoints function. It expertly scans a trend narrative and extracts a structured array of VisualDataPoint objects—a bank of high-impact, visualizable concepts.
Today, we'll bridge the gap between abstract data and concrete visuals. We're going to take those VisualDataPoint objects and use them to generate actual image files. This lesson directly addresses the learning outcome: Generate visual assets for carousels and infographics using an image generation API.
We will explore how text-to-image APIs like OpenAI's DALL-E work, learn the fundamentals of prompting for high-quality results, and write a TypeScript function to automate the entire process from structured data to a saved .png file.
The Image Generation Workflow: A High-Level View
At its core, using an image generation API is a client-server interaction. Your application sends a request containing a text prompt and configuration parameters, and the API returns the generated image data.
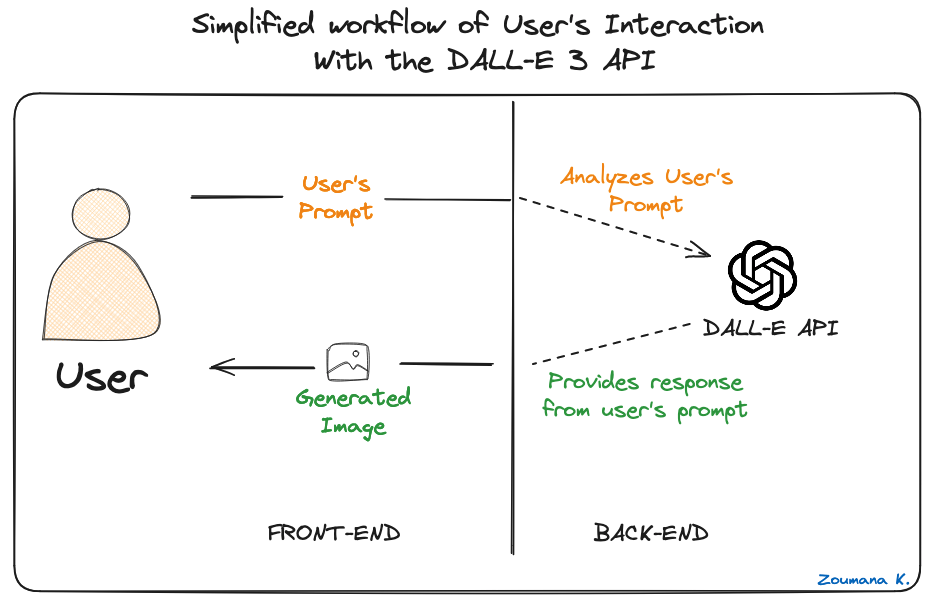
For creating a multi-slide carousel, this process is repeated in a loop. To get a better sense of a complete, automated carousel creation workflow, let's look at a conceptual demonstration.
Insane N8N AI Automation Creates & Posts Instagram/TikTok Carousels! (Tutorial)
The video 'Insane N8N AI Automation Creates & Posts Instagram/TikTok Carousels!' demonstrates an entire automated workflow. While it uses a different tool (N8N), the underlying logic is highly relevant to what we are building in TypeScript.
Please watch these three key segments: Prompt Generation (05:08 - 06:45): Notice how a detailed system prompt is used to generate specific image prompts for each slide. Generating the First Image (09:19 - 11:12): This part shows the call to the OpenAI image generation API via an HTTP request, which is what we'll do in our code. Generating Subsequent Images (11:28 - 13:00): Pay close attention to the concept of using an 'edit images' API to maintain character consistency across slides. This is an advanced technique we can incorporate later.
This gives us a clear picture of the necessary steps:
- Craft a detailed prompt for each visual asset.
- Call the image generation API with that prompt.
- Process the response and save the image.
Choosing Your Tools: Image Generation APIs
Several powerful text-to-image models are available via API, with OpenAI's DALL-E 3 and GPT-Image series being prominent choices. Given your background with Microsoft Azure, it's useful to see how these models are offered and compared within that ecosystem.
How to use Azure OpenAI image generation models
This documentation from Microsoft, 'How to use Azure OpenAI image generation models', provides an excellent technical overview and comparison of the available models.
First, review the comparison table in the 'Overview' section to understand the differences between models like DALL-E 3 and the GPT-Image series. Then, read the sections 'Call the image generation API' and 'Specify API options' to familiarize yourself with the core parameters like prompt, model, size, n, and quality. We'll be using these directly in our code.
Key takeaways from the documentation are:
- Models: Different models have different strengths (e.g., realism, speed, cost). We'll use a recent model like
dall-e-3for high-quality output. - Parameters: We have fine-grained control over the output through parameters like
size(e.g.,1024x1024),quality(standardvs.hd), andstyle(vividvs.natural). - Response Format: We can request the image as a temporary
urlor, more usefully for our automation pipeline, as ab64_jsonobject. This gives us the raw image data as a base64-encoded string, which we can then save to a file.
Activity Part 1: From API Call to Saved File
Let's start building. Our first goal is to create a function that takes a simple prompt, calls the OpenAI API, receives the base64 data, and saves it as a local .png file. Your experience with backend development will make this process familiar.
This next video provides a direct, hands-on walkthrough of this exact process in Node.js.
How to use the Dall-E API in Node.js - Fun with AI
The video 'How to use the Dall-E API in Node.js' by ParametricCamp is a practical, code-along tutorial that covers exactly what we need to do.
Please watch the segment from 11:23 to 19:18. This is the most critical part of the lesson. It demonstrates how to: Change the response_format to b64_json. Receive the base64 string from the API response. Use Node.js's Buffer.from() to convert the string into a binary buffer. Use the fs.writeFileSync() method to save that buffer to a file. Add a timestamp to the filename to avoid overwriting previous images.
Now, let's translate this into our TypeScript project.
Activity Part 2: Engineering a High-Quality Prompt
Simply sending a basic prompt like "a bar chart" won't produce the polished, engaging visuals we need for thought-leadership content. We need to practice prompt engineering.
The key is to be specific and descriptive. Instead of just stating the subject, you should describe the style, composition, lighting, and intended mood.
OpenAI's official 'Gpt-image-1.5 Prompting Guide' is an excellent resource for learning how to craft effective prompts.
Read the section 'Key principles for effective prompting' to understand the core concepts. Then, look through the examples in 'Use Cases — Generate (text → image)', particularly 'Infographics' and 'Story-to-Comic Strip', to see how detailed prompts create specific visual outputs.
Our challenge is to programmatically create these detailed prompts by translating our structured VisualDataPoint objects into descriptive text. For example, if we have a VisualDataPoint with type: 'statistic', our prompt-generating function should create a prompt like:
"A clean and modern infographic visual for a tech social media post. It features a prominent statistic: '[statistic.data.value]' for '[statistic.data.label]'. The style should be minimalist, using a professional color palette of blues and greys. Include a simple, relevant icon. The overall feel should be sharp, clear, and data-driven. Aspect ratio 1:1."
Activity Part 3: Building the generateVisualAsset Function
Let's bring everything together. We will create a new file, src/generateVisuals.ts, and build a complete function that orchestrates this entire process.
Here is the code. It defines a helper function to build the prompt and a main function to handle the API call and file saving.
// src/generateVisuals.ts

import OpenAI from 'openai';
import fs from 'fs';
import path from 'path';
import { VisualDataPoint } from './identifyVisuals'; // Assuming this is exported from our previous file

const openai = new OpenAI({
  apiKey: process.env.OPENAI_API_KEY,
});

const OUTPUT_DIR = path.join(__dirname, '..', 'output', 'images');
if (!fs.existsSync(OUTPUT_DIR)) {
  fs.mkdirSync(OUTPUT_DIR, { recursive: true });
}

/**
 * Creates a detailed image generation prompt from a VisualDataPoint object.
 * @param dataPoint - The structured data point to visualize.
 * @returns A detailed string prompt for the image generation model.
 */
function createPromptFromDataPoint(dataPoint: VisualDataPoint): string {
  let promptDetails = '';

  switch (dataPoint.type) {
    case 'statistic':
      promptDetails = `It should clearly display the statistic: "${dataPoint.data.label}: ${dataPoint.data.value}". Use a large, bold font for the value.`;
      break;
    case 'process':
      const steps = (dataPoint.data as string[]).map((step, i) => `${i + 1}. ${step}`).join('; ');
      promptDetails = `It should illustrate a process with the following steps: ${steps}. Use arrows or connecting lines to show the flow.`;
      break;
    case 'comparison':
        // A simple text representation for the prompt
        const comparisonText = `${dataPoint.data.item1.name} vs ${dataPoint.data.item2.name}`;
        promptDetails = `It should visually compare two items, titled "${comparisonText}". Use a split-screen or side-by-side layout.`;
        break;
    // Add more cases for 'timeline', 'quote', 'concept' as needed
    default:
      promptDetails = `The visual should represent the concept of "${dataPoint.title}".`;
  }

  // Base prompt that sets the overall style
  const basePrompt = `
    Create a visually appealing graphic for a professional tech social media carousel slide.
    The graphic's title is "${dataPoint.title}".
    ${promptDetails}
    Style: Clean, minimalist, modern infographic style.
    Color Palette: Professional and engaging, primary colors #4A90E2 and #F5A623, with shades of grey.
    Composition: Centered, with clear hierarchy and generous negative space.
    Format: Flat design, vector art, no photorealism.
    Aspect Ratio: 1:1 (square).
    The image should contain NO text unless explicitly requested in the details above. The text will be overlaid later.
  `;
  return basePrompt.trim().replace(/\s+/g, ' ');
}

/**
 * Generates an image from a VisualDataPoint and saves it to a file.
 * @param dataPoint - The structured data point to visualize.
 * @returns The file path of the saved image, or null on error.
 */
export async function generateVisualAsset(
  dataPoint: VisualDataPoint
): Promise<string | null> {
  const prompt = createPromptFromDataPoint(dataPoint);
  console.log(`[ImageGen] Generated Prompt: ${prompt}`);

  try {
    const response = await openai.images.generate({
      model: "dall-e-3",
      prompt: prompt,
      n: 1,
      size: "1024x1024",
      quality: "standard", // Use 'hd' for higher detail, 'standard' for faster generation
      response_format: "b64_json",
    });

    const image_b64 = response.data[0].b64_json;
    if (!image_b64) {
      console.error("[ImageGen] API did not return base64 data.");
      return null;
    }

    // Create a unique filename
    const timestamp = new Date().getTime();
    const filename = `${dataPoint.id}-${timestamp}.png`;
    const filePath = path.join(OUTPUT_DIR, filename);

    // Decode the base64 string into a buffer and write it to a file
    const buffer = Buffer.from(image_b64, 'base64');
    fs.writeFileSync(filePath, buffer);

    console.log(`[ImageGen] Successfully saved image to: ${filePath}`);
    return filePath;

  } catch (error) {
    console.error("[ImageGen] Error generating or saving image:", error);
    return null;
  }
}
Deconstructing the Code
createPromptFromDataPoint: This function is our "prompt engineer". It takes aVisualDataPointand constructs a detailed, well-structured prompt by combining a base style instruction with specific details derived from the data point'stypeanddata. Note the final instruction to avoid rendering text in the image; this is a common best practice, as text is better overlaid with more control in a later step.generateVisualAsset: This is our main orchestrator. It uses theopenailibrary, specifiesb64_jsonas the response format, and handles the file-saving logic exactly as shown in the video resources. The use ofpathand dynamic filenames makes it robust.
You can now import and call generateVisualAsset with any of the VisualDataPoint objects from our previous lesson to create a corresponding visual.
Conclusion
Congratulations! You've successfully built a critical component of our autonomous content creator. You now have a function that can take structured data, translate it into a high-quality prompt, and generate a polished visual asset ready for a social media post.
Key Takeaways:
- Image generation APIs like DALL-E 3 can be controlled programmatically using parameters for model, size, quality, and response format.
- Requesting the image as
b64_jsonis essential for automation, as it allows you to receive the image data directly within your application. - In Node.js/TypeScript, you can decode a base64 string to a
Bufferand write it to a file using thefsmodule. - Effective prompt engineering is crucial for quality. This involves creating detailed, descriptive prompts that specify style, composition, and color, which can be automated by a helper function that translates structured data into text.
Preview of the next lesson:
We now have two key generated assets: the per-slide captions from our CarouselPlan and the image files from generateVisualAsset. In the next lesson, "Compose final Instagram posts by combining generated visuals, captions, and relevant hashtags," we'll focus on the final assembly. We'll explore strategies for generating relevant hashtags and structure all the pieces into a final post object, ready for an API to publish.