Welcome to the first lesson of your crash course on LangChain. Given your goal to quickly build practical applications, we'll start by laying a solid, modern foundation for our projects. You've expressed a preference for a hands-on approach and for using uv as your package manager, so we will dive right into that.
Today's lesson focuses on setting up a complete Python project environment for LangChain. By the end of our 60 minutes, you will have a fully configured, reproducible project structure that we will use as the starting point for all the applications we build throughout this course.
Getting Started with uv
You're already interested in uv, so you probably know it's a new, extremely fast package and environment manager written in Rust. It aims to be a drop-in replacement for tools like pip, venv, virtualenv, and pip-tools, providing a single, unified command-line interface.
For a quick overview of its goals and a comparison to the traditional pip and venv workflow, you can watch the first few minutes of this excellent tutorial from Corey Schafer.
Python Tutorial: UV - A Faster, All-in-One Package Manager to Replace Pip and Venv
This video provides a great introduction to uv and its philosophy.
Watch the segment from the beginning to the introduction, which explains what uv is. Then, you can optionally watch the section on the 'old way' to see a direct contrast with the venv and pip commands you're likely familiar with.
Step 1: Installing uv and Initializing the Project
First, ensure uv is installed on your system. If you haven't installed it yet, you can do so with pip, Homebrew, or other methods outlined in its documentation.
Python Tutorial: UV - A Faster, All-in-One Package Manager to Replace Pip and Venv
The same video provides clear installation instructions.
If you need to install uv, watch the section from this timestamp. The author uses Homebrew, but also points to the official documentation for other operating systems.
Once uv is installed, you can create and initialize a new project directory with a single command. Let's call our project lcel-quickstart. Open your terminal and run:
uv init lcel-quickstart
This command creates a new directory named lcel-quickstart and populates it with a standard project structure. Now, change into that directory:
cd lcel-quickstart
Let's examine the files uv created for us. This initial structure is designed to follow modern Python best practices.
Python Tutorial: UV - A Faster, All-in-One Package Manager to Replace Pip and Venv
This part of the video explains the default project structure created by uv init.
Watch the segment from the timestamp where the author walks through each file generated by the uv init command. Focus on the explanation of .gitignore, .python-version, and especially the pyproject.toml file.
As you just saw, the pyproject.toml file is central to our project's configuration. It will define our project's metadata and, most importantly, its dependencies.
Step 2: Adding LangChain Dependencies
One of the most convenient features of uv is its integrated environment management. You don't need to manually create or activate a virtual environment. uv will automatically create one in a .venv directory the first time you perform an action that requires it, such as adding a package.
Let's add the core LangChain packages. Since you have extensive experience with the OpenAI API, we'll install the langchain-openai integration package as well. We'll also add python-dotenv to handle API keys, which we'll set up in the next step.
In your terminal, run the following command:
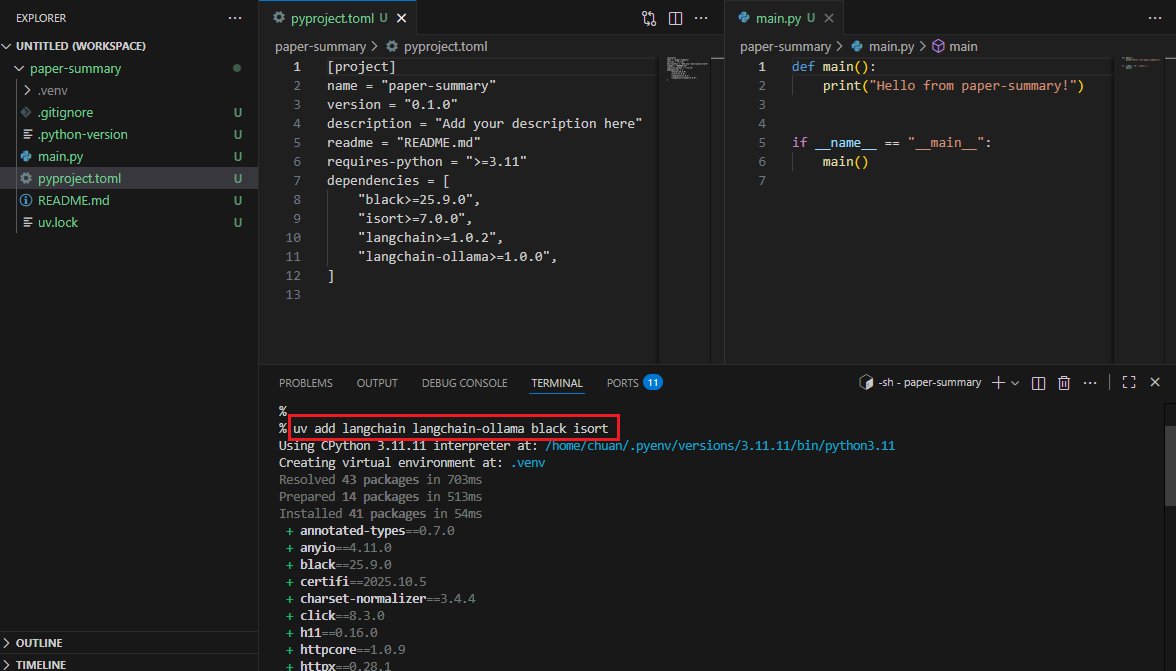
uv add langchain langchain-openai python-dotenv
This command does several things:
- Detects that a virtual environment is needed and creates it at
./.venv. - Resolves and installs
langchain,langchain-openai,python-dotenv, and all their sub-dependencies into the virtual environment. - Updates the
pyproject.tomlfile to list these packages as dependencies. - Creates a
uv.lockfile, which records the exact versions of all installed packages, ensuring your environment is perfectly reproducible.
The following reading provides an excellent written explanation of this process.
Part 1: Build your first AI agent + chatbot with Langchain and ...
This article section details the uv workflow for creating a virtual environment, adding dependencies, and explains the roles of pyproject.toml and uv.lock.
In the article, find the section "Step 1: Setting up the Python project 🐍". Read from the introduction to uv. Then, skip to the part explaining the configuration files, starting from the explanation of pyproject.toml and uv.lock. Finally, read the part about ensuring reproducibility with uv sync.
Your project directory should now resemble the setup shown in the image below, with the pyproject.toml file populated with the new dependencies.
Step 3: Configuring API Keys
Nearly every LangChain application requires an API key for an LLM provider. It's crucial to manage these keys securely and avoid hardcoding them into your scripts. The python-dotenv library we installed allows us to load environment variables from a .env file.
-
In the root of your
lcel-quickstartproject, create a new file named.env. -
Open the
.envfile and add your OpenAI API key:OPENAI_API_KEY="sk-..."
Because .env is listed in the .gitignore file that uv created for us, you won't accidentally commit your secret keys to version control.
In the next lesson, we will see how to load this key in our Python script using the dotenv library. The same article we just reviewed also covers this step, which you can use as a reference.
Part 1: Build your first AI agent + chatbot with Langchain and ...
This section explains how to use a .env file and python-dotenv to manage API keys. It also introduces LangSmith, a topic we'll cover in a later module.
Find "Step 2: Load API keys" and read from the beginning down to the code block that demonstrates accessing the variable in Python. You can ignore the parts about Groq and LangSmith for now; we will focus on OpenAI and introduce LangSmith later in the course.
Conclusion
In this lesson, we successfully laid the groundwork for our LangChain journey. You now have a robust, modern Python project structure managed entirely by uv.
Here are the key takeaways:
uv initscaffolds a new Python project with sensible defaults, includinggitintegration and apyproject.tomlfile.uv addhandles dependency installation and virtual environment creation automatically, updating bothpyproject.tomlanduv.lockto ensure a reproducible setup.- Managing API keys using a
.envfile andpython-dotenvis a standard practice for keeping secrets out of your source code.
In the next lesson, we'll put this setup to use. We will write our first lines of LangChain code to invoke a chat model. We'll explore the LangChain Expression Language (LCEL) and its "pipe" (|) syntax, contrasting it with the direct OpenAI API calls you're already familiar with. This will be our first step into what makes LangChain a powerful framework for composing complex LLM-powered logic.