Hello! Welcome back to our course on building a production-grade rate limiter.
In our last lesson, you gained fine-grained control over API responses using ResponseEntity. We modified the GreetingController to return a 400 Bad Request for invalid input, but in doing so, we left a piece of text hardcoded: private static final String template = "Hello, %s!";. While this works, hardcoding values that might need to change is not a scalable practice. What if you wanted to change the greeting message without recompiling the entire application?
This lesson addresses exactly that. We'll dive into one of Spring Boot's most powerful features: externalized configuration. You will learn how to move application settings out of your Java code and into a simple, human-readable file called application.yml. This skill is fundamental for building the flexible and maintainable rate limiter we're aiming for.
Your learning outcome for this lesson:
Use Spring Boot's application.yml for basic application configuration.
1. The "Why": Separating Code from Configuration
In any robust software system, it's crucial to separate the code (the logic) from the configuration (the settings that influence that logic). This principle allows you to:
- Modify application behavior without changing the source code.
- Use the same application artifact (the compiled
.jarfile) across different environments (development, testing, production) just by changing the configuration. - Allow non-developers (like system administrators) to tweak settings easily.
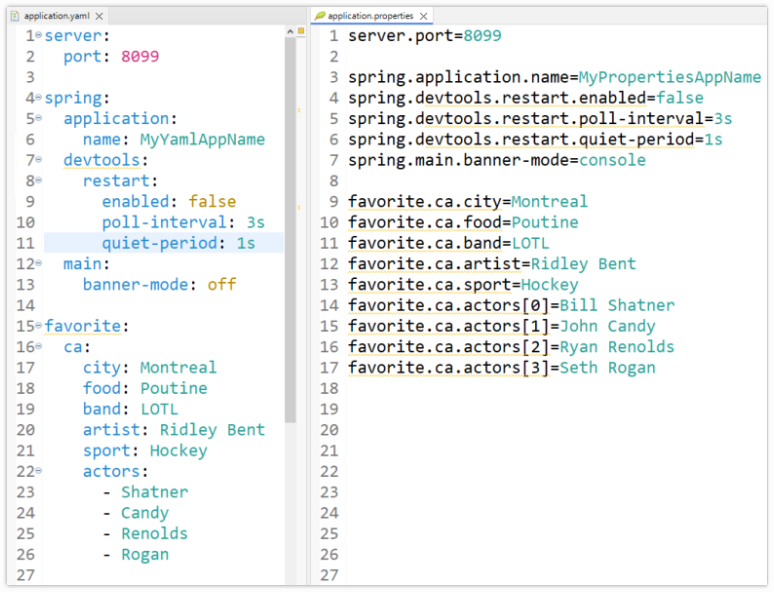
Spring Boot makes this incredibly easy by automatically looking for configuration files in specific locations. The two most common formats are .properties and .yml (YAML).
To understand the difference and why YAML is often preferred, watch the first part of this video.
application.yml vs application.properties in SpringBoot | Properties vs YAML | Geekific
The video 'application.yml vs application.properties in SpringBoot' from Geekific provides a concise introduction to external configuration and compares the two primary formats.
Please watch these sections: Introduction (00:14 - 00:44): Get a quick overview of external configuration in Spring Boot. Properties Format (00:44 - 01:18): Understand the traditional key-value format of .properties files. YAML Introduction (02:01 - 02:32): See how YAML provides a more readable, hierarchical structure.
The key takeaway is that YAML's hierarchical nature makes it much cleaner for complex, nested configurations, which is exactly what we'll need for defining our rate limiting rules later on.
2. Accessing Configuration with @Value
The simplest way to read a property from application.yml is with the @Value annotation. It injects a single configuration value directly into a field in your Spring bean.
Let's put this into practice by externalizing the greeting template from our GreetingController.
Configuration with YAML - Spring Boot - TechieLearns
The article 'Configuration with YAML' by TechieLearns provides a clear, step-by-step guide. We'll use it to create our first application.yml file and access its properties.
Please read the sections 'Getting Started: Creating Your First application.yml File' and 'Accessing YAML Configuration in Your Java Code', focusing on the part about the @Value annotation. Pay close attention to the file location (src/main/resources) and the syntax (${property.key}).
Exercise 1: Refactor GreetingController to use @Value
Now, apply what you've just read to your project.
-
Create the
application.ymlfile: In your project'ssrc/main/resourcesdirectory, create a new file namedapplication.yml. If anapplication.propertiesfile already exists, you can either delete it or rename it to avoid confusion. -
Add a custom property: Add the following content to your new
application.ymlfile. This defines a custom propertygreeting.template.greeting: template: "Hello from config, %s!" -
Update
GreetingController.java: Modify your controller to inject this value.- Remove the
private static final String template = ...;line. - Add a new field annotated with
@Value.
Your controller should now look like this:
package com.example.ratelimiter.controller; import com.example.ratelimiter.dto.Greeting; import org.springframework.beans.factory.annotation.Value; // <-- Import this import org.springframework.http.HttpStatus; import org.springframework.http.ResponseEntity; import org.springframework.web.bind.annotation.GetMapping; import org.springframework.web.bind.annotation.RequestParam; import org.springframework.web.bind.annotation.RestController; import java.util.concurrent.atomic.AtomicLong; @RestController public class GreetingController { // The template is now injected from application.yml @Value("${greeting.template}") private String template; private final AtomicLong counter = new AtomicLong(); @GetMapping("/greeting") public ResponseEntity<Object> greeting(@RequestParam(value = "name", defaultValue = "World") String name) { if (name == null || name.trim().isEmpty()) { return ResponseEntity .status(HttpStatus.BAD_REQUEST) .body("The 'name' parameter cannot be empty."); } Greeting body = new Greeting(counter.incrementAndGet(), String.format(template, name)); return ResponseEntity.ok(body); } } - Remove the
-
Run and test: Start your application and visit
http://localhost:8080/greeting. The response should now be{"id":1,"content":"Hello from config, World!"}. You've successfully separated configuration from your code!
3. Structured Configuration with @ConfigurationProperties
Using @Value is great for simple, isolated properties. However, as configurations grow, scattering @Value annotations across your codebase can become messy. For our rate limiter, we'll need to define multiple related properties for each rule (e.g., limit, time window, algorithm).
A much cleaner, type-safe, and more scalable approach is to use the @ConfigurationProperties annotation. This annotation binds a whole tree of properties into a dedicated Java object.

This approach offers several advantages, which are nicely summarized in the following article.
ConfigurationProperties in Spring Boot
The article 'ConfigurationProperties in Spring Boot' from Learn Code With Durgesh provides an excellent comparison between @Value and @ConfigurationProperties and outlines the best practices for structured configuration.
Please read these key sections: Why Use @ConfigurationProperties?: Understand the main benefits. @ConfigurationProperties vs @Value: Focus on the comparison table, which clearly contrasts the two approaches. Best Practices: Absorb the advice on how to structure your configuration classes for maintainability.
To enable better IDE support (like auto-completion and validation) for your custom properties, it's a best practice to add the spring-boot-configuration-processor dependency. In your pom.xml, add this inside the <dependencies> block:
<dependency>
    <groupId>org.springframework.boot</groupId>
    <artifactId>spring-boot-configuration-processor</artifactId>
    <optional>true</optional>
</dependency>
Exercise 2: Refactor to use @ConfigurationProperties
Let's refactor our simple greeting configuration to use this more robust pattern.
-
Create a properties class: Create a new package
com.example.ratelimiter.configand add a new Java class namedAppProperties.java.package com.example.ratelimiter.config; import org.springframework.boot.context.properties.ConfigurationProperties; import org.springframework.stereotype.Component; @Component @ConfigurationProperties(prefix = "app") public class AppProperties { private String name = "Rate Limiter API"; // A default value private Greeting greeting = new Greeting(); public static class Greeting { private String template = "Hello, %s!"; // Default template private String defaultName = "World"; // Default name // --- Getters and Setters --- public String getTemplate() { return template; } public void setTemplate(String template) { this.template = template; } public String getDefaultName() { return defaultName; } public void setDefaultName(String defaultName) { this.defaultName = defaultName; } } // --- Getters and Setters --- public String getName() { return name; } public void setName(String name) { this.name = name; } public Greeting getGreeting() { return greeting; } public void setGreeting(Greeting greeting) { this.greeting = greeting; } }Note: The
@Componentannotation makes this class a Spring bean, and@ConfigurationProperties(prefix = "app")tells Spring to bind all properties starting withappto this object. -
Update
application.yml: Modify your YAML to match this new structure.app: name: "My Awesome Rate Limiter" greeting: template: "Welcome, %s!" default-name: "User" -
Update
GreetingController.java: Inject theAppPropertiesbean and use it.package com.example.ratelimiter.controller; import com.example.ratelimiter.config.AppProperties; // <-- Import this import com.example.ratelimiter.dto.Greeting; import org.springframework.http.HttpStatus; import org.springframework.http.ResponseEntity; import org.springframework.web.bind.annotation.GetMapping; import org.springframework.web.bind.annotation.RequestParam; import org.springframework.web.bind.annotation.RestController; import java.util.concurrent.atomic.AtomicLong; @RestController public class GreetingController { private final AppProperties appProperties; // <-- Inject the properties bean private final AtomicLong counter = new AtomicLong(); // Use constructor injection - a best practice public GreetingController(AppProperties appProperties) { this.appProperties = appProperties; } @GetMapping("/greeting") public ResponseEntity<Object> greeting(@RequestParam(value = "name", required = false) String name) { // Use the default name from config if the parameter is missing String effectiveName = (name != null && !name.trim().isEmpty()) ? name : appProperties.getGreeting().getDefaultName(); if (effectiveName.trim().isEmpty()) { return ResponseEntity .status(HttpStatus.BAD_REQUEST) .body("The 'name' parameter cannot be empty."); } String template = appProperties.getGreeting().getTemplate(); Greeting body = new Greeting(counter.incrementAndGet(), String.format(template, effectiveName)); return ResponseEntity.ok(body); } }Notice we also updated the
@RequestParamto berequired = falseand handle the default name logic inside the method. -
Run and test again:
- Visit
http://localhost:8080/greeting. You should see{"id":1,"content":"Welcome, User!"}. - Visit
http://localhost:8080/greeting?name=Student. You should see{"id":2,"content":"Welcome, Student!"}.
- Visit
You have now successfully implemented a structured, type-safe configuration system. This pattern will be the foundation for defining our complex rate-limiting rules in future lessons.
Key Takeaways
- Externalized configuration separates your application's logic from its settings, making it more flexible and easier to manage across different environments.
- YAML (
.yml) is the preferred format for Spring Boot configuration due to its readability and support for hierarchical data. - The
@Valueannotation is suitable for injecting single, simple configuration properties. - The
@ConfigurationPropertiesannotation is the best practice for binding groups of related properties to a type-safe Java object, which is ideal for complex configurations like our future rate limiter rules.
Next Steps
We now have a configurable API endpoint. The next logical step in building our rate limiter is to find a way to intercept incoming requests before they even reach the GreetingController. This "interception" point is where our rate-limiting logic will live.
In the next lesson, we will learn how to implement request interceptors using HandlerInterceptor for cross-cutting concerns. This will provide the architectural hook we need to plug our rate limiter into the Spring request lifecycle.