Hello! Welcome back to our course on building a production-grade rate limiter.
In our last few lessons, you've done the heavy lifting of implementing the core distributed rate-limiting logic. You designed Lua scripts for the sliding window and token bucket algorithms to ensure atomicity, and you learned how to use Redis's EXPIRE command to create a memory-efficient system that cleans up after itself. Our algorithmic components are robust and ready.
This lesson is about architecture and integration. We have these powerful Redis-based limiters, and we also have the RateLimiter interface we designed back in Module 2. Now, it's time to connect them.
Your learning outcome for this lesson:
By the end of this session, you will be able to integrate the Redis-based implementations behind the common RateLimiter interface. This will make our system polymorphic, allowing it to seamlessly use either in-memory or distributed rate limiters, a key feature for a flexible and maintainable engine.
1. The Architectural Blueprint: The Strategy Pattern
From the beginning of this course, we've planned for a system that can support multiple rate-limiting algorithms. The creation of the RateLimiter interface was a deliberate first step in this direction. This design choice sets us up perfectly to use a classic and powerful software design pattern: the Strategy Pattern.
The core idea of the Strategy Pattern is to define a family of algorithms, encapsulate each one, and make them interchangeable. This lets the algorithm vary independently from the clients that use it.
In our project:
- Strategy Interface:
RateLimiter - Concrete Strategies:
InMemoryFixedWindowRateLimiter,RedisSlidingWindowRateLimiter,RedisTokenBucketRateLimiter, etc. - Context: Our
RateLimitInterceptor, which uses aRateLimiterobject to perform the check.
This diagram illustrates the pattern using a sorting algorithm example, which is perfectly analogous to our rate-limiting scenario.

By adhering to this pattern, we can add new rate limiters or switch between them (e.g., from in-memory to Redis) with minimal changes to the core application logic that invokes the limiter.
2. Creating Concrete Redis Strategies
Your next task is to wrap the Redis/Lua logic you've developed into concrete classes that implement our RateLimiter interface. Let's assume our interface looks something like this (your actual method signature might differ slightly):
public interface RateLimiter {
    /**
     * Checks if a request is allowed under the rate limit.
     * @param key The unique key identifying the client/entity to be limited.
     * @return A result object indicating if the request is allowed and containing metadata like remaining requests.
     */
    RateLimitResult isAllowed(String key);
}
You will create two new classes, RedisSlidingWindowRateLimiter and RedisTokenBucketRateLimiter. Each will be a Spring @Component and will implement the RateLimiter interface.
Let's focus on the RedisSlidingWindowRateLimiter. The process involves:
- Defining the class and making it a Spring bean.
- Injecting the
RedisTemplate. - Defining the
DefaultRedisScriptwith your Lua script from the previous lessons. - Implementing the
isAllowed(String key)method, which executes the script usingredisTemplate.execute().
The following reading provides a near-perfect template for this.
Mastering Rate Limiting in Spring Boot: A Complete Guide
This article, 'Mastering Rate Limiting in Spring Boot,' contains a Java implementation of a SlidingWindowRateLimiter that aligns perfectly with our goal. It demonstrates how to wrap the Lua script execution within a Spring component that implements a common interface.
Locate the Java code block for the SlidingWindowRateLimiter class. Pay close attention to how it's structured: it's a @Component, it has a constructor that initializes a DefaultRedisScript with the Lua code, and its validate method (our isAllowed) executes this script via RedisTemplate. Use this as a model to build your own RedisSlidingWindowRateLimiter.
After you've reviewed the example and structured your RedisSlidingWindowRateLimiter, apply the same pattern to create your RedisTokenBucketRateLimiter. It will also inject RedisTemplate, define a DefaultRedisScript for the token bucket Lua logic, and execute it within the isAllowed method.
This diagram serves as a good reminder of the interaction you are encapsulating within these Java classes.
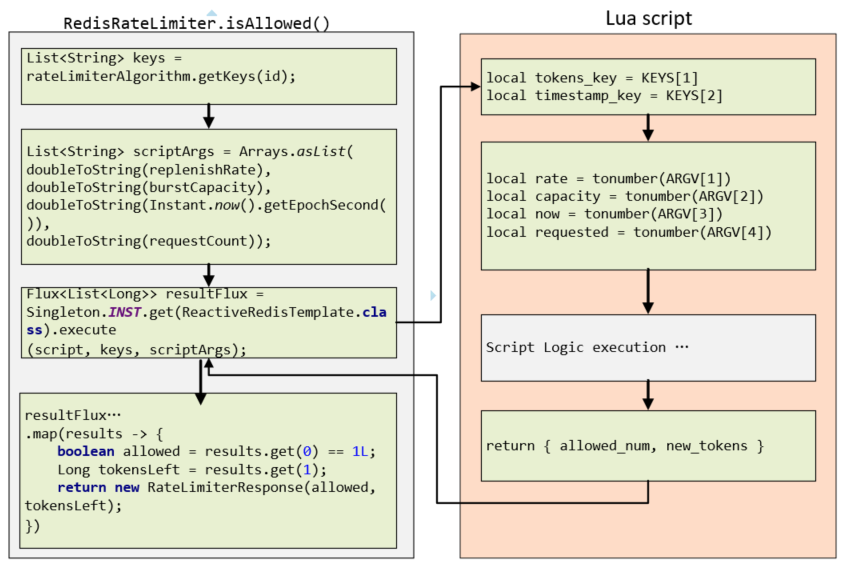
3. Selecting the Right Strategy at Runtime
Now that you have multiple RateLimiter implementations (in-memory and Redis-based), how does the application choose the correct one for a given request? We need a component that can resolve the appropriate strategy.
Spring's dependency injection provides an elegant solution. If you have multiple beans that implement the same interface, you can inject them all into a Map<String, RateLimiter>, where the key is the bean's name and the value is the bean instance itself.
To leverage this, you should name your strategy beans, for example:
@Component("sliding_window_redis")
public class RedisSlidingWindowRateLimiter implements RateLimiter { ... }

@Component("token_bucket_redis")
public class RedisTokenBucketRateLimiter implements RateLimiter { ... }

@Component("fixed_window_in_memory")
public class InMemoryFixedWindowRateLimiter implements RateLimiter { ... }
Next, we'll create a RateLimiterResolver service. Its job is to determine which strategy to use (based on configuration, which we'll cover in the next module) and fetch the corresponding bean from the map.
Mastering Rate Limiting in Spring Boot: A Complete Guide
The same article provides an excellent example of a RateLimiterResolver that uses this exact Map injection pattern. This is a clean, extensible way to manage your collection of strategies.
Find the code for the RateLimiterResolver class. Note how it injects final Map<String, RateLimiterHandler> rateLimiters. The resolve method then uses a client's configuration to get a strategy name (e.g., 'SLIDING_WINDOW') and retrieves the correct bean from the map. You will build a similar resolver.
For now, your resolver might have a hardcoded logic to select a strategy, but this structure prepares us for the dynamic configuration we'll build in Module 8.
The idea of having swappable backends (in-memory vs. Redis) is a common pattern in distributed systems. The following article discusses a similar concept, reinforcing the value of this design.
Designing and Implementing an API Rate Limiter - DEV Community
This article, 'Designing and Implementing an API Rate Limiter,' discusses an architecture with a TenantBucketProvider interface that has two implementations: StandaloneBucketProvider (in-memory) and RedisBucketProvider (distributed). This further validates our design of abstracting the storage and logic behind a common interface.
Read the sections 'Domain Modeling' and 'Profiles.' Notice the TenantBucketProvider interface and its two implementations. The application uses Spring Profiles to switch between them. This is another way to achieve the same goal of interchangeability that we're implementing with our resolver.
4. Integrating the Resolver into the Request Lifecycle
The final step is to use our new RateLimiterResolver within the RateLimitInterceptor you built in Module 3.
The updated workflow inside your interceptor's preHandle method will be:
- Use the
RateLimitKeyResolverto get the unique key for the current request (e.g., "ip:127.0.0.1"). - Pass this key (or related configuration) to the
RateLimiterResolverto obtain the correctRateLimiterinstance (e.g., an instance ofRedisSlidingWindowRateLimiter). - Call the
isAllowed(key)method on the returnedRateLimiterinstance. - If the result is "not allowed," return an HTTP 429 response and stop further processing.
- If allowed, permit the request to proceed to the controller.
The example below shows this flow within an AOP Aspect, but the core logic of resolving and then validating is identical to what you will do in your HandlerInterceptor.
Mastering Rate Limiting in Spring Boot: A Complete Guide
To see how all the pieces connect, let's look at the RateLimitAspect from the 'Mastering Rate Limiting' guide. It demonstrates the end-to-end flow of using the resolver to enforce a limit.
Examine the rateLimit method in the RateLimitAspect class. Trace the logic: it gets a clientId, uses the rateLimiterResolver to get the handler, calls rateLimiter.validate(), and then throws an exception if the limit is exceeded. This is the same sequence of operations your interceptor will now perform.
With this integration, your rate limiter engine is now fully capable of using the distributed, Redis-based algorithms you've built.
Conclusion
Congratulations on reaching this significant milestone! You have successfully bridged the gap between raw algorithmic logic and clean, extensible software architecture.
Key Takeaways:
- The Strategy Design Pattern is the architectural foundation that allows our rate limiter to support multiple, interchangeable algorithms.
- By having our Redis-based classes implement the common
RateLimiterinterface, we make them plug-and-play components. - A Resolver or Factory component, powered by Spring's dependency injection, provides a clean mechanism to select the appropriate strategy at runtime.
- Integrating this resolver into your
RateLimitInterceptorwires the distributed logic into your application's request lifecycle.
Next Steps
Our Redis implementations are now integrated, but how do we prove they work correctly within the full application context? In our next lesson, we will focus on writing unit tests to verify the behavior of the Redis-based implementations. This will involve using tools like Testcontainers or an embedded Redis server to create reliable, automated tests for our distributed logic, ensuring your engine is robust and trustworthy.