Hello! Welcome to the next lesson in our journey to build a production-grade rate limiter.
In our last session, we implemented the sliding window algorithm using a Lua script. We made a deliberate design choice to use a Redis Sorted Set (ZSET) for that implementation, as it provided a much simpler and more robust atomic operation compared to a HASH for that specific use case. This highlighted an important engineering principle: choosing the right data structure is crucial for both performance and correctness.
Today, we'll implement our final core algorithm: the token bucket. You'll see how, for this algorithm, the HASH data structure we originally considered is, in fact, the perfect tool for the job. This lesson will solidify your understanding of how different algorithms map to different optimal data structures in Redis.
Your learning outcome for this lesson:
By the end of this session, you will be able to implement the token bucket logic, including lazy refills, using a Lua script. This will complete the set of distributed algorithms for your rate limiter engine.
1. The Token Bucket Algorithm in Redis
The token bucket algorithm is one of the most popular for production systems because it's both flexible and intuitive. It allows for controlled bursts of traffic while enforcing a steady average rate over time.
The core concepts are:
- Bucket Capacity: The maximum number of tokens the bucket can hold. This defines the maximum burst size a client can make.
- Refill Rate: The rate at which new tokens are added to the bucket (e.g., 10 tokens per second).
- Tokens: Each incoming request consumes one or more tokens. If the bucket is empty, the request is denied.
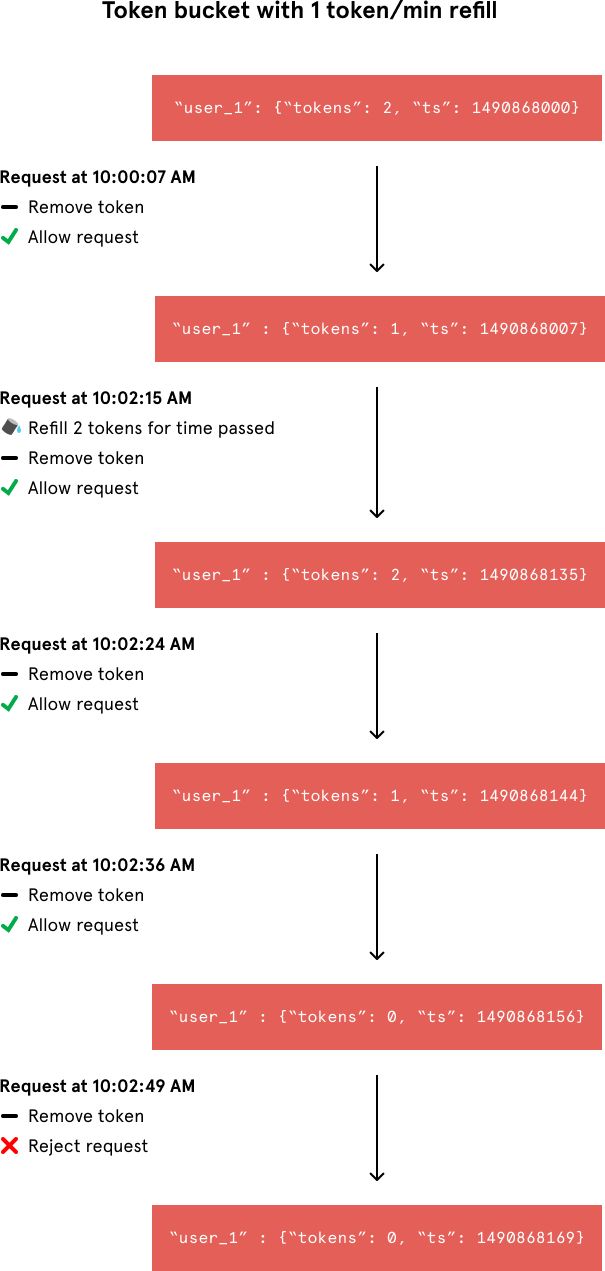
A key implementation detail is the lazy refill. Instead of having a background process constantly adding tokens, we calculate how many tokens should have been added since the client's last request and add them just before processing the current one.
The Redis documentation provides an excellent overview of this algorithm and its data structure mapping.
Build 5 Rate Limiters with Redis
The official Redis documentation offers a clear explanation of the token bucket algorithm. It's a great starting point to understand the mechanics and why a Redis HASH is the recommended data structure.
Read the sections titled '4. Token bucket', 'How it works', and 'Redis data structure'. Focus on how the algorithm is described and the choice of a HASH with tokens and last_refill fields.
As the resource explains, a Redis HASH is a natural fit. We can use a single key for each client, with the hash containing two fields:
tokens: The number of available tokens.last_refill_timestamp: The time of the last request, which we'll use to calculate the lazy refill.
Let's look at a visual walkthrough of this process.
2. Ensuring Atomicity with Lua
Just like with the sliding window, the read-modify-write sequence for the token bucket must be atomic to prevent race conditions. Two concurrent requests from the same client could otherwise read the same token count, both decide they are allowed, and incorrectly consume more tokens than permitted.
Why can't we use a standard Redis transaction (MULTI/EXEC)?
Build 5 Rate Limiters with Redis
This section of the Redis documentation explains precisely why Lua is essential for this algorithm, and why a simple transaction is not sufficient.
Read the section 'Why Lua?'. Pay close attention to the argument against using MULTI/EXEC—that you cannot branch on intermediate results within a transaction block.
The key takeaway is that Lua allows for conditional logic within the atomic operation, which is exactly what we need: read the state, calculate the refill, and then decide whether to consume a token.
Here is the logical flow of our token bucket Lua script:
- Read state: Get the current
tokensandlast_refilltimestamp from the HASH for a given client key. If they don't exist, initialize them to the max capacity and the current time. - Calculate refill: Determine the time elapsed since the last refill and calculate how many tokens to add based on the
refill_rate. - Apply refill: Add the new tokens, making sure not to exceed the
max_tokens(the bucket's capacity). - Check and consume: If the current token count is greater than zero, decrement the count and mark the request as
allowed. - Write state: Save the updated
tokensand the newlast_refilltimestamp back to the HASH. - Set TTL: Set an expiration on the key to ensure Redis automatically cleans up data for inactive clients.
3. Dissecting the Token Bucket Lua Script
Now let's examine a complete Lua script that implements this logic. The following resource contains a clean and well-commented example.
API Rate Limits with Spring Boot and Redis Buckets
This article from Medium provides a concise and effective Lua script for the token bucket algorithm that we can use as our reference implementation.
Focus on the first code block in the article, which contains the Lua script. Study each line and how it corresponds to the logical steps we just outlined above.
Let's break down the script you just read:
-
Inputs:
KEYS[1]: The Redis key for the client (e.g.,ratelimit:tb:user:123).ARGV[1]:max_tokens(capacity).ARGV[2]:refill_rate(tokens per second).ARGV[3]:now(current timestamp in seconds).ARGV[4]:ttl(time-to-live for the key in seconds).
-
Core Logic:
-- Read the current state, or initialize if it's the first request
local data = redis.call("HMGET", key, "tokens", "timestamp")
local tokens = tonumber(data[1]) or max_tokens
local last_refill = tonumber(data[2]) or now

-- Calculate and apply the lazy refill
local elapsed = now - last_refill
local refill = math.floor(elapsed * refill_rate)
tokens = math.min(tokens + refill, max_tokens)

-- Check if a token is available and consume it
local allowed = 0
if tokens > 0 then
  tokens = tokens - 1
  allowed = 1
end

-- Write the new state back and set an expiry
redis.call("HSET", key, "tokens", tokens, "timestamp", now)
redis.call("EXPIRE", key, ttl)

return allowed
This script is a perfect, self-contained unit of logic that atomically performs our rate-limiting check.
For another perspective on how such a script works, especially concerning its inputs and outputs, the following video provides a clear walkthrough.
Rate Limiting your Serverless Functions with Upstash Redis
This video by Leigh Halliday explains a very similar Lua script, focusing on the parameters passed in and the values returned. It offers a great practical view of the script in action.
Watch from 05:59 to 10:14 to see a detailed breakdown of the script's logic and parameters. Then, watch from 14:23 to 17:30 to understand how Lua's boolean false is converted to nil in Redis, which is an important detail for handling the script's return value in your Java code.
4. Integration with Spring Boot
Integrating this script into your RedisTokenBucketRateLimiter class will follow the exact same pattern you used for the sliding window limiter in the previous lesson.
You will use RedisTemplate and DefaultRedisScript to execute the Lua script.
- Create a
DefaultRedisScript<Long>: Since our script returns0or1, the result type will beLong. You can store the Lua script text in a string constant or load it from a.luafile in your resources directory. - Call
redisTemplate.execute(): You will pass the script object, a list containing the single Redis key, and the arguments (max_tokens,refill_rate,now,ttl). - Interpret the Result: The
executemethod will return aLong. A value of1means the request is allowed, and0(ornull, as the video pointed out for other script variants) means it's denied.
Your implementation will conform to the RateLimiter interface, taking the key, capacity, and refillRate as inputs and returning a boolean. This keeps your Redis-based implementation interchangeable with the in-memory one you built earlier.
Conclusion
Excellent work! You have now implemented the two most common and powerful distributed rate-limiting algorithms, understanding the deep connection between the algorithm's logic and the optimal Redis data structure.
Key Takeaways:
- The Token Bucket algorithm is excellent for allowing bursts while maintaining a fair average rate.
- A Redis HASH is the ideal data structure for storing the
tokensandlast_refilltimestamp for each client. - The lazy refill logic (calculating token refills on-demand) is an efficient implementation strategy.
- The entire read-refill-consume cycle must be performed atomically using a Lua script to prevent race conditions.
- Integrating the script in Spring Boot follows the established pattern of using
RedisTemplateandDefaultRedisScript.
Next Steps
With our in-memory and distributed rate-limiting algorithms now implemented, the next logical step is to build a system that can dynamically choose and configure them. In our next lesson, we will move to Module 8: Dynamic Configuration with YAML. You will learn how to use Spring Boot's powerful configuration features to define rate-limiting rules in an application.yml file, creating a truly flexible and production-ready engine.