Hello! Welcome back.
In our last lesson, we successfully implemented the sliding window counter algorithm. This gave us a more accurate, smoother rate limiter that solves the "boundary burst" problem inherent in the fixed window approach. You've now built two of the three core algorithms, both based on counting requests over time.
Today, we're shifting paradigms. Instead of looking backward at past requests, we'll look forward by managing a "budget" of available requests. This is the core idea behind the Token Bucket algorithm, a very popular choice for production systems due to its flexibility and predictable performance.
Your learning outcome for this lesson:
You will design a TokenBucket class with capacity, available tokens, and last refill timestamp. We will focus on understanding the components and the logic that governs how tokens are generated and consumed.
1. The Token Bucket Concept
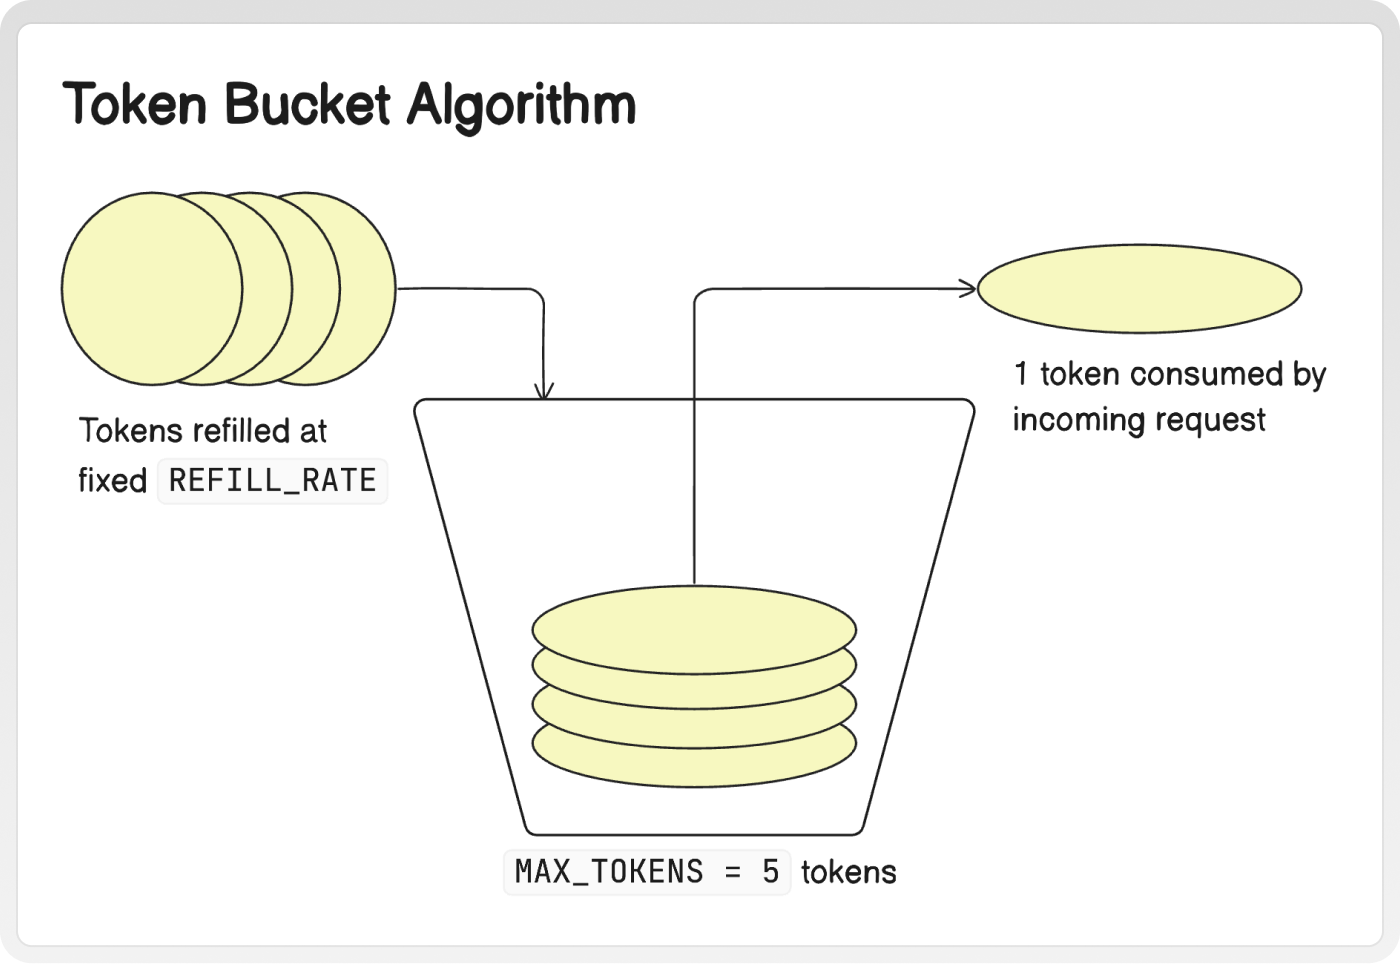
The Token Bucket algorithm is conceptually simple and intuitive. Imagine a bucket with a certain capacity. This bucket is continuously filled with tokens at a fixed rate. Each incoming request must take one token from the bucket to be processed.
- If a token is available, the request takes it and is allowed.
- If the bucket is empty, the request is denied.
- If the bucket is full, any new tokens that arrive are discarded.
The two key parameters are:
- Capacity: The maximum number of tokens the bucket can hold. This determines the maximum burst of requests a client can make in a short period.
- Refill Rate: The rate at which new tokens are added to the bucket (e.g., 10 tokens per second). This defines the average, sustained rate of allowed requests.
To solidify your understanding of these principles, please read the following short overview.
Rate Limiter using Token Bucket Algorithm | by Anil Goyal - Medium
The article 'Rate Limiter using Token Bucket Algorithm' by Anil Goyal provides a concise explanation of how the algorithm works.
Please read the section titled 'How It Works'. Focus on the five key points that describe the process of token generation, storage, and consumption.
2. Designing the TokenBucket Class
Now, let's translate this concept into the state, or fields, of a Java class. To implement the algorithm, our class needs to track four key pieces of information:
capacity: The maximum number of tokens. This will be afinalvalue set during construction.refillRate: How many tokens are generated per unit of time. This is also afinalvalue.availableTokens: The current number of tokens in the bucket. This value will change as tokens are refilled and consumed.lastRefillTimestamp: The precise time the bucket was last refilled. This is essential for calculating how many new tokens to add when the next request arrives.
This design uses a "lazy refill" or "on-demand" strategy. Instead of having a background process constantly adding tokens, we calculate and add the appropriate number of tokens only when a request actually arrives. This is a very common and efficient pattern as it does no work when the system is idle.
Let's examine a complete implementation that uses this lazy refill approach.
How to Design a Rate Limiter in a System Design Interview?
This article from dev.to provides a clear and concise Java implementation of the Token Bucket algorithm that we can use as our design blueprint.
Read the section 'Token Bucket in Java' and carefully study the TokenBucket class code provided. Pay attention to the fields it uses and the logic inside the allowRequest() method.
3. Deconstructing the Implementation
Let's break down the code from the article you just reviewed. It perfectly demonstrates the on-demand refill logic and the state management required.
Class Structure and State
The class defines the four fields we identified:
public class TokenBucket {
    private final int capacity;
    private final double refillRate; // tokens per second
    private double tokens; // Represents our 'availableTokens'
    private long lastRefillTimestamp;
    // ... constructor ...
}
- The
tokensfield is adoubleto allow for fractional tokens to accumulate. For example, if your rate is 0.5 tokens per second, after 1 second you should have 0.5 tokens, not 0. This prevents losing precision when refill intervals are short. A request is only granted when the total accumulated tokens are>= 1.0.
The allowRequest() Method
The synchronized keyword is used on this method. This is critical. It ensures that on a multi-threaded system, only one thread can be checking and taking a token at a time, preventing race conditions where two requests might simultaneously be granted with only one token available.
Let's look at the logic inside the method step-by-step:
-
Calculate Elapsed Time and Tokens to Add:
long now = System.nanoTime();
double tokensToAdd = ((now - lastRefillTimestamp) / 1e9) * refillRate;
First, it captures the current time using
System.nanoTime(), which is ideal for measuring elapsed time. It calculates the time passed since the last refill, converts it to seconds (by dividing by 109), and multiplies by therefillRateto determine how many new tokens should be generated. -
Refill the Bucket (Up to Capacity):
tokens = Math.min(capacity, tokens + tokensToAdd);The newly generated tokens are added to the current token count.
Math.min()ensures the total number of tokens never exceeds thecapacity. This is how the "overflow" is handled. -
Update the Timestamp:
lastRefillTimestamp = now;The timestamp is updated to the current moment. This "resets the clock" for the next request.
-
Check and Consume a Token:
if (tokens >= 1) {
    tokens -= 1;
    return true; // Request is allowed
} else {
    return false; // Request is blocked
}
Finally, the code checks if at least one full token is available. If so, it decrements the token count and returns
true. Otherwise, it returnsfalse.
This entire sequence—refill, check, and consume—happens atomically within the synchronized method, guaranteeing correctness under concurrent access.
Key Takeaways
- The Token Bucket algorithm manages a budget of tokens, contrasting with the counting-based approaches of Fixed and Sliding Window algorithms.
- The core design of a
TokenBucketclass requires tracking capacity, refill rate, available tokens, and the last refill timestamp. - A "lazy refill" mechanism is an efficient implementation strategy, calculating and adding new tokens only when a request arrives.
- Ensuring the entire "refill-check-consume" operation is atomic (e.g., using a
synchronizedblock) is critical for thread safety.
Next Steps
You now have a solid design for a TokenBucket class. In the next lesson, we will implement two versions of this algorithm. First, we will build a straightforward, lock-based implementation using the synchronized approach we just analyzed. Then, drawing on your experience from the last lesson, we will refactor it into a more advanced lock-free implementation using AtomicLong and compare-and-set loops, exploring the performance trade-offs between the two concurrency models.