Introduction
Hello! In our previous lesson, we established a strong conceptual understanding of the Java persistence stack, clarifying the roles of JPA as a specification and Spring Data JPA as a powerful abstraction layer that simplifies data access code. You now know why we use these tools and what they do.
Today, we move from the conceptual to the practical. This lesson addresses the learning outcome: Configure a datasource to connect a Spring Boot application to a relational database. We will bridge the gap between your application code and the physical database.
We'll start by defining the central component for database connectivity in Java: the DataSource. We will then explore how Spring Boot’s auto-configuration simplifies its setup through simple properties. Crucially, we will also delve into the "why" behind connection pooling—a vital performance optimization pattern—and see how Spring Boot seamlessly integrates the high-performance HikariCP connection pool.
The DataSource: A Factory for Connections
In the last lesson, we saw that a JPA provider like Hibernate ultimately uses JDBC to talk to the database. The modern, standard way for an application to get a JDBC connection is through a javax.sql.DataSource.
A DataSource is essentially a factory for database connections. Instead of your application code dealing with the low-level details of a specific database driver (DriverManager), it simply asks the DataSource for a connection. This provides a crucial level of indirection and is central to how connection management is handled in enterprise Java and Spring.
In Spring Boot, you don’t typically create this DataSource object yourself. Instead, Spring Boot’s auto-configuration creates it for you, based on settings you provide in your application's configuration files.
The Spring Environment abstraction provides a unified way to manage configuration from various sources. These properties are then used to configure beans in the application context, including the DataSource.
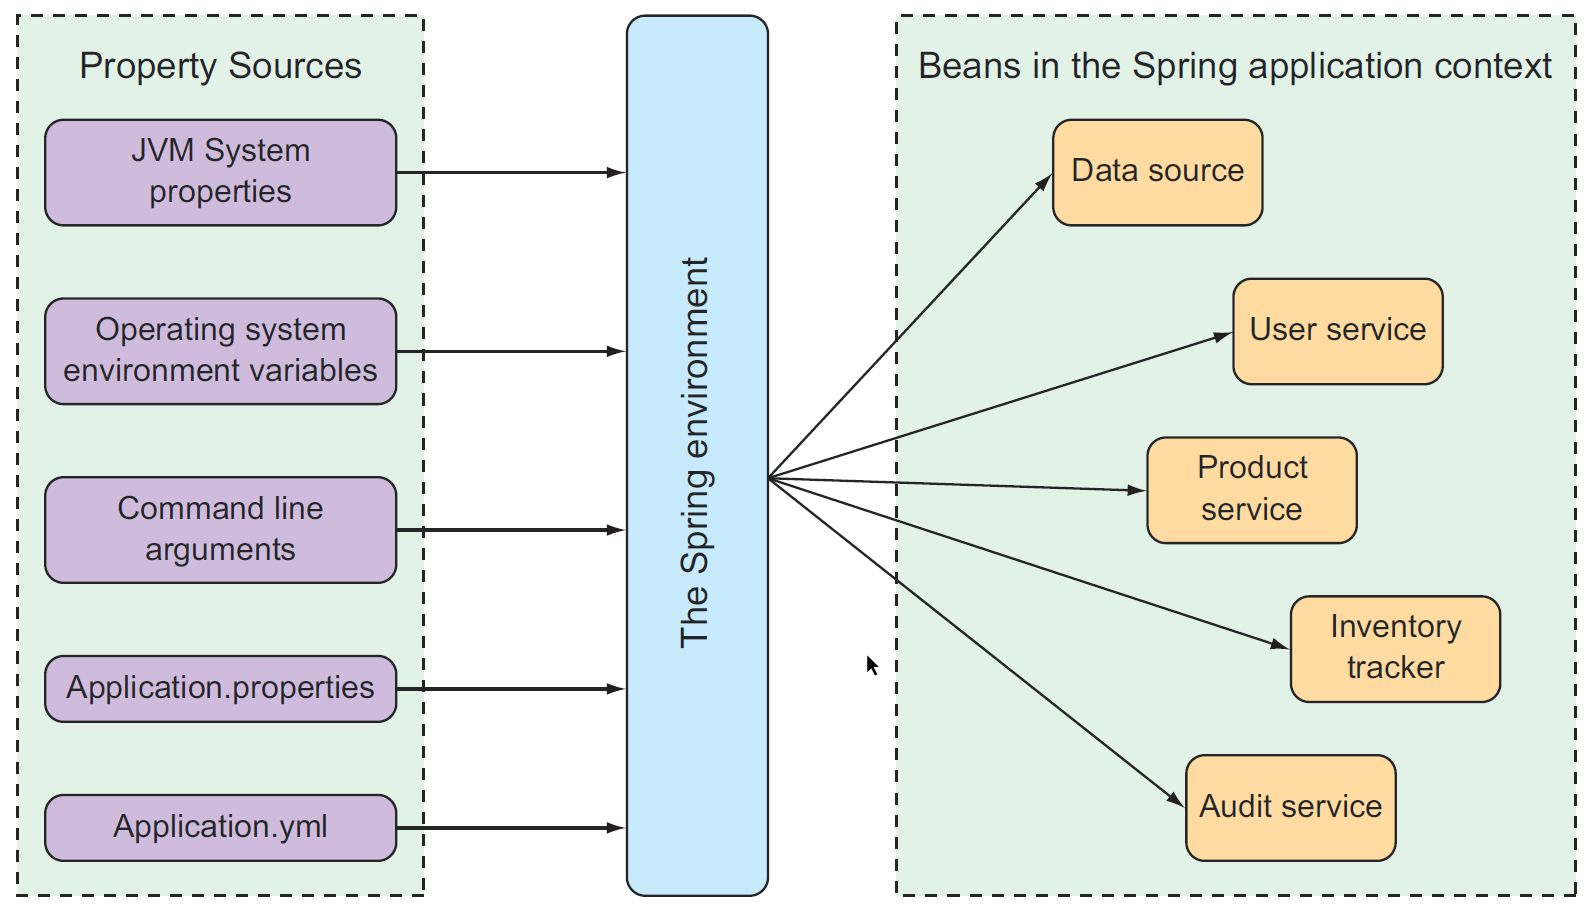
The most common way to configure the DataSource is by adding properties with the spring.datasource prefix to your src/main/resources/application.properties file.
Spring Boot DataSource Configuration Examples
The article 'Spring Boot DataSource Configuration Examples' from HowToDoInJava clearly lists the essential properties for connecting to various databases.
Please read section 2.2, 'Properties Configuration'. Focus on the three core properties: spring.datasource.url, spring.datasource.username, and spring.datasource.password. Note the different URL formats for different databases like MySQL and H2.
With just these three properties, Spring Boot can establish a connection to your database. For example, to connect to a local MySQL database named mydatabase, your application.properties file would look like this:
spring.datasource.url=jdbc:mysql://localhost:3306/mydatabase
spring.datasource.username=your_username
spring.datasource.password=your_password
That's it. Spring Boot handles the rest. But what exactly is "the rest"? It involves a critical performance pattern: connection pooling.
The Performance Imperative: Connection Pooling
Establishing a new database connection for every query is an expensive operation. It involves network overhead (TCP handshakes), database authentication, and memory allocation. In a high-traffic application, this would quickly become a major performance bottleneck.
The solution is connection pooling. It's a specific application of the general resource pooling pattern used in system design to manage costly resources. Instead of creating and destroying connections on demand, the application maintains a "pool" of open, ready-to-use database connections.
When your code needs to access the database:
- It "borrows" a connection from the pool.
- It uses the connection to execute its queries.
- It "returns" the connection to the pool, making it available for the next request.
This dramatically reduces latency, as the cost of establishing the connection is paid only once upfront.

Spring Boot automatically enables connection pooling. If you include the spring-boot-starter-data-jpa or spring-boot-starter-jdbc dependency, it brings in HikariCP, a highly optimized and very fast JDBC connection pool, which Spring Boot uses by default.
To understand the concept more visually, the following video gives an excellent overview.
Spring Boot Hikari Connection Pool Tutorial
The video 'Spring Boot Hikari Connection Pool Tutorial' provides a clear, conceptual explanation of why connection pooling is necessary and how it works.
Please watch from the beginning to 06:39. Focus on: The problem description: why opening/closing connections is slow. The solution: how a pool of reusable connections improves performance. The diagrams showing clients acquiring and releasing connections from the pool.
Under the Hood: The Magic of DataSourceAutoConfiguration
So, how does Spring Boot take a few lines in application.properties and produce a fully configured, high-performance HikariCP DataSource bean? The answer lies in Spring Boot's auto-configuration mechanism, specifically a class named DataSourceAutoConfiguration.
This auto-configuration class is triggered when it finds database-related classes on the application's classpath. It then performs a series of steps:
- It checks for a connection pooling library on the classpath. It prioritizes HikariCP, then falls back to Tomcat Pooling, and then to Commons DBCP2.
- It creates a
DataSourcebean using the detected library (e.g.,HikariDataSource). - It configures this
DataSourcebean using the properties you defined underspring.datasource.*.
To truly appreciate what auto-configuration does for you, it's insightful to see what the manual process looks like. The following video provides a deep dive. It first disables Spring Boot's auto-configuration and manually constructs the required beans (DataSource, JdbcTemplate). This process vividly illustrates the complexity that Spring Boot abstracts away.
How Spring JDBC Auto configuration works internally ?🤔 Spring Boot Foundation tutorial | MySQL
The video 'How Spring JDBC Auto configuration works internally?' provides an exceptionally detailed walkthrough of what a DataSource is in code and how it relates to connection pooling.
Please watch the segment from 00:18:03 to 00:50:57. This is a longer segment, but it's rich with detail that aligns with your interest in underlying design principles. Focus on how the code fails when auto-configuration is turned off and a DataSource is missing. Observe the steps to manually create a DataSource bean. Pay close attention to the distinction made between the simple DriverManagerDataSource (which does not pool connections) and a true connection pooling implementation like C3P0 or HikariCP. This contrast is key to understanding the performance benefits.
As you saw, manually wiring up these components is entirely possible but involves a lot of boilerplate code. DataSourceAutoConfiguration performs these exact steps for you, but in a more robust and flexible way, by inspecting the classpath and your properties at startup.
Fine-Tuning the Pool: Customizing HikariCP
While Spring Boot's default settings for HikariCP are sensible for many applications, you will often need to tune the connection pool for production environments based on your application's load profile.
You can easily customize any of HikariCP's settings by using the spring.datasource.hikari prefix in your application.properties file.
Common properties you might want to configure include:
spring.datasource.hikari.maximum-pool-size: The maximum number of connections the pool can hold. This is one of the most important settings to prevent your application from overwhelming the database.spring.datasource.hikari.minimum-idle: The minimum number of idle connections that HikariCP tries to maintain in the pool.spring.datasource.hikari.connection-timeout: The maximum number of milliseconds that a client will wait for a connection from the pool.spring.datasource.hikari.idle-timeout: The maximum amount of time that a connection is allowed to sit idle in the pool.
The following segment demonstrates how to set these properties.
Spring Boot Hikari Connection Pool Tutorial
Let's return to the 'Spring Boot Hikari Connection Pool Tutorial' to see a practical demonstration of how to configure these properties.
Please watch from 09:22 to 13:17. This section shows how to add the spring.datasource.hikari.* properties to application.properties and then verify that they are applied by checking the application's startup logs.
This ability to declaratively configure low-level components like a connection pool is a powerful feature of the Spring ecosystem, allowing you to adapt your application's behavior without changing its code.
Conclusion
In this lesson, we connected the dots between your Spring Boot application and a relational database. You now have the practical knowledge to configure this crucial link.
Key Takeaways:
- A
DataSourceis the standard Java component for obtaining database connections, and Spring Boot creates and manages one for you. - Configuration is straightforward using the
spring.datasource.*prefix inapplication.propertiesfor the URL, username, and password. - Connection pooling is essential for performance. Spring Boot defaults to the high-performance HikariCP connection pool.
- The magic behind this is
DataSourceAutoConfiguration, which detects your database driver and pooling library to create a fully configuredDataSourcebean. - You can fine-tune the connection pool's behavior using implementation-specific properties like
spring.datasource.hikari.*.
Now that we know how to establish a connection to the database, our next step is to define the data model that will be persisted. In the next lesson, we will learn how to define entity classes using @Entity, @Id, and relationship annotations (@OneToMany, @ManyToOne). This will allow us to map our Java objects to database tables, building on the JPA concepts from our previous lesson.